How To Attach Sheet Rope To Window And Fence In Project Zomboid (Build 42.19)
Build 42.19 · Vanilla escape ropes · Windows, frames, fences & railings
 Sheet
1 → 1 Sheet Rope
Sheet
1 → 1 Sheet Rope
 Sheet Rope
Fabric escape rope
Sheet Rope
Fabric escape rope
 Rope
Full substitute
Rope
Full substitute
 Hammer
Nail path only
Hammer
Nail path only
 Nails
1 for nail path
Nails
1 for nail path
1. Craft Sheet Rope (not with hammer and nails)
In Build 42.19 the hand craft Tie Sheet Rope takes only 1 Sheet and outputs 1 Sheet Rope. It is an in-hand craft that can be done in the dark. There is no hammer or nail requirement on the recipe.
You can reverse the craft with Untie Sheet Rope: 1 Sheet Rope → 1 Sheet. That is useful if you over-craft fabric ropes and need bedding again.
| Recipe | Inputs | Outputs | Tools |
|---|---|---|---|
| Tie Sheet Rope | 1 Sheet | 1 Sheet Rope | None (in-hand) |
| Untie Sheet Rope | 1 Sheet Rope | 1 Sheet | None (in-hand) |
2. How many ropes you actually need
Do not plan on a fixed “two or three sheets.” The game calculates how many ropes the target needs by height. Item tooltips describe it as one sheet rope per level of drop. Carry enough rope for the full height before you open the context menu; if you do not have enough, the Nail/Tie option never appears.
- Either Sheet Rope or regular Rope can fill the count—mix is not required, but you must have enough of one type for the request.
- 12 Sheet Ropes pack into a Sheet Rope Bundle (same packing family as Rope stacks).
- You must be on a level above the ground floor, and the target object must also be above ground level. Escape ropes are for upper storeys going down, not for ground-floor decoration.
3. Two attach paths: Nail vs Tie
Right-click the window, window frame, player-built opening, fence, or railing. The menu label tells you which path you are on.
| Path | Typical targets | Context menu (Sheet Rope) | Context menu (Rope) | Extra tools |
|---|---|---|---|---|
| Nail | Normal windows, many frames and openings that do not allow tying | Nail Escape Rope (Fabric) | Nail Escape Rope | Unbroken hammer + 1 Nail |
| Tie | Many fences, railings, metal bars, and some stone walls that allow tying | Tie Escape Rope (Fabric) | Tie Escape Rope | None beyond the rope count |
Nail path (most windows)
- Stand on the upper floor next to an openable / usable window or opening that is not barricaded.
- Have enough Sheet Rope or Rope for the height, plus a hammer and at least one Nail in your character inventory or in a bag / container you are carrying.
- Right-click the window → Nail Escape Rope (Fabric) or Nail Escape Rope.
- Wait for the timed action. The ropes are consumed from inventory; the hammer is a tool requirement, not a craft ingredient for the rope itself.
Tie path (fences and many railings)
- Find a hoppable fence, railing, or similar piece that shows Tie options. Vanilla metal-bar, wooden, and stone hoppable pieces often support this.
- Bring only the required Sheet Rope or Rope count—no hammer and no nails.
- Right-click → Tie Escape Rope (Fabric) or Tie Escape Rope.
4. Conditions that block the menu
- Barricades: If the window, door, or similar opening is currently barricaded, sheet-rope options are hidden. Clear boards or metal first, or pick another opening. See the barricade guide for layer costs.
- Height: You and the target object must both be above the ground floor.
- Missing count: Inventory must hold enough Sheet Rope or enough Rope for the full height.
- Nail path tools: Missing hammer or nails hides the nail options even if ropes are ready.
- Already installed: When a rope is present, the add options are replaced by Remove Escape Rope.
5. Climbing and removing the rope
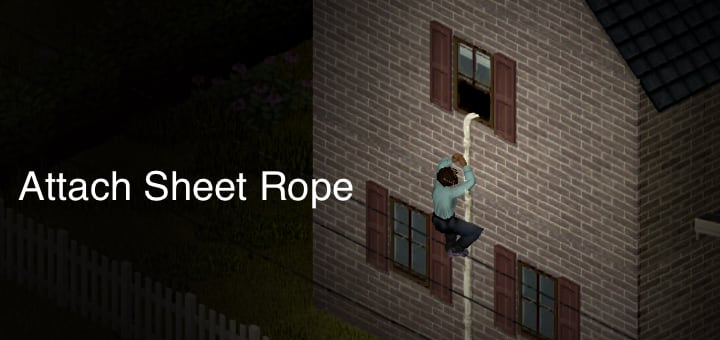
- Climb: Stand on a square that can start a climb and press E (default Interact). You can also use the world context option Climb Sheet Rope when it appears. Climbing up and climbing down are checked separately.
- Remove: Right-click the attachment and choose Remove Escape Rope. This fully removes the rope; it is not a “pull it up and keep it staged” toggle.
- Failure chance: Sandbox option Easy Climbing disables failure chances when climbing sheet ropes or over walls. On default Apocalypse-style presets it is off, so expect stamina cost and possible fail outcomes on long climbs.
6. Safehouse pattern that still works
Escape ropes pair well with ground-floor denial: fully barricade lower windows and doors, then enter and leave through upper openings with sheet ropes. That pattern still matches current safehouse design advice—just remember barricades and ropes fight for the same opening, so the rope window itself must stay clear of boards while you need the rope.
For broader sheet and fabric uses beyond escape ropes, see the sheet survival guide. For walls, stairs, and other structure work around the entry, use the carpentry guide.
7. Quick troubleshooting
| Symptom | What to check |
|---|---|
| No Nail / Tie option | Height (above ground), rope count, hammer + nail for nail path, barricade state, and whether the tile already has a rope. |
| Only Tie options, no Nail | Normal for fences and railings that allow tying—do not look for a hammer requirement. |
| Craft recipe missing | You need a Sheet, not ripped clothing. Recipe name is Tie Sheet Rope. |
| E does nothing | Stand on the rope square / valid climb square; confirm a rope exists below or above; check keybind for Interact. |
| Rope vanished | Likely destroyed by zombies or removed by another player in multiplayer—rebuild and add a second route. |
Numbers at a glance
- Craft: 1 Sheet → 1 Sheet Rope (in-hand); reverse with Untie Sheet Rope.
- Nail path: hammer + 1 Nail; menu labels Nail Escape Rope (Fabric) / Nail Escape Rope.
- Tie path: rope count only; menu labels Tie Escape Rope (Fabric) / Tie Escape Rope.
- Climb / remove: E or Climb Sheet Rope; Remove Escape Rope fully removes the attachment.
- Tooltip: one rope per level; Press E to climb. Hammer and nails apply to the common nail path, not every fence that allows tying.
Related guides
Related Articles