How to Cook in Project Zomboid (Build 42.19): Heat Sources, Evolved Recipes, Rotten Food
Build 42.19 · Heat sources, recipe bases, sandwiches, raw meat, rotten food at Cooking 7, and skill books
Cooking is how you stretch hunger, remove many raw-meat risks, and turn scavenged scraps into soups, stir-fries, sandwiches, and more. This page covers the Build 42.19 workflow: bases vs heat sources, beginner dishes, raw meat rules, Cooking skill and rotten food, skill books, and cold storage. For water purification and specific dishes, see boil water, eggs, and tacos.
1. Two systems: recipe bases and heat sources
Older guides often list “four ways to cook: pot, roasting pan, frying pan, baking pan.” That mixes two different systems.
- Recipe base (container or bread) — what you right-click to start a dish (soup in a pot, stir-fry in a pan, sandwich on bread slices).
- Heat source — oven, stove, microwave, campfire, BBQ, fireplace, and similar objects that actually raise cooking temperature and finish cookable food.
Fuel and power depend on the heat source, not on whether your pot is small, large, red, or forged.
 Cooking Pot
Soup / stew base
Cooking Pot
Soup / stew base
 Frying Pan
Stir-fry base
Frying Pan
Stir-fry base
 Roasting Pan
Roasted veg base
Roasting Pan
Roasted veg base
 Bowl
Salad (no cook)
Bowl
Salad (no cook)
 Bread Slices
Sandwich base
Bread Slices
Sandwich base
 Campfire
Off-grid heat
Campfire
Off-grid heat
Common recipe bases (Build 42.19)
| What you want | Typical base item | Max ingredients | Cookable dish? | Notes |
|---|---|---|---|---|
| Soup / stew | Cooking Pot, Bucket, forged pot variants | 6 (some soup variants 4) | Yes | Needs enough water in the pot/bucket for soup and stew starts. |
| Stir-fry | Frying Pan / Griddle Pan / forged pan | 4 | Yes | Roasting pan uses a related “place ingredients” path (max 6). |
| Sandwich | Bread Slices or Baguette | 4 | Yes | Can be heated: about 5 minutes to cook, 20 minutes to burn. |
| Burger | Hamburger bun (single) | 4 | No (assembly only) | Meat and other toppings that need cooking must already be cooked before adding. |
| Salad / fruit salad | Bowl or Clay Bowl | 6 | No | Eat cold after combining ingredients. |
| Rice / pasta | Watered pot or saucepan rice/pasta items | 4–5 | Yes | Start from the prepared water+grain base, then add toppings. |
| Hot drink | Mug, teacup, metal cup, and similar | 3 | Yes | Needs a full cup of water; mood/thirst helper more than a meal. |
| Taco / burrito | Taco shell / tortilla | 5 | No (assembly) | Many fillings require cooked meat first. |
Build 42 also includes pie, cake, pizza, oatmeal, bagels, toast toppings, muffins, and forged cookware variants. Always trust the right-click menu on the base item: if an ingredient is missing from the list, it is not valid for that recipe in the current version.
Heat sources after (and before) the power cut
| Heat source | Needs power? | Fuel / notes |
|---|---|---|
| Electric oven / stove / microwave | Yes (building power or generator) | Turn on, set heat, watch cook → burn timers. Never put metal cookware in a microwave. |
| Campfire | No | Build with 3× Stone, add fire fuel, light. Reliable outdoor option. |
| Wood stove / fireplace (map furniture) | No | Add wood-type fuel and light; good indoor heat if the object supports cooking. |
| Charcoal-style BBQ | No | Add charcoal/wood fuel via the BBQ menu; light when fueled. |
| Propane BBQ | No (uses propane tank) | Must have a propane tank installed; empty tank is called out in the BBQ info panel. |
For clean water used in soups and drinks, purify tainted water first: boil / purify water guide.
2. Basic cooking workflow
- Put the base and ingredients in your inventory (or an open nearby container the menu can see).
- Right-click the base (for example Cooking Pot or Bread Slices).
- Choose the prepare/make option (Prepare Soup, Make Sandwich, and so on).
- Add ingredients one at a time. Spices show as spices; food entries often show a hunger-use number in parentheses.
- If the recipe is cookable, place the dish on a heat source, turn it on or keep the fire lit, and remove it when cooked—before it burns.
Higher Cooking skill shortens how long each “add ingredient” action takes (roughly a few percent faster per level). It does not change which heat source you need.
3. Easy food with low or zero Cooking skill
Sandwich (now cookable)
Right-click Bread Slices (or a baguette) → Make Sandwich → add up to 4 ingredients. In Build 42.19 the sandwich can be heated: about 5 minutes to cook and 20 minutes to burn if left on heat.
Burger vs sandwich meat
Burgers are assembled on a hamburger bun and are not themselves an oven-cookable dish. Cook the patty or meat first, then add it to the bun. You do not have to “convert every raw meat plan into a burger” just to heat meat—cook the meat item on its own, or use a cookable recipe that accepts raw meat (stew, stir-fry, soup, and similar).
Salad, coffee, tea
- Salad / fruit salad — bowl + ingredients; no cooking step.
- Hot drinks — filled mug/teacup + coffee, tea bag, or other allowed add-ins, then heat; light hunger but useful thirst/mood support.
- Canned food — open and eat without Cooking skill; still watch for spoiled cans and unhappiness tags.
4. Raw meat: cook-first toppings and a mutton example
Some foods can go into soups and stews raw, while the same meat must already be cooked before it can go on a sandwich, burger, or salad. Use the right-click ingredient list as the source of truth for each dish.
 Mutton Chop
Example meat
Mutton Chop
Example meat
| Mutton Chop destination | Must be cooked first? | Hunger contribution (fresh, not rotten) |
|---|---|---|
| Soup, stew, pie, stir-fry, rice, pasta | No (raw allowed) | 15 hunger units toward the dish |
| Sandwich | Yes — cook first | 5 when cooked and eligible |
| Burger | Yes — cook first | 10 when cooked and eligible |
| Salad | Yes — cook first | 10 when cooked and eligible |
Practical takeaway: put a raw mutton chop into a stew pot if you want a one-heat cook, or fully cook the chop first if you want it on a sandwich or burger. Bacon, chicken, steak, fish fillets, and many other meats follow the same pattern—check the dish menu rather than assuming one global rule.
Dangerous uncooked meats still carry food-sickness risk if eaten raw; cooking the finished dish (or the ingredient) is what clears that for cookable items.
5. Cooking skill, rotten ingredients, and leveling
Rotten food (Cooking 7+)
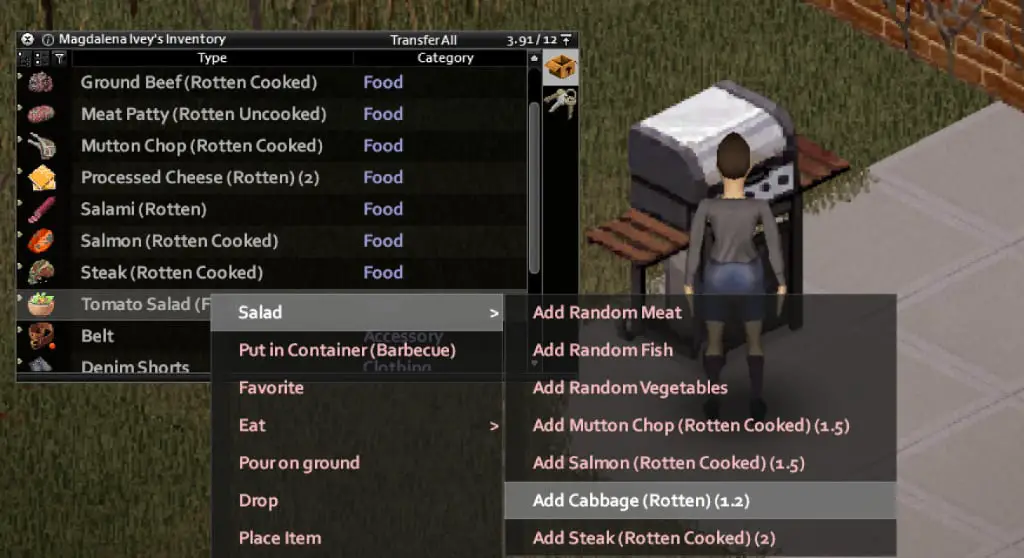
- Below Cooking 7: rotten food and rotten spices are not accepted into dishes.
- Cooking 7–8: rotten ingredients can be added, but they only contribute about 5% of their base hunger value to the dish.
- Cooking 9–10: rotten ingredients contribute about 10% of base hunger.
Rotten food is a last-resort stretch, not a free full meal. Burnt food is still rejected.
What Cooking skill actually helps
- Faster ingredient-adding actions.
- Access to rotten-ingredient cooking at level 7+.
- Unlocking more craft recipes through magazines, Keen Cook, and Chef (doughs, pizza, jars, and similar), separate from “add to pot” cooking.
Dish fullness mainly comes from which ingredients you add and their hunger values—not from a simple “level 0 mutton = X, level 7 mutton = 3×” multiplier on every chop.
How to gain Cooking XP
- Add ingredients to dishes and finish cookable food on heat.
- Cook raw cookable foods (meat, doughs, and similar) on heat sources.
- Read Cooking skill books for multipliers before a grind session.
- Life and Living / cooking TV media can help early; default sandbox media XP cuts off around skill level 3.
Skill books (multipliers 3 / 5 / 8 / 12 / 16)
 Cooking I
Trains 1–2
Cooking I
Trains 1–2
 Cooking II
Trains 3–4
Cooking II
Trains 3–4
 Cooking III
Trains 5–6
Cooking III
Trains 5–6
 Cooking IV
Trains 7–8
Cooking IV
Trains 7–8
 Cooking V
Trains 9–10
Cooking V
Trains 9–10
Read the book that matches your current level band before mass-cooking. Keen Cook (3 points) and the Chef profession grant cooking recipe knowledge and XP boosts; Chef is stronger on Cooking XP and starts with the profession Cook trait.
6. Storage: fridges without myths
Refrigerators and freezers slow spoilage when they have power (grid or generator). That is their job.
- There is no current Build 42.19 mechanic that simply “buffs mood for owning a fridge.”
- There is no automatic “raw meat contaminates cooked food in the same fridge” cross-contamination system. Manage freshness and cook dangerous raw foods instead.
- Without cold storage, fresh food hits rotten much faster—plan jars, cans, dry goods, and farming accordingly.
Broader food storage and nutrition tips: food guide and farming guide.
7. Practical tips checklist
- Separate base (what you fill) from heat (what you turn on or fuel).
- After the power dies, prioritize campfire + pot for soups/stews and a fueled BBQ or wood stove for pans and meats.
- Cook meats that require a cook-first step before sandwich, burger, taco, or salad use.
- Sandwiches can be grilled; burgers are assembled after cooking toppings.
- Save rotten ingredients for Cooking 7+ and expect only a small hunger contribution.
- Watch cook timers—burnt food wastes the whole prep.
- Use skill books before large cooking sessions; aim Cooking 7 when you want rotten-food recycling.
8. Troubleshooting
| Problem | Likely cause | What to do |
|---|---|---|
| No prepare option on pot/pan | Wrong base, missing water for soup/stew, or item already full | Use a valid empty/compatible base; soup/stew need minimum water. |
| Meat missing from sandwich menu | Meat needs to be cooked first | Cook the meat, then add it. |
| Rotten food never appears | Cooking below 7, or item is burnt | Level Cooking to 7+; burnt items stay unusable. |
| Oven does nothing after day ~0–30 | Power shutoff | Connect a generator outdoors, or switch to campfire/BBQ/wood heat. |
| Propane BBQ will not stay usable | No tank or empty tank | Install/replace a propane tank; check the BBQ info panel. |
| Food burns | Left on heat past the burn timer | Remove at cooked; sandwiches burn at about 20 minutes of heat time. |
Related Articles