3 Ways to Enter a Locked Gun Store in Project Zomboid
Mechanics updated for Project Zomboid Build 42.19. The Twiggy’s screenshots show a legacy, map-specific route.
Locked gun stores can contain firearms, ammunition, and weapon parts, but the safest entry method depends on your tools and the building layout. Clear nearby zombies before starting: destroying walls, building outside, and fighting a fire can all leave you exposed.
1. Destroy a wall with a sledgehammer
Best choice: reliable and controlled.
You need a working sledgehammer. Right-click a suitable wall or barrier, choose Destroy, and target one section that opens onto a walkable tile.
2. Use a corpse fire
Last resort: dangerous and not guaranteed.
Burn Corpse requires a corpse, an ignition source, and a petrol container with at least 0.1 units of fuel. Fire can destroy the building and its loot instead of making a useful opening.
3. Build a roof bridge
Map-dependent: scout the destination first.
At the legacy West Point location, players can bridge from Twiggy’s upper floor toward the neighboring roof. Reaching a solid roof does not automatically create an entrance.
Method 1: Sledgehammer breach
- Find a sledgehammer and make sure it is not broken.
- Clear the exterior and choose a wall section with safe, walkable space on both sides.
- Right-click the wall or barrier and select Destroy.
- Confirm the highlighted object before committing. Destroying the wrong floor or structural tile can create a fall hazard.
- Enter, close off the breach if needed, and check for an alarm or zombies inside.
This is the only method here with a dedicated in-game destroy action. Keep the sledgehammer in your inventory when you use Destroy.
On multiplayer servers, the tool alone may not be enough: some hosts disable sledgehammer destruction entirely, and others limit it to safehouse territory. Check the server rules before hauling a sledgehammer to the store.
Method 2: Corpse fire
- Place a corpse on the exact tile where you intend to start the fire.
- Bring a lighter or matches and a petrol container. Burning one corpse consumes 0.1 units of petrol.
- Prepare a fire extinguisher or enough water before ignition. Do not wait for the wall to catch before looking for supplies.
- Use Burn Corpse, retreat to a clear escape route, and watch for spreading flames.
- If the fire moves toward loot or adjacent buildings, extinguish it immediately. If it does not create an opening, stop rather than repeatedly feeding the fire.
A bucket or other water container can fight fire in Build 42, but it must contain enough water for the affected squares. A dedicated extinguisher is the safer choice.
Method 3: Twiggy’s roof bridge
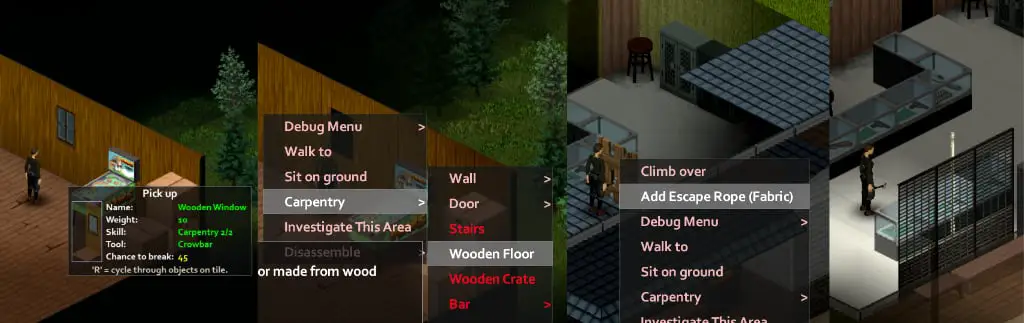
This route comes from the older West Point layout shown below. Build 42 map changes or a different gun store may make the route unusable. Before carrying lumber upstairs, inspect the destination roof and identify the exact opening that will let you descend into the building.
| Part | Build 42.19 requirement | Material cost |
|---|---|---|
| Each wooden floor tile | Woodwork 2 and a hammer | 1 plank + 1 nail per tile |
| Lowest wooden fence for a rope anchor | Woodwork 3 and a hammer | 2 planks + 2 nails |
| Sheet-rope descent | Enough rope sections for the full drop | Usually a hammer + nail unless the attachment point supports tying |
For a bridge that is N tiles long plus one wooden fence, carry N + 2 planks and N + 2 nails. Count the floor tiles on the actual gap; do not rely on a fixed “30 planks / 32 nails” kit that ignores fence materials and gap length.
- Reach Twiggy’s upper floor and clear both buildings.
- Open or remove the window facing the target roof. Bring a crowbar if the window will not open by hand.
- Build one floor tile at a time. Keep spare materials and avoid stepping onto roof areas you have not confirmed are solid.
- Stop when you reach the roof and inspect the final entry point.
- If there is an existing opening, use it. If the roof is solid, the bridge has only reached the roof; you still need another valid breach method.
- If you add a sheet-rope exit, use Woodwork 3 for the fence and carry enough rope for the entire height.
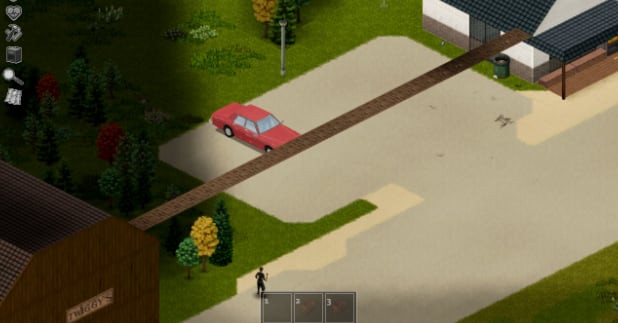
For more locations, see where to find guns. For bridge and rope setup, use the guides to get planks and attach a sheet rope.
Related Articles