Noob to Fortress: Building Walls in Project Zomboid (Build 42.19)
Build 42.19 wall guide: wooden frames and finish tiers, log / metal / brick / stone options, HP tables, and zombie damage rules.
Quick-start: building your first wall
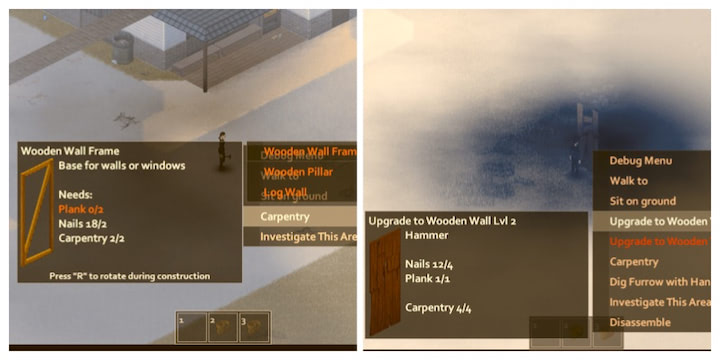
- Tools and materials. Keep a hammer equipped. For one Wooden Wall Frame you need 2 Planks + 2 Nails. Each wooden wall finish (Level 1, 2, or 3) costs another 2 Planks + 4 Nails. Keep a saw if you still need to cut logs into planks.
- Carpentry 2 minimum for wooden frames and Level 1 walls. Level 0–1 cannot place Wooden Wall Frames. Log walls have no Carpentry minimum (they still use Carpentry for the skill-HP bonus). Metal walls need Welding and learned recipes; stone/brick need Masonry.
- Open the build UI. In Build 41, equip a hammer and right-click the ground → Carpentry → wall options. In Build 42, use the dedicated Build panel (brick/trowel-style icon), search “wall”, and pick Wooden Wall Frame.
- Place the frame. Click a valid edge, rotate with R if needed. The frame is a skeleton only — zombies can path through unfinished openings and treat empty frames as non-walls.
- Finish the wall on the frame. Build Wooden Wall Level 1 (Carpentry 2), Level 2 (4), or Level 3 (6) onto an existing wooden or metal wall frame. You can skip intermediate tiers: Level 3 can be built directly on a frame if you meet Carpentry 6 and pay that step’s materials.
- Close the loop. Leave door or window frames where you need access and sight lines. Corners snap from the wall pieces themselves — no separate corner recipe.
| Structure | Carpentry | Planks | Nails | Base HP | Skill HP / level | HP at min skill | HP at Carpentry 10 |
|---|---|---|---|---|---|---|---|
| Wooden Wall Frame | 2 | 2 | 2 | 50 | 20 | 90 | 250 |
| Wooden Wall Level 1 | 2 | 2 | 4 | 450 | 20 | 490 | 650 |
| Wooden Wall Level 2 | 4 | 2 | 4 | 550 | 20 | 630 | 750 |
| Wooden Wall Level 3 | 6 | 2 | 4 | 650 | 20 | 770 | 850 |
Frame + Level 1 totals 4 Planks and 6 Nails for one finished segment. Level 2 and Level 3 finish steps also use 2 Planks + 4 Nails each — not 3 planks, and not Carpentry 7 for Level 3. Final HP uses the builder’s relevant skill when the piece is created: base HP + (skill level × skill HP per level). Complete wooden walls in 42.19 do not add a separate bonus-HP layer, so sandbox Construction Strength does not change those totals.
B41 vs B42 building interface
Build 41 puts construction on the right-click Carpentry path. Build 42 keeps the same wall options under a dedicated Build panel with search and skill filters. If you open general crafting and cannot find walls, switch to the Build panel and set the category filter to All or Carpentry (or Masonry / Welding for those recipes).
Then right-click the frame to upgrade when materials and skill allow.
Walls, floors, doors, and related pieces are listed with skill and item costs.
Materials, skills, and HP by wall type
Complete walls in the table below use that formula only — sandbox Player-built Construction Strength does not change their totals. Strength still matters for objects that do carry a bonus-HP layer (for example some window frames). Sandbox option Damage Construction controls whether zombies can damage player constructions at all.
Complete wall comparison (Build 42.19)
| Complete wall | Skill | Base HP | Skill HP / level | HP at min skill | HP at skill 10 | Finish materials (this step) |
|---|---|---|---|---|---|---|
| Wooden Wall Level 1 | Carpentry 2 | 450 | 20 | 490 | 650 | Hammer kept; 2 Planks; 4 Nails |
| Wooden Wall Level 2 | Carpentry 4 | 550 | 20 | 630 | 750 | Hammer kept; 2 Planks; 4 Nails |
| Wooden Wall Level 3 | Carpentry 6 | 650 | 20 | 770 | 850 | Hammer kept; 2 Planks; 4 Nails |
| Log Wall | No minimum; uses Carpentry for bonus | 500 | 50 | 500 at Carpentry 0 | 1,000 | 4 Logs; 4 bindings (ripped sheets, dirty ripped sheets, twine, rope, or sheet rope) |
| Metal Wall Level 1 | Welding 3; recipe learned | 700 | 20 | 760 | 900 | 4 Blowtorch uses; 3 Small Sheet Metal; 4 Welding Rod units |
| Metal Wall Level 2 | Welding 5; recipe learned | 800 | 20 | 900 | 1,000 | 4 Blowtorch uses; 4 Small Sheet Metal; 4 Welding Rod units |
| Brick Wall Level 1 | Masonry 2 | 500 | 70 | 640 | 1,200 | Mason’s trowel kept; 2 concrete units; 4 Clay Bricks |
| Brick Wall Level 2 | Masonry 5 | 800 | 70 | 1,150 | 1,500 | Mason’s trowel kept; 2 concrete units; 4 Clay Bricks |
| Stone Wall | Masonry 2 | 0 (skill-only HP) | 400 | 800 | 4,000 | Mason’s trowel kept; 2 concrete units; 6 Stone Blocks |
Wooden and metal finish steps require a wooden or metal wall frame. Wooden frame: Carpentry 2, 2 Planks, 2 Nails, base HP 50. Metal frame: Welding 2, learned recipe, 1 Blowtorch use, 3 Metal Bars, 2 Welding Rod units, base HP 100. In-game skill names are Carpentry, Welding, and Masonry.
Wooden walls
Default early perimeter. Higher finish tiers raise base HP and need higher Carpentry. Level 3 is the plasterable wooden finish (see aesthetics). Stock boxes of nails — small compounds still burn through dozens of nails.
Log walls
No Carpentry gate; 4 Logs (9.0 weight each) plus 4 bindings. At Carpentry 0 they sit at 500 HP; at Carpentry 10 they reach 1,000 HP. They are not immune to zombies. Treat them as another damageable wall type when Damage Construction is on.
Metal walls
Use the Welding skill. Frames and finished metal walls must be learned first — read the metalworking / welding magazines that unlock those recipes. Propane and rods are consumable budget items; metal is stronger than mid wooden tiers but not automatically strongest overall.
Brick and stone
Masonry recipes: Clay Bricks for brick walls, Stone Blocks for stone, plus concrete and a kept mason’s trowel. Brick Level 2 is strong at unlock (1,150 HP at Masonry 5). Stone scales hard with skill (800 at Masonry 2, 4,000 at Masonry 10) because almost all of its HP comes from skill bonus.
Skill and the Handy trait
Higher Carpentry / Welding / Masonry raises finished HP via the skill-HP column above. Building at a higher skill than the minimum still adds more HP on the piece you place. The Handy trait costs 8 points and grants XP boosts including Carpentry +1, Masonry +1, Maintenance +1, and Carving +1, plus several granted recipes. It does not add a separate universal “+10% construction strength” bonus in Build 42.19.
Defensive walls: keeping zombies out (mostly)
With Damage Construction enabled (default in Apocalypse, Outbreak, Rising, Extinction, and Six Months Later), zombies can damage player-built walls. Higher HP buys more time; it is not permanent safety. Patrol, clear noise sources, and design choke points rather than relying on a single HP number.
Layer and funnel
Double walls with a one-tile gap, outer fences, and a controlled gate/door give you warning time and a repair corridor. Deliberate weak points (a door you can reinforce and shoot through) are easier to manage than an unbroken wall that fails somewhere out of sight.
Use existing structure
Warehouses, storage lots, and fenced compounds reduce how many player walls you need. Close open edges with frames and finishes instead of rebuilding an entire rectangle from scratch.
Height and access
Upper floors with sheet-rope access remain a strong layout option when ground walls are optional or secondary. Sheet ropes can be yanked by zombies; wooden stairs and floors have their own recipes and skill gates.
Maintenance reality
Vanilla does not offer a general “patch wall HP” action for partially damaged segments. Replace broken pieces and keep the exterior clear so one persistent thumper does not work unattended for hours.
For a focused HP ranking and sandbox detail, see Can zombies destroy walls? and the step-only wooden guide How to build a wooden wall.
Multiplayer notes
- Claim safehouses before investing in long perimeters when the server uses claiming.
- Have the highest relevant skill player place critical finish tiers so skill-bonus HP is maximized.
- Sledgehammers and admin tools can still remove walls regardless of zombie HP tables — PvP defense is not the same problem as horde thumping.
- Shared nail, sheet-metal, and propane stocks run out on long-lived servers; plan resupply routes.
Plaster, paint, and finish
Wooden Wall Level 3 can be plastered after you place it. Plaster is a separate wall-covering recipe: Carpentry 6, a kept plaster trowel, and a full plaster bucket (standard plaster bucket or carved plaster bucket). That is not Carpentry 5. Brick Wall Level 2 can also be plastered.
- Finish a plasterable wall tier (wooden Level 3 or brick Level 2 as applicable).
- Prepare a full plaster bucket (plaster powder or quicklime paths both exist — check the current bucket recipe in-game).
- Use a plaster trowel with the plaster covering action at Carpentry 6.
- Paint plastered surfaces with a brush and paint cans when you want solid colors or signs.
Plaster changes the wall surface for decoration and painting. Treat it as finish work after the defensive shell is already sound.
Action steps
- Gather a hammer, planks, nails, and get Carpentry to 2.
- Place Wooden Wall Frames around the perimeter; leave door/window frames where needed.
- Finish Level 1 walls immediately; upgrade to Level 2/3 when skill and materials allow.
- Budget materials honestly: 4 planks + 6 nails per frame+Level 1 segment; more if you climb tiers step by step.
- Consider log walls for zero-skill shells, metal/brick/stone when Welding or Masonry and materials are ready — using the HP table above, not old ~150 HP figures.
- Patrol, clear thumpers, and design dual layers or height access; never treat any player wall as permanently zombie-proof while Damage Construction is on.
- Plaster and paint only after Level 3 wood (or eligible brick) and Carpentry 6 are available.
Related guides
Related Articles