Project Zomboid Server Survival: Admin Tips for B41 & B42
Build 41 and Build 42.19
Table of Contents
Introduction – Surviving the Setup
So you've decided to run a Project Zomboid server for you and your friends (or a whole community of survivors). Good choice! Being a server admin in PZ is like being the leader of a ragtag apocalypse camp – it's rewarding, but you'll face some challenges that require creativity and grit. This article is a toolbox of tips for Project Zomboid server administrators on Build 41 and the new Build 42.
We'll start with a Quick-Start setup guide for the impatient, then dive into performance tweaks, mod management, security against griefers, and advanced tricks to keep your server running smoothly. By the end, you'll know how to handle everything from installing mods to stopping a horde of trolls (sometimes literally!). For detailed memory optimization, see our comprehensive server memory guide.
Whether you're hosting a cozy co-op server for a few friends or administering a bustling public server with dozens of players, these tips will help you avoid common pitfalls. We'll cover in-game admin tools, configuration files, hardware advice, and what changes Build 42 brings to the table. Let's turn you from a survivor into the ultimate server Overseer (with admin powers comes great responsibility, after all).
Grab your axe and your notepad, and let's get started!
Quick-Start Guide to Hosting (B41/B42)
If you're new to hosting, here's a Quick-Start checklist to get your Project Zomboid server up and running fast. This assumes you want a basic server for Build 41 or 42 with default settings:
- Decide How to Host: For 2-4 friends, using the in-game Host option can be simplest. Launch PZ, click Host, create a server name and admin password, and start the server. The game will auto-handle port forwarding via Steam in many cases (UPnP) and create config files. (Downside: the server only runs when you're in-game and performance may suffer if your PC isn't beefy.) For a more permanent or larger server, use the dedicated server application (either on your own hardware or through a hosting provider). For detailed multiplayer setup guidance, check our Build 41 vs 42 multiplayer comparison.
-
Install Server Files: If going dedicated, install Project Zomboid Dedicated Server via SteamCMD or Steam. On Steam, it's listed under Tools. On SteamCMD, run:
steamcmd +login anonymous +force_install_dir /pzserver +app_update 380870 validate +quit
This installs the latest server (Build 41 by default). For Build 42 unstable, use the
-beta unstablebranch. -
Configure Ports: Current server options use two UDP ports:
DefaultPort=16261(player data / game) andUDPPort=16262(Steam section of server options). Forward both on your router when hosting at home, and allow the dedicated server binary through the OS firewall. Older community guides that only list 8766/8767 or omit 16262 are outdated for current builds. If friends cannot join, check ports, firewall, and CGNAT first. For connection troubleshooting, see our server initialization troubleshooting guide. -
Initial Server Settings: After first launch, config files live under the Zomboid user folder (Windows example:
C:\Users\<YourName>\Zomboid\Server\). Openservertest.ini(or your server name). At minimum set:Public=true/false(false if it is just for friends)Password=if you want a join passwordDefaultPort=16261andUDPPort=16262(change both only if you run multiple servers and update port forwarding to match)Map=(commonlyMuldraugh, KYfor vanilla)- Admin access:
AdminPasswordis not a normal ServerOption in the current options table. Set a strong admin password in the in-game Host flow (or the host/co-op admin password path), then promote your play account with/setaccesslevelfrom the console if needed.
-
Launch and Test: Start the server. If using the dedicated server, run the
ProjectZomboidServer.bat(Windows) or the start script (Linux). Now launch Project Zomboid (game client), go to Join, and input127.0.0.1if hosting on the same PC or your server's IP. Use username "admin" and the admin password you set. - Invite Friends: Give friends your external IP (Google "my IP" to get it) or use the Invite via Steam feature. Make sure they have the exact same game version (Build 41 or opted into the 42 beta).
-
Set Yourself as Admin: By default, the first account "admin" with the password is the superuser. If you want to make your player account admin, from the server console type:
setaccesslevel "YourUsername" admin
In chat or console use the official form with quotes:
/setaccesslevel "YourUsername" "admin". Access levels include Admin, Moderator, Overseer, GM, and Observer./grantadmin "YourUsername"also exists for granting admin. - Save Settings and Go: If everything works with default settings, you're good to play. Survivors can join, and zombies await. But you'll likely want to adjust loot, zombies, etc., which we'll cover next.
This quick-start got you running; the sections below will turn this barebones setup into a finely tuned apocalypse experience.
Choosing Your Hosting Approach
One of the first decisions is how to host: use the built-in Host feature or set up a standalone dedicated server. Both have pros and cons:
In-Game Host (Co-op mode)
Advantages:
- Easiest to set up - just click Host in the main menu
- Friends join through Steam's friend list (no IPs needed)
- Perfect for quick sessions or casual play
- Auto-configures most settings
Disadvantages:
- Your PC's resources are shared between playing and hosting
- Server shuts down when you exit the game
- Less stable for larger groups (5+ players)
- Limited advanced configuration options
Ideal for: Small groups of 2-4 friends who play together at the same time.
Dedicated Server
Advantages:
- Runs continuously, even when you're offline
- Players in different time zones can play on their schedule
- More stable for larger groups and heavily modded setups
- Full control over server configuration
Disadvantages:
- More complex setup and maintenance
- Requires dedicated hardware or hosting service
- Need to manage configuration files and network issues
- Higher resource requirements (4GB+ RAM recommended)
Ideal for: Larger communities, persistent worlds, or players with varying schedules.
Tip: Hosting Providers
Not keen on running a server from your home network? Consider using a game server provider. Companies like G-Portal, Nitrado, GTXGaming, etc., offer PZ servers for a monthly fee. They handle the hardware and give you a web interface to change settings.
These services can simplify mod management with one-click installs and usually have good DDoS protection and uptime. The trade-off is cost and sometimes slightly less flexibility than hosting yourself.
Tweaking Server Settings
Once the server is up, you'll probably want to adjust gameplay settings: zombie count, loot rarity, PvP on/off, etc. Project Zomboid has two types of settings: core server settings (in servertest.ini) and sandbox settings (in servertest_SandboxVars.lua).
Pro Tip: Using the GUI
If you're not comfortable editing files directly, you can use the in-game UI. On the main menu, click Host > Manage Settings, adjust everything via the GUI, and save it. The game will write the changes to the config files for you.
Managing Mods on Your Server
Mods are a huge draw for PZ – everything from new guns, maps, to admin tools and gameplay overhauls. But mods on servers can be tricky if not handled correctly. Let's break it down step-by-step, since misconfigured mods are a top cause of server problems.
Installing a New Mod
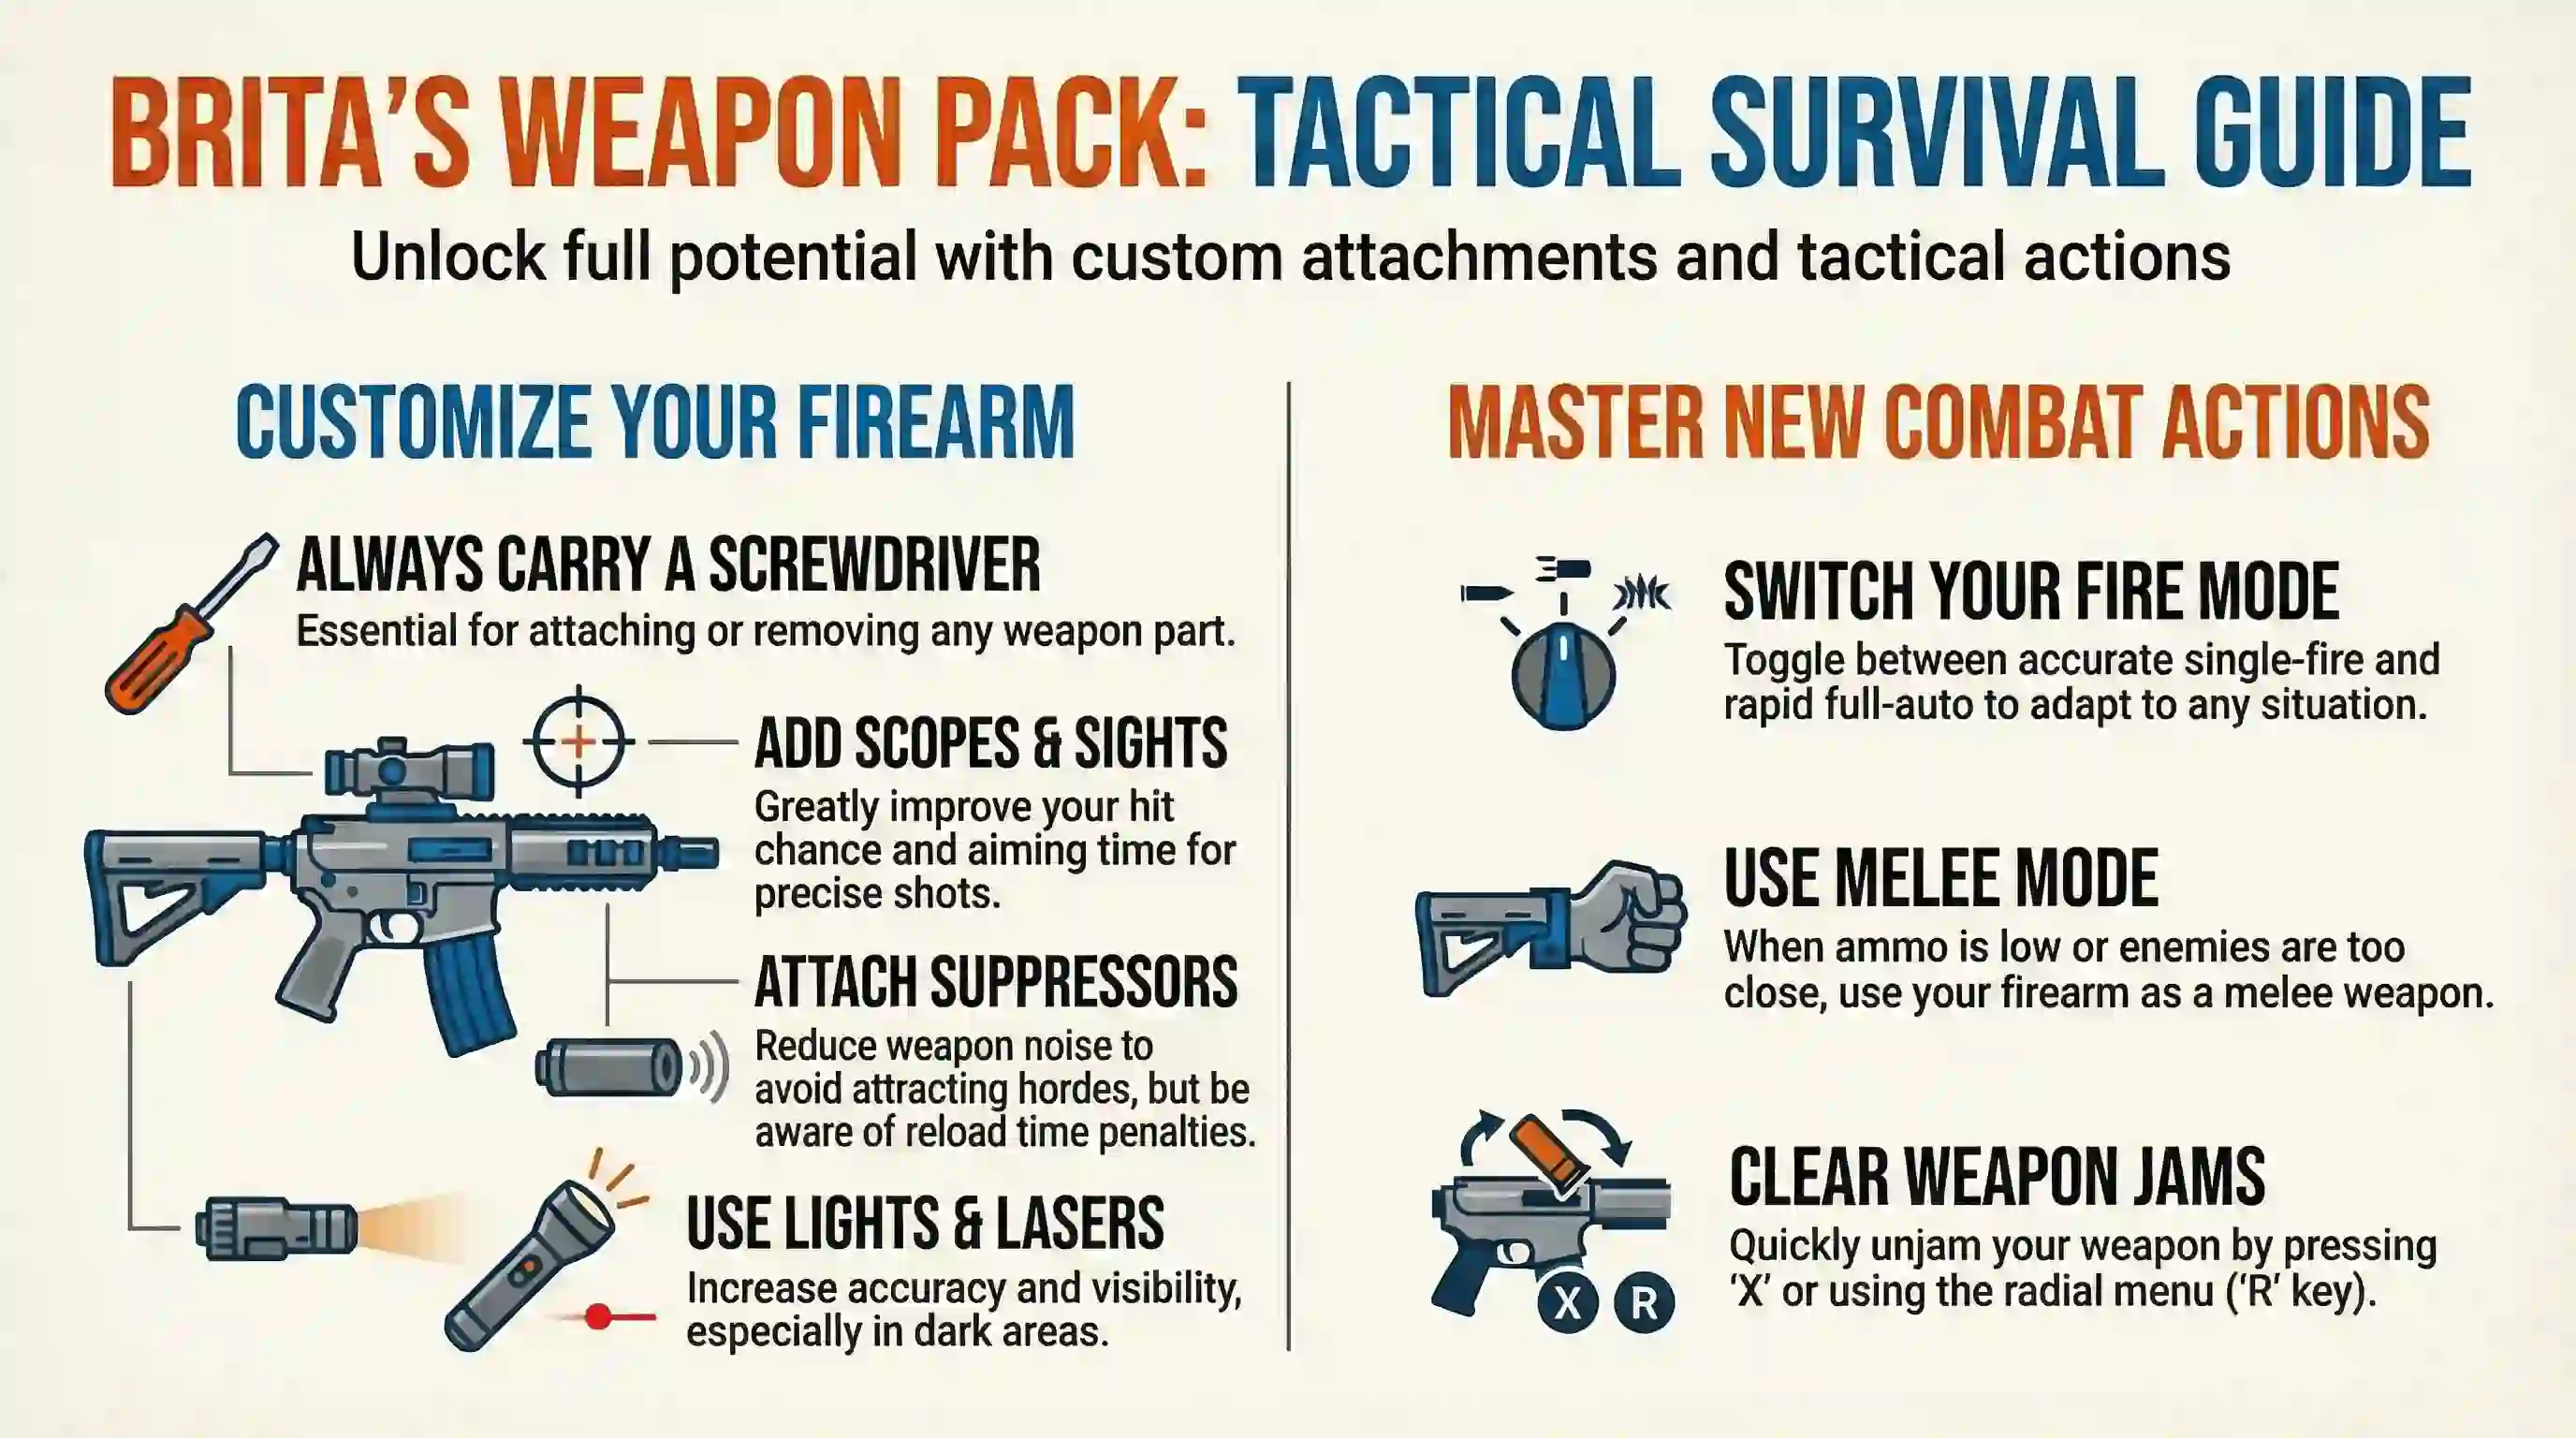
Suppose you want to add the popular Brita's Weapons mod to your server. Here's what you do:
-
Subscribe and Check Mod ID: Subscribe to the mod in Steam Workshop. In the Workshop page URL you'll see something like
?id=2256623446– that number is the Workshop ID. The page will also list the "Mod ID". -
Update Server .ini: Open
servertest.ini. FindWorkshopItems=line. Add the workshop ID. For multiple mods, they go separated by a semicolon. Then findMods=line. Add the mod's name exactly as specified. Example:WorkshopItems=2256623446;2256623668 Mods=Brita;BritaGunFighter
- Ensure Clients Have It: When players join a modded server, if they are missing mods, the game will show a popup with a list of required mods and offer to enable/download them. It's good practice to announce mods beforehand so they can preload them.
- Restart the Server: Whenever you change mods, always restart the server fresh. The server on startup will log each Workshop ID and attempt to download/update them. Double-check the console log for any errors.
- Matching Versions: If a mod updates on Workshop, clients will auto-update but the server only checks for mod updates when it starts. This can lead to "Workshop item version different than server" kicks. The fix is to restart the server so it grabs the latest version.
- Anti-Cheat Adjustments: Some mods might require turning off specific anti-cheat protections. If players get inexplicable kicks after using a mod item, check the anti-cheat settings.
-
Mod Load Order: PZ loads mods in the order they're listed in the
Mods=line. If two mods modify the same thing, the last one in the list wins. -
Maps Mods: Want to add custom maps? These require a bit more editing. In addition to WorkshopItems/Mods entries, you must edit
Map=line to include the map folder names.
Recommended Admin/Utility Mods
Important Note for B42: Build 42 has significant changes and many B41 mods will not work with it. The devs explicitly warned: "Build 41 saves and mods are NOT compatible with Build 42."
Keeping Your Server Running Smoothly
There's no quicker way to kill a fun session than server lag or crashes. Project Zomboid can be surprisingly demanding on servers, so let's talk performance optimization and maintenance.
Hardware Considerations
Recommended Server Specs
PZ server is single-thread heavy. Higher clock speed beats more cores. A CPU with good single-core performance is ideal.
Start with several GB of free RAM for the Java process, then watch real usage under load. Player count, explored map area, and heavy mods dominate growth—size heap from observed memory and logs, not fixed per-player formulas.
Server files are relatively small, but save files grow with player activity, map exploration, and accumulated items.
Prefer a wired connection. Bandwidth needs rise with player count and activity; measure actual usage on your host rather than relying on a single published figure.
Performance Tips
- Periodic Cleanup: Over time, the world can accumulate a lot of dropped loot. There are sandbox settings to make corpses decay and even disappear after a time – consider enabling corpse removal.
-
Backups: Config alone is not enough. Before mods, branch changes, or major patches, stop the server and copy at least:
Zomboid/Server/(INI, sandbox vars, ban/whitelist-related server files)Zomboid/Saves/Multiplayer/<servername>/(the live multiplayer world—this is the main world data)- Related DB / auth files under the Zomboid user directory when present
BackupsCount,BackupsOnStart,BackupsPeriod) help day-to-day recovery; keep a full off-box copy before risky changes. -
Monitoring Performance: F11 opens the Lua debugger, not a server FPS panel. For server statistics use
/stats help(and related/statsmodes such as file/console). Also watch host CPU/RAM, console logs, and player reports of rubber-banding. -
Memory Management: If the server throws an "OutOfMemory" error, the Java heap might need increasing. Look for
-Xmxparameter in the start script and increase it (e.g.,-Xmx4gfor 4GB heap).
Auto-Restart and Watchdog
Sometimes servers can hang or crash (especially modded ones). It's good to have a mechanism to auto-restart on crash. If you run via a .bat, you can loop it to restart.
Regular restarts (like a daily restart during off hours) can preempt issues and also apply mod updates. Many community servers restart every 24 hours to keep things fresh.
Admin Powers and Keeping Order
Running a server isn't just ticking checkboxes and updating mods – you're also the sheriff of this survivor town. Let's talk about admin powers and how to use them effectively (and fairly).
Admin Panel and Commands
Build 41's multiplayer introduced a robust admin panel UI. Once you're admin, you'll notice a new icon on the left of your screen – clicking that opens the panel. From there you can navigate various tabs:
Players
Shows who is online, their Steam ID, ping, etc. You can teleport to them, heal them, or ban/kick.
Safehouses
Manage claimed safehouses. If a player quit and their safehouse is blocking others, you can remove it here.
Items / Spawn Items
Search and spawn any item to your inventory. Useful to replace glitched items or give gifts to players.
Visibility and Ghost Mode
Toggle invisibility with /invisible -true (or -false) and invincibility with /godmode -true (alias /godmod). For another player: /godmodeplayer "username" -true.
Banning and Whitelisting
To ban a player, use the official command /banuser "username" (or the admin panel / scoreboard). Optional flags: -ip and -r "reason". Example: /banuser "rj" -ip -r "spawn kill". Related commands include /unbanuser, /kickuser, /banid, and /banip. There is no short /ban alias in the current command set.
For a whitelist model (only accounts you create can join), set Open=false in the server INI. When false, administrators must create username/password combos (for example /adduser "username" "password"; password is optional in the help text). You can also protect accounts with /addusertowhitelist "username".
The server creates useful logs in the Logs/ directory. chat.txt records all chat, pvp.txt logs PvP hits/kills, and admin.txt tracks admin commands used.
Fun with Admin Commands
/createhorde count "username"
Spawn a horde near a player. Example: /createhorde 150 "rj". Username is optional in-game (horde near you) but required from the server console.
/additem "username" "module.item" count
Give items to a player (or yourself if username is omitted). Example: /additem "rj" Base.Axe 5.
/chopper
Place a helicopter event on a random player. The command name is chopper, not /heli.
/startrain, /stoprain
/startrain accepts optional intensity 1–100; /stoprain clears rain on the server.
Always balance fun with fairness. Don't abuse powers to give your faction an undue advantage – players will notice. Many admins use a separate account for "playing" as a normal player and only use their admin account when needed.
Build 42: New Challenges and Opportunities
Build 42 (B42) brings a lot of new content plus server-side changes that admins should plan for before switching.
No Upgrade In-Place – Start Fresh: You cannot simply load a Build 41 save on a Build 42 server. The differences in data are too big. Plan a server wipe or new world when moving to B42.
Key Build 42 Changes for Admins
Animal Husbandry
Players can find and pen animals (chickens, pigs, cows, etc.), feed and breed them. This introduces new complexity:
- Animals need to be synced and updated on the server, consuming resources
- Watch for performance impact if many players start hoarding animals
- Check SandboxVars for new animal-related settings
New Professions & Crafting
B42 expands crafting (blacksmithing, pottery, etc.). For admins, consider:
- Players might ask for skill books if something is super rare
- Some crafting recipes are gated behind magazines that spawn rarely
- With brewing and food crafting expanded, farming and hunting become more central
Aiming and Combat Changes
Build 42 changes firearm handling enough that players coming from Build 41 may need time to adjust.
- Consider hosting a friendly shooting range event to let players adjust
- You might get feedback that "guns suck now" or "too hard"
- There is no stock
HitChancesandbox key to paste; adjust difficulty options in the server GUI, or use a tested mod if you want a different aiming model
Map Expansions & Wilderness
B42 expands the vanilla map with new towns and locations. Plan storage and travel around the actual map shipped by the selected build.
- Newly visited areas create additional world data, so watch save growth as players spread out
- The first weeks, many players may rush to new towns
- Vanilla Build 42.19 does not add infinite randomized wilderness—plan around the map that ships with the game (plus any map mods you install)
B42 Server Security Improvements
In Build 42, the devs have moved more calculations to the server (to combat cheating). This means B42 servers might actually have higher CPU load than B41 for the same scenario, because previously some physics or inventory logic was client-side but now server has to handle it.
The flip side is better security (no more easy item spawn cheats because server verifies everything). Keep an eye on performance initially, you might need to adjust population down a notch if you notice server load increased.
Staying Updated with B42
B42 unstable will likely receive frequent patches. If you're running it, you must update the server whenever the game updates (or players won't be able to join due to version mismatch).
Subscribe to Project Zomboid dev news, join their Discord or check the official forum News section regularly, so you know when updates hit. And obviously, backup before each update because unstable updates can introduce bugs that corrupt saves.
Keeping It Fun and Fair
Being a server admin is a bit of work, but it's also very rewarding to see a thriving community enjoying the world you host. You'll learn a lot as you go – don't be afraid to make mistakes, just communicate and learn from them. Remember that at the end of the day, everyone's here to have fun surviving the zombie apocalypse.
Adminning a PZ server is like running a neighborhood watch in zombie town. You coordinate the block party (server events), make sure no one's wrecking the place (moderation), and occasionally chase a stray dog or zombie off someone's lawn (technical issues or griefers). It's a responsibility, but also a lot of fun.
Action Steps Recap (TL;DR)
-
Set Up Right: Use in-game Host for small groups or a dedicated server for long-term communities. Forward UDP 16261 and 16262 (
DefaultPort/UDPPort). -
Tune Performance: Lower zombie population and explored-area load until the host stays stable. Use
/stats, console logs, and OS monitors—not F11. - Manage Mods Carefully: Match Workshop IDs and Mod IDs in the config. Restart after adding mods. Change AntiCheat only when logs show real false positives for your mod set and version.
-
Use Official Commands: Prefer
/banuser,/godmode,/setaccesslevel, and/helpover outdated short aliases. -
Secure the Server: Use join password, whitelist (
Open=false) when needed, and safehouse options that match your PvP/PvE rules. -
Backup Config + World: Copy
Zomboid/Server/andZomboid/Saves/Multiplayer/<servername>/(plus DB files when present). - Version Discipline: Clients and server must share the same build. B41 worlds/mods do not carry cleanly into B42—plan a fresh world when switching major builds.
- Keep Powers Separate: Play on a normal account when possible; use admin tools only for maintenance and fair events.
Further Resources
Project Zomboid Wiki
Contains up-to-date info on every server setting and admin command. An excellent reference for exact syntax and config options.
The Indie Stone Forums
If you encounter a weird issue, chances are someone on the forums has seen it. Search the Multiplayer section or post your problem.
Project Zomboid Discord
The official Discord has a channel for server hosting where you can ask quick questions and share knowledge with other admins.
Correct ports, complete backups, and the right admin commands prevent most avoidable outages. When something fails, start from the console log and the live world path under Saves/Multiplayer, not from outdated port lists or shortened command names.
Keep the server build aligned with clients, re-check Workshop items after every game update, and treat admin powers as maintenance tools first. A stable world with clear rules beats a heavily modded one that nobody can join.
Related Articles