How To Board Up Windows In Project Zomboid

Board Up, Barricade, Survive
The Solo Player's Guide to Window Security in Project Zomboid (B41/B42)
Zombies breaking in through windows at 3 AM? Not on your watch! This guide will teach you exactly how to board up windows in vanilla Project Zomboid Build 41 and 42. Whether you're a day-one newbie or testing the unstable Build 42, we've got you covered on the tools you need, step-by-step boarding techniques, advanced barricading tactics, and recent changes to the system. For comprehensive safehouse planning, also check our safehouse design guide. Grab your hammer – it's time to make your safehouse actually safe.
Quick-Start Summary
Barricading windows (and doors) buys you crucial time against the undead. Right-click a window with a hammer + planks + nails to "Barricade (Planks)". Each plank nailed up adds durability to the window and blocks zombie entry. For maximum security, stack up to 4 planks per side of a window (2 per side for doors), or upgrade to metal sheets/bars if you have a torch. Always keep a crowbar or hammer handy to remove planks in a pinch, and consider using sheet ropes for a second-floor exit so you can barricade the ground floor completely. The details below will turn you from a barricading beginner to a zombie-fortification pro!
Why Barricade Windows in Project Zomboid?
Barricading is critical for solo players, especially in the early game or during zombie swarm events. An un-barricaded window is basically an open invitation to zombies – they can see you through the glass, hear you, and with enough pounding, they will break the glass and climb right in. Boarding up a window serves several purposes:
- 🛡️ Prevent Entry: Each barricade layer adds hit points to the window. Zombies must destroy all barricade layers and the underlying window to get in.
- 👁️ Reduce Visibility: A barricaded window blocks line of sight. With 3+ wooden planks, zombies cannot see through to you.
- ⏱️ Delay and Divert Zombies: Barricades significantly slow down zombies that try to break in.
- 😌 Psychological Relief: Boarding windows up reduces your anxiety by providing a feeling of security.
Tools of the Trade: What You Need to Board Up a Window
Before you start nailing planks to every frame in sight, make sure you've gathered the proper tools and materials. Project Zomboid doesn't allow barricading with your bare hands – you'll need some specific items in your inventory:
Hammer (any type)
The primary tool for barricading. A claw hammer is most common, but a Ball-peen hammer, Stone hammer, or even a crafted hammer will do. In Build 42, there's also a "Wooden Mallet" – do not use that for barricading; it currently doesn't count as a hammer for this purpose.
Nails
You'll use 2 nails per plank per barricade layer. Make sure to open boxes of nails in your inventory, or the game won't recognize that you have nails available. Build 42 update: the game will now auto-move nails to your main inventory when barricading.
Planks
Wooden planks are your primary barricade material. Each plank covers one "layer" of a window or door. Windows accept up to 4 planks on each side; doors accept up to 2 on each side. Planks weigh 3.0 each, so bring a backpack if hauling many.
Saw (optional)
If you want to make your own planks from logs, you'll need a saw. This isn't required if you're strictly using already-existing planks from looting or disassembling furniture.
Crowbar (optional)
While not needed to put barricades up, a crowbar or claw hammer is needed to take them down. Crowbars do it slightly faster. Keep one on you for quick escapes!
Checklist Before Barricading:
- ✓ Hammer equipped in Primary hand (check your hotbar or inventory – the hammer icon should show in your hand)
- ✓ Planks in inventory (floor or bags won't count – have them in your main inventory if possible)
- ✓ Nails opened/unpacked (you should see individual nails, e.g. "Nails (x20)", not just a "Box of Nails")
- ✓ Area is clear (you don't want a zombie biting your back while you're busy hammering)
Step-by-Step: How to Barricade a Window (Wooden Planks)
Let's walk through a practical example of boarding up a window in Project Zomboid. Imagine you've found a nice little two-bedroom house and want to secure the front windows. Here's what you do:
A survivor prepares to barricade a window: hammer equipped and ready (note the context menu with "Equip Primary" for the hammer). Always ensure your hammer is in hand before attempting to barricade.
- Gather at the Window: Stand next to the window you intend to barricade. This can be done from either inside or outside – it doesn't matter for the first layer. If the window has a closed curtain or sheet, consider removing or opening it temporarily so you can see the progress – but it's not required.
-
Right-Click the Window: This brings up the interaction menu for the window. In the list of options (which might include "Open/Close window", "Remove Broken Glass" if it's shattered, etc.), look for "Barricade (Planks)". Click this option.
- If you don't see "Barricade (Planks)": Double-check that you have a hammer equipped and at least 1 plank + 2 nails in inventory. Also make sure you're clicking the window frame (the bottom part of the window works best).
- Hammering in Progress: Once you click "Barricade", your character will kneel down and start hammering. A progress bar will appear over their head. This takes a couple of in-game seconds per plank. Stay alert – you are vulnerable while barricading.
-
One Plank Up! When the action completes, one wooden plank will appear nailed across the window sprite. Congrats – that window now has a basic barricade. It will now read "Barricaded" if you examine it, and it's already stronger than it was. At this point:
- The "Barricade (Planks)" option will still be there on right-click, until you hit the max of 4 layers on that side. Go ahead and click it again to add another plank.
- Each subsequent plank you add is another repetition of the hammering process. The more planks, the more durable the barricade.
- Repeat for Additional Layers: Keep selecting "Barricade (Planks)" until it's no longer available (or until you choose to stop). If you have 4 planks on one side, that side is fully barricaded. You might notice you can barricade both sides of the window separately.
- Barricading Doors: The process for doors is identical – right-click a door and choose "Barricade (Planks)". The only differences are: (a) you can only put up to 2 planks on a door from each side, and (b) you obviously can't open a barricaded door without removing the planks first.
- Finished Barricade: Now your window is reinforced. Visually, 4 planks will cover most of the window's area in a criss-cross pattern. From the outside, it's clear that window is barricaded. From the inside, you'll see the backs of those planks.
Mid-barricade: our survivor has nailed one plank and is working on a second. Each plank takes time to hammer in – don't rush outside to barricade if zombies are already on you. Better to clear them first or barricade from the safer side.
After following these steps, you should have a nicely barricaded window or door. Do this for all ground-floor windows of your safehouse for best results. Many players prioritize front-facing windows or any large glass doors first (since zombies tend to roam streets).
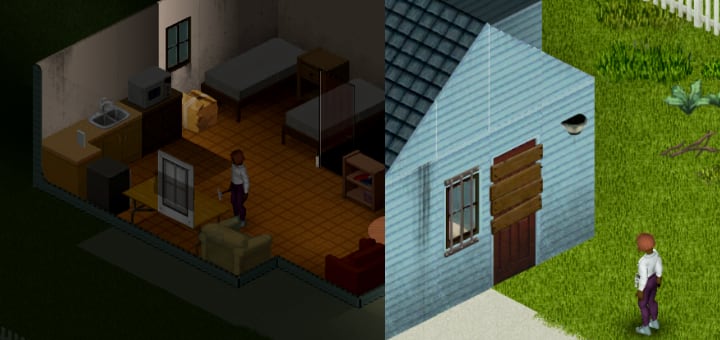
Home sweet home – fully barricaded. This portable office has been fortified with wooden planks on the windows and even the door. With only one way in or out (sheet rope not visible here), it's a secure hideout. Just remember: if you barricade that door, have a plan to exit!
Barricade Materials: Wood vs. Metal (and Which Is Best)
By default, you'll be barricading with wooden planks – it's the simplest and doesn't require any special skills. However, Project Zomboid also lets you use metal sheets and metal bars (rods) as barricades if you've delved into Metalworking. Each material has pros and cons. Let's break them down:
| Material | Durability (HP) | See-Through? | Tools/Skills Required |
|---|---|---|---|
| Wooden Plank | ~1000 HP per plank | Partially – 1-2 planks still allow some view/light; 3+ planks block vision | Hammer; Nails (2 per); No skill requirement. |
| Metal Sheet | 5000 HP per sheet | No – completely opaque (blocks vision and light). | Propane Torch + Welding Mask; Metalworking lvl 3 (recommended for efficiency). Uses propane (about 10% per sheet). |
| Metal Bars (B41) / Steel Rods (B42) | 5000 HP per set (of 3 rods) | Yes – acts like jail bars, you and zombies can see through (and you can shoot through). | Propane Torch + Welding Mask; Metalworking lvl 4 for bars (in B41). Build 42: use 3 steel rods. Torch fuel ~10%. (Mask currently not required in B42) |
A few observations from the table and player experience:
- Metal barricades are far stronger than wooden ones. One metal sheet = the strength of ~5 planks. And you can double them (inside/outside) to stack durability.
- Metal Bars/Rods vs. Sheets: Bars are usually preferred by players who can get them because of the visibility factor. You can still watch the outside world and even shoot or stab through window bars.
- Resource availability: Wood is everywhere – every piece of furniture can yield planks. Metal sheets are a bit rarer; you find them in industrial locations or by dismantling things like car doors/hoods.
- Noise & Time: Nailing planks and welding metal both make noise, but welding creates a distinctive sound that can draw zombies similarly to carpentry.
- No Carpentry XP: One might think barricading improves Carpentry skill – it doesn't. You gain no Carpentry XP for barricading (only for building or dismantling objects).
Advanced Barricading Strategies (Solo Play)
Okay, you've mastered hammering up a simple barricade. Now let's level up your strategy. Barricading is one layer of defense – you can combine it with other tactics to create an almost zombie-proof home. Here are some advanced tips and setups:
1.Barricade Both Sides of Windows
We touched on this, but it's worth emphasizing: for critical windows, barricade them from both outside and inside. Each side of a window or door has its own set of 4 (or 2) possible planks. Zombies typically attack from the outside, so they'll hit the outside barricades first. If they happen to break through those, they'll then need to break the window glass, then the inside barricades.
- Practical execution: It can be time-consuming to double-barricade everything, so prioritize. Maybe you put 4 planks outside on all windows first.
- Metal + Wood combo: Some players like to put metal bars on the outside (for vision) and wood planks inside (for a bit of extra after they get past bars).
- When not to double-barricade: If you're in a hurry or on the move, barricading both sides might be overkill.
2.Leave Yourself an Escape Route
One rookie mistake in barricading is doing too good a job – sealing every possible exit so well that you trap yourself. Don't board up your last exit behind you without a plan. Here are some ways to stay safe but not sealed in:
-
Sheet Rope Exits: This is a classic strategy. Find an upstairs window (or even attic), secure a sheet rope to it (requires 1 nail and a sheet rope, and the window must be opened). Then you can climb in and out without using the ground floor. If you do this, you can comfortably barricade every ground floor window and door to the max and not worry about coming and going. For detailed instructions on sheet rope mechanics, see our comprehensive sheet survival guide.
Pro-tip: Set up two sheet rope exits on different sides of the house, if possible. That way if a horde is gathered at one rope, you might escape out the other.
- One Door Rule: Some solo players adopt the "barricade all but one door" approach. They fully barricade every window and door except a single door (usually at the back of the house, out of sight).
- Have Tools Ready: If you do barricade everything, keep a hammer/crowbar on you, and maybe don't barricade the room you sleep in from the inside.
3.Use Fences and Furniture to Augment Barricades
Barricades alone are great, but you can create layers of defense. Imagine a zombie approaching your barricaded window: what if there was also a fence outside it? Or a couch pushed in front of it inside? These can further slow zombies or even prevent some from reaching the window.
- Exterior Fences/Walls: If you have Carpentry skill, you can build wooden walls or fences. Construct a fence a tile or two away from the window outside. Learn more about advanced construction in our carpentry guide.
- Moveable Furniture: You can't nail furniture to windows, but you can place heavy objects as a first line. For instance, a large bookshelf or vending machine in front of a window.
- Cars as Barricades: In Build 41+ you can move cars fairly easily if you have keys. Some players park vehicles against doors or windows outside to block passage.
4.When to Barricade: Timing and Priority
Knowing when to barricade is as important as knowing how. If you spend all of day 1 barricading a base in a town full of zombies, you might not live to enjoy it. Here are timing tips:
- After Clearing, Before Looting: A good practice: clear out all zombies inside your chosen safehouse and immediate vicinity. Once clear, quickly barricade the most exposed windows.
- Nightfall = Barricade-fall: As evening approaches, if you plan to sleep in a location, barricade at least the bedroom windows.
- Helicopter Event Prep: If you know the metagame, around 6-9 days in, the notorious helicopter event will drag zombies all over the map. You do not want to be caught with an undefended house when that happens.
- Don't Barricade What You Don't Need: If you're in a temporary safehouse or plan to move on in a day or two, you might skip barricading entirely or do the bare minimum.
Common Barricading Misconceptions (FAQ)
Let's clear up a few myths or questions new players often have:
Living with Barricades: Surviving Day-to-Day
Once your windows and doors are all nicely boarded, there are a few lifestyle changes and maintenance tasks to keep in mind:
Visibility & Light
Your safehouse will be darker inside, especially if every window is covered. You'll rely on indoor lighting (if power is on) or generators later. Zombies can't see light through barricades of 3+ planks or metal sheets.
Noise
Expect more random thumps. Zombies wandering might idly bump your barricades. Don't panic at every little thud, but do go check if it persists – a single zombie can eventually remove a plank after many minutes.
Repairs
You can't repair a broken plank except by replacing it with a new one. If a window had 4 and one got destroyed, it will show 3 planks remaining; just barricade again to add a 4th (using another plank and nails).
Fire Hazard
Wooden barricades can catch fire. If a fire starts inside your base and reaches a barricaded window, those planks will burn. They'll eventually turn to ash and the window will be open again. Metal barricades obviously don't burn.
Real Example: Barricading a Safehouse (Anecdote)
"It was my 5th day in West Point. I'd set up a base in the second floor of a two-story tavern. The first floor had huge glass windows – a nightmare for zombie incursions. On day 1, I hastily hung sheets. By day 3, I finally found a hammer and some nails at a hardware store (almost got myself killed getting them!). That evening, I decided to barricade those big pub windows. I snuck outside at noon, after clearing a few stragglers, and started hammering away. Plank one, plank two… by the time I got to plank three on the first window, a pack of five zombies heard the noise and came shambling around the corner. My heart jumped. They saw me and gunned straight for the half-barricaded window. Thankfully, those three planks held up just long enough – I retreated inside, and they started clawing at the boards.
Upstairs, I peeked down from the balcony to see them tearing at my new barricade. It was bending but holding. I had a sheet rope out a back window, so I climbed down, crept around, and dispatched the zombies from behind with my axe. The window planks were scuffed but intact (phew!). Lesson learned: clear a larger radius or have a buddy watch your back when barricading.
Finally, on day 5, the helicopter event hit. A huge horde migrated through the area. I stayed upstairs, quiet as a mouse. The zeds pounded on those pub windows, but those 4 planks on each held like champs for hours. They never got in – eventually the helicopter noise moved them along. If I hadn't barricaded, that horde would've crashed through in seconds and I'd be dead. Instead, I lived to see day 6, all thanks to solid carpentry and a bit of luck."
Barricading will lead to stories like this – close calls where a few pieces of wood made all the difference.
Recap & Key Takeaways
- Barricading is Essential: In Build 41 and 42, the mechanics are largely the same – use a hammer, nails, and planks to barricade windows/doors. No skill needed, just the right tools.
- Board Early, Board Smart: Secure your safehouse windows once you've cleared the area. Prioritize ground floor and known entry points. One plank can save your life, four planks can save your base.
- Common Hurdles: Always open nail boxes, equip your hammer in hand, and avoid the "favorited hammer" bug in B42. If "Barricade" doesn't show up, double-check these.
- Advanced Moves: Use sheet ropes to keep an escape. Consider metal barricades if you get the chance – they're stronger and can let you see/shoot outside (bars). Double-barricading (inside+outside) dramatically increases time to breach.
- Maintaining Barricades: Keep spare materials around. Listen for warning signs (persistent banging). And remember, barricades are a delay tactic, not an invincibility shield – always have a Plan B.
With these tips, you're well-equipped to transform any building into a veritable zombie bunker. There's a unique comfort in sitting by a barricaded window, hearing the rain and distant groans outside, knowing that you have layer upon layer of defense between you and the horrors out there. This is how you survived the apocalypse – one plank at a time. Stay safe, stay smart, and happy hammering!
Patch History & Changes Affecting Barricading
- Build 41 Stable (Dec 20, 2021): Major "Animations" update. Barricading mechanics from previous builds remained mostly consistent in B41. Notably, barricading no longer required any Carpentry skill (if it ever did in older builds) – anyone can do it.
- Build 41.50 – 41.78 Patches (2022): Various fixes; one notable fix (mid-2022) addressed exploits like unbreakable TVs as furniture barricades. Zombies can now destroy virtually all furniture, so no more "invincible" obstacles.
- Build 42 Unstable (Dec 17, 2024): Quality of Life Improvement: Nails auto-transfer to main inventory when starting a barricade action. This means if you have nails in a backpack, the game moves them so your character doesn't stand there unable to find nails. Also in B42, "Metal Bars" renamed to "Steel Rods" for crafting.
- Build 42.1 – 42.5 (Early 2025 Unstable Patches): Minor tweaks – one hotfix corrected an infinite-nails exploit involving fanny packs, ensuring nails properly deduct even from secondary containers. Another fix addressed graphical issues with steel bar (rod) placement on windows, purely visual.
In Project Zomboid, barricading your safe house is crucial for survival during a zombie outbreak. Barricades can prevent entry or exit for both the player and zombies, and they can also make it much harder for zombies to break through doors or windows. In this tutorial, we will go over the steps for barricading a window, the different materials you can use, and how to effectively barricade your safe house.
Steps for Barricading a Window
- Gather your supplies: You will need a hammer, some planks, and nails. These can be found in certain locations throughout the game world, or you can scavenge them from objects such as master beds or cupboards.
- Right-click on the window you want to barricade: This will bring up a menu of options.
- Click on "barricade (planks)": Your character will then take out the planks and start nailing them into the window. You can do this up to four times, depending on the number of planks you have. Each time you barricade a window, you will use up some of your resources (planks and nails).
- Consider barricading both sides of the window: This will provide extra protection against zombies.
Different Materials for Barricades
There are several different materials you can use to create barricades in Project Zomboid. Each material has its own advantages and disadvantages:
- Metal sheets: These provide a high level of protection, but they cannot be seen through.
- Wooden boards: These can be seen through, but they are weaker than metal sheets.
- Metal bars: These can also be seen through, but they provide the same level of protection as a metal sheet.
To create metal sheets and metal bars, you will need a propane torch and a welder mask. These can be found in certain locations throughout the game world, or you can scavenge them from objects such as workshops or garages.
How to Remove a Barricade
To remove a barricade that has been put in place, you will need the same tool that was used to create the barricade. If you do not have that tool, you can use a crowbar instead.
To remove a barricade, right-click on it and click "unbarricade." When the barricade is removed, any metal sheets, bars, or wooden planks will be retrieved, but nails will be lost.
Effectively Barricading Your Safe House
When choosing a building for your safe house, there are a few things to consider:
- Choose a building with multiple exits: This will give you more opportunities to escape if your safe house becomes compromised.
- Choose a building with few windows: This will spread out the zombies and make them easier to defend.
- Choose a building with a door that faces a safe side: This will give you an extra layer of protection against zombie attacks.
Once you have chosen your building, there are a few more steps you can take to effectively barricade it:
- Use walls to barricade door frames and windows: This will make it much harder for zombies to break through.
- Use furniture as barricades: Furniture can be used to barricade doors and windows, providing some measure of protection while still allowing you to be aware of your surroundings.
- Barricade any doors or windows that are likely to be attack points: This will provide extra protection against zombie attacks.
By following these steps, you can effectively barric
ade your safe house in Project Zomboid and protect yourself from zombies. Remember, it is important to choose a building with multiple exits and few windows for your safe house, and to use the right materials for your barricades. By barricading your safe house effectively, you can increase your chances of survival during a zombie outbreak.
Tips for Barricading
Here are a few additional tips to keep in mind when barricading your safe house:
- Master beds are a good source of planks, nails, and experience points.
- If you are using a building with second-story windows, consider using sheet ropes as an entrance that zombies cannot use. This will allow you to fully secure the ground floor doors and windows.
- Always have a crowbar on hand in case you need to remove a barricade.
- Keep an eye on your resources, such as planks and nails, and restock as needed. For tips on finding construction materials, check our hardware store locations guide.
By following these tips and the steps outlined in this tutorial, you can effectively barricade your safe house in Project Zomboid and protect yourself from the dangers of a zombie outbreak.