Forging the Apocalypse: Build 42's Metalworking Overhaul in Project Zomboid

Project Zomboid Build 42 Metalworking Progression Tool
Blacksmithing Progression Path
Stage 1: Gathering Raw Materials
Before you can start metalworking, you need to gather these essential materials:
- Stones & Rocks: Forage for small stones, quarry stone blocks from large rocks
- Clay: Dig in suitable terrain (often near rivers)
- Sand: Find in bags at construction sites or dig gravel
- Water: Needed for clay cement and other processes
- Wood: Logs for charcoal, planks for construction
- Iron Ore/Scrap Metal: Mine iron ore veins or dismantle metal objects
Imagine you’re deep in the zombie apocalypse, and instead of scouring warehouses for that last box of nails or a decent axe, you’re smelting iron and forging your own weapons. Sounds wild, right? Well, that’s exactly what Project Zomboid Build 42 is bringing to the table. In this gamer-to-gamer deep dive, we’ll break down how Build 42 completely reinvents metalworking (aka blacksmithing) in Zomboid, how it compares to the old system, and how you can become the medieval blacksmith of your zombie-infested dreams. Grab your sledgehammer and let’s get smithing!
What’s New in Build 42 Metalworking?
Build 42 is a game-changer for late-game survivors. The devs at The Indie Stone set out to enrich the endgame by letting players craft and build more instead of relying on looted supplies. The centerpiece of this overhaul is a new metalworking (blacksmithing) system that lets you start from primitive tools and progress all the way to forging steel. This isn’t just a minor tweak – it’s “arguably the most ambitious and feature-rich update in Project Zomboid’s history”.
Before we jump in, let’s clear up terminology: in Build 41, “Metalworking” referred to using a propane torch to weld metal sheets and bars (think barricading windows or fixing car parts). In Build 42, that old skill has been renamed to Welding, and “Metalworking” now refers to blacksmithing – the art of forging metal from raw materials. So don’t worry, you’ll still use propane torches for metal barricades under the Welding skill, but Metalworking in B42 is all about smithing with forges and anvils. Essentially, Welding = old metalworking, and Metalworking = new blacksmithing in Build 42.
Why the Overhaul?
The devs had a few big goals with Build 42’s crafting overhaul:
- Deeper Late-Game: Give long-term survivors more to strive for. Instead of feeling “done” once your base is secure, you’ll have tons of new projects like forging weapons, crafting machines, and building up a self-sufficient community. Think of it like entering a new era of gameplay where you can progress from scavenger to settler to blacksmith.
- Infinite World, Finite Loot: Eventually loot runs dry on long-running servers. B42’s crafting (metalworking included) is designed so players can replace items that used to require looting. In theory, a dedicated group could sustain themselves indefinitely – farming, hunting, and now forging – without magic loot respawns.
- Team Play & Roles: The new systems encourage specialization. It’s much harder for one character to master everything, but also not necessary – a community can have a farmer, a carpenter, a blacksmith, etc.. In multiplayer (and in the future when NPCs arrive in B43), this means richer cooperation: “I’ll trade you a sword for some gasoline” might become a thing.
- Modding Potential: By completely overhauling crafting, the devs are giving modders a robust framework to create even more cool stuff. If vanilla lets us forge swords, imagine what mods will add – fantasy weapons? Advanced machinery? It’s an exciting foundation for the community.
In short, Build 42’s metalworking isn’t just a new skill – it’s part of a broader vision to make Project Zomboid a deeper survival simulation. Now let’s dig into how it actually works, because it’s way more complex (and rewarding) than the old weld-some-scrap-metal days.
Metalworking vs. Welding (Build 41 vs Build 42)
First, a quick comparison of how things were in Build 41 versus what’s coming (or already in testing) with Build 42:
- Metalworking in Build 41: This skill (now called Welding in B42) was relatively simple. You’d find a propane torch and welding mask, scavenge some metal sheets, pipes, bars, and scrap, and then use the right-click menu to craft metal structures. Examples: metal walls, fences, gates, storage lockers, and metal roof sheets. It also let you repair car parts or disassemble objects like wrecked cars or metal furniture for materials. While handy, Build 41 metalworking was limited – you couldn’t create new raw metal or advanced items. You were basically repurposing scavenged material. If you ran out of propane or scrap, that was it. Also, its utility was a bit niche; many players stuck to carpentry for base-building since metal constructions were costly (propane isn’t infinite) and required finding magazines to unlock recipes.
- Metalworking in Build 42: Now refers to blacksmithing/forging. This is a brand new skill introduced in B42. It lets you create metal items from scratch – starting from iron ore or scrap metal and ending up with things like weapons, tools, and armor that never existed in B41’s crafting. Instead of a welding torch and mask, you’ll be working with forges, furnaces, anvils, hammers, and tongs. It’s a far more involved, multi-step process (as we’ll cover in a moment). Also worth noting: the old Metalworking magazines you’d collect in Build 41 are largely replaced by new blacksmithing recipe magazines in B42 (for learning specific crafts), since welding recipes are simpler and often unlocked by default or tied to the welding skill now.
Think of it this way: Build 41’s metalworking (now Welding) was about using existing metal junk to make basic structures. Build 42’s metalworking is about creating new metal goods using raw resources and fire – basically medieval smithing injected into the zombie apocalypse. Both skills exist side by side in Build 42. In fact, they complement each other: you might use Welding to dismantle car wrecks for scrap metal and iron bars, then use Metalworking (smithing) to melt that scrap down and forge a sword or nails out of it. Pretty cool synergy!
One more small comparison: in Build 41, leveling metalworking was straightforward (just weld more stuff, dismantle more things). In Build 42, leveling metalworking/blacksmithing is more complex and – as many testers found – quite grindy (we’ll discuss strategies to tackle that grind later on). But the payoff is huge: high skill lets you craft gear that can give you a serious edge in surviving the Knox Event.
Alright, now that we know what’s what, let’s walk through how you actually become a blacksmith in Project Zomboid Build 42. Sharpen those chisels! 🔨
From Scavenger to Smith: How to Start Blacksmithing in Build 42
So, you want to forge metal like a pro? In Build 42, it’s a journey – literally from Stone Age tech to Iron Age and beyond. Don’t worry, we’ll break it down step by step. Whether you’re starting in the woods with nothing but a stone hammer or you’ve already got a stockpile of scrap, here’s how you go from zero to steel-smelting hero.
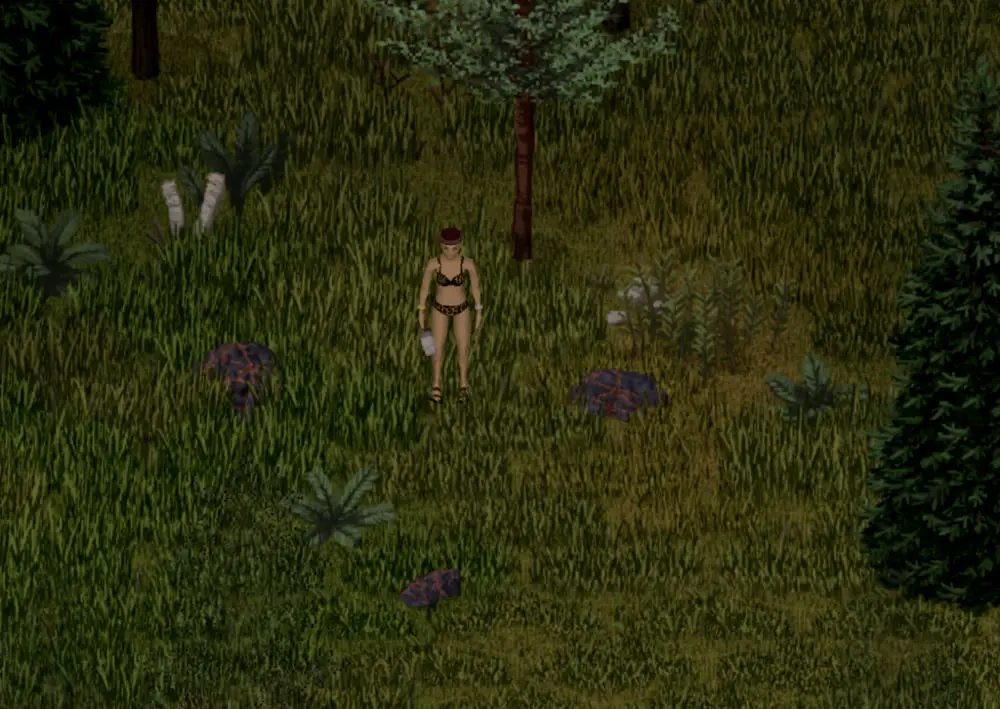
A lone survivor in primitive garb stands amid iron ore deposits in the forest. Even in an “all-forest” start with no towns, Build 42 lets you eventually forge metal tools from these raw resources. The reddish rocks on the ground are iron ore outcroppings, which can be mined for ore. Time to channel your inner caveman!
Step 1: Gather Raw Materials (Stone, Clay, Ore, Wood)
Every blacksmith starts somewhere – in Build 42, that means digging in the dirt and rocks. You’ll need to gather some key resources before you can craft any metal:
- Stones & Rocks: Lots of them. Small stones can be found by foraging, but you’ll also need Stone Blocks (larger stones) for building forges and furnaces. You can quarry stone blocks by breaking big rocks or dismantling certain structures. Start collecting a heap of stones early.
- Clay: Essential for making clay cement and molds. Clay is gathered from digging in suitable terrain (often near rivers or certain soil types). You’ll need clay to build your first furnace and to craft molds for casting metal parts.
- Sand: Yes, sand. Combine it with clay and water to make Clay Cement (which is more like a crude mortar). You might get sand from bags at construction sites or possibly from digging gravel.
- Water: Clay cement requires water, and you’ll also need water for some other processes (like quenching metal or processing leather later). A few buckets of water should be set aside for crafting use.
- Wood: Logs, planks, tree branches – wood is fuel and construction material. Notably, you’ll need logs to burn into charcoal, and planks for building certain workstations (and making handles, etc.). Chop some trees and stockpile logs and planks.
- Iron Ore or Scrap Metal: If you’re in the wilderness, you may find iron ore veins on the ground (like the reddish rocks in the image above). Mining those (with a pickaxe or sledgehammer) yields usable iron ore. If you’re near civilization instead, an alternative is to gather scrap metal, metal bars, pipes, and other junk from wrecked cars or metal furniture. These can be smelted down as well. Essentially, you need some form of iron/steel feedstock to start metalworking – either naturally occurring ore or recycled scrap.
In a nutshell, early on you’re foraging and mining. B42’s design even allows for a scenario where you start on an all-forest map with no loot, and still eventually succeed in metalworking by just using natural resources. It’s intended to be “gamey” but possible – they even added iron ore tiles in Kentucky’s wilds to facilitate this (not realistic, but necessary). So, no excuses – get out there and gather stuff!
Step 2: Build a Primitive Furnace (Bloomery)
Once you have a pile of rocks, clay, and some iron ore, your first major goal is a furnace. The most basic version is often called a bloomery in real life – a simple clay and stone furnace for smelting iron. In-game, we’ll just call it the Primitive Furnace.
This simple furnace is basically a clay pit that can get hot enough to smelt iron ore into an iron “bloom” (a lump of impure iron). You don’t need any skill to build the primitive furnace – it has no skill requirement, meaning anyone can slap one together as long as you have the materials:
- Primitive Furnace recipe: 6 Clay + 4 Stone + 1 Bucket of Clay Cement for the structure, plus some extra clay, sand, and stone as “fuel”/processing (the guide shows an additional 8 Clay, 1 Sack of Sand, 4 Stone needed, probably to actually use it). The good news: no tools or special skills needed. Just raw materials and some manual labor.
Once built, the primitive furnace allows you to smelt iron ore into a usable form. How exactly? You’ll use it to heat the ore with charcoal (more on charcoal in a second) and produce an iron bloom, which is a chunk of low-quality iron.
But wait – to actually get that iron out, you’ll need to heat the furnace. And that requires fuel.
Interlude: Charcoal – Your New Best Friend
In Build 42, charcoal is the fuel that makes the whole metalworking system go. Every forge and furnace runs on charcoal (you’re not exactly piping gasoline into a medieval furnace, after all). How do you get charcoal? By burning wood in a controlled way:
- Charcoal Pit or Barrel: Early on, you can dig a pit and cover it to smolder logs into charcoal, or use a metal drum to the same effect. The game offers both a Charcoal Burning Pile (essentially a covered log stack) and a Charcoal Kiln/Barrel option. They serve the same purpose: toss in logs, burn slowly, get charcoal. This step is crucial – you’re going to need a lot of charcoal, as “every recipe in the forge uses it”. So convert those logs into charcoal early and often. One or two full batches should get you started.
Now, with charcoal ready, you can fire up that primitive furnace. Smelt your iron ore and you’ll end up with an Iron Bloom – basically a lump of sponge iron. Time to work that bloom into something useful.
Step 3: Primitive Forge & Crude Tools – Beating Iron into Shape
You’ve got an iron bloom fresh out of the furnace – congrats! It’s not yet a usable tool or weapon; it’s more like a hunk of metal full of slag. The next step is to refine that bloom into workable iron and start making your first basic tools.
This is where you need a forge. Now, there are multiple tiers of forges in B42 (we’ll get to the advanced ones), but initially you might start with a Primitive Forge (sometimes also called a “stone age” forge). This is basically a simple pit or makeshift forge where you can heat up metal for working.
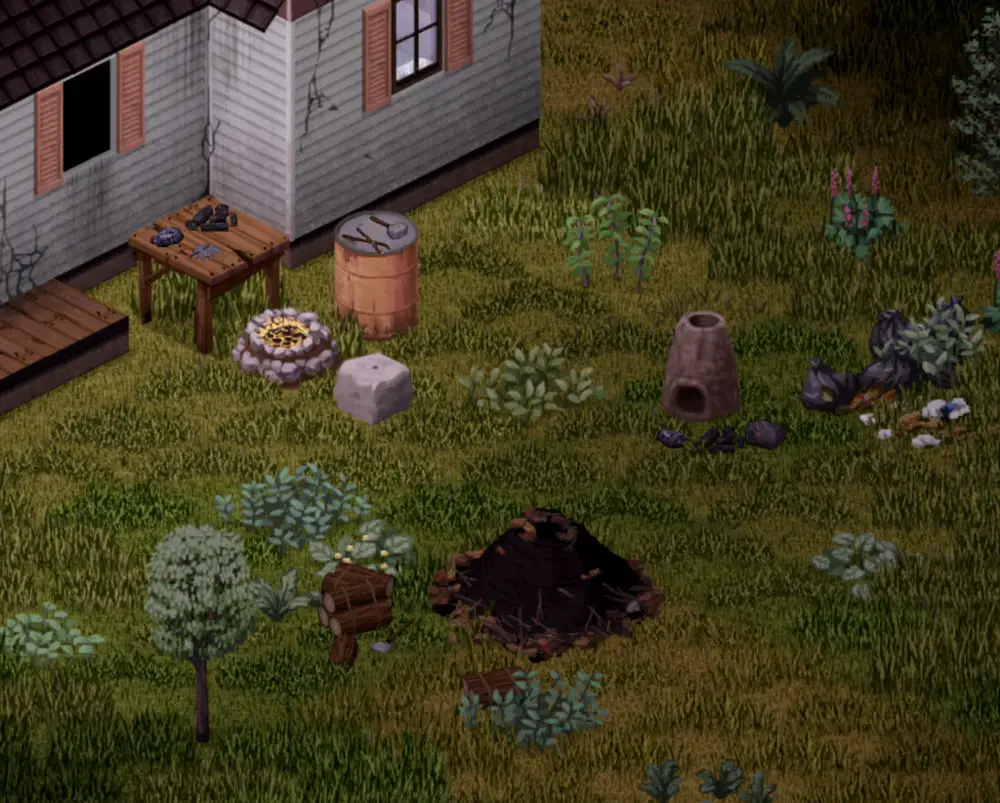
An early survivalist smithing setup: In front of the house is a primitive stone furnace (right) for smelting, a charcoal pit (center) covered with soil and ash, and a makeshift work area with a tree stump anvil and some basic tools on a table (left). The barrel and bucket hold water for quenching, and a campfire ring provides heat for a crude forge. It’s not pretty, but this setup lets you turn iron blooms into simple iron tools!
Primitive Forge requirements: The game’s guide references a “Primitive Forge” with needed components like a Stone Anvil, clay, stones, etc.. It looks like the primitive forge is extremely low-tech: essentially a firepit and a stone acting as an anvil. The listed skill requirement was Masonry 2 – meaning you might need a bit of experience in the Masonry skill to build it (perhaps from constructing stone piles or similar beforehand). If you don’t have Masonry 2, don’t worry; there’s also a “Simple Forge” we’ll discuss next that only needs Masonry 1 but a bit more setup.
Using your primitive forge, you can now heat up that iron bloom. But to work the hot iron, you need a few basic tools:
- Stone Anvil: You likely start with a simple anvil made from a big rock (yes, that counts!). The “Stone Anvil” item is used in the primitive forge recipe. It won’t last forever, but it’s enough to get started.
- Hammer: At first, a Stone Hammer will do. (If you’ve been in PZ long, you’ve probably made a stone hammer for basic carpentry – same idea.)
- Tongs: How do you hold hot metal? Wooden tongs! In the beginning, you might craft crude wooden tongs. They won’t last long (“won’t survive the process” as the devs say), but you can use them to handle hot iron until they burn up. Alternatively, if you found Metal Tongs looting, congrats – that saves you a step.
- Crude Chisel: Helpful for cutting and chipping at metal. You can fashion a primitive chisel, or use a mason’s chisel if you looted one. The primitive forge recipe lists “1 Crude / Mason’s Chisel” as acceptable.
With a heated iron bloom on your stone anvil and a stone hammer in hand, you can beat the bloom into workable iron. This process yields some iron ingots or chunks that can be used to craft tools. Specifically, your first targets to craft will be:
- Improvised Iron Tools: The devs mention you can produce “simple iron implements such as tongs, smithing hammers, nails, and basic masonry tools” at this stage. So, you’ll want to make a proper iron hammer (better than your stone one), some iron tongs (so they don’t burn up like the wooden ones), maybe a masonry trowel and chisel (which you’ll need for building better forges and furnaces soon), and nails (yes, you can forge nails now!). The ability to make nails cannot be overstated – no more dependence on looting hardware stores for your construction needs if you get this going.
- Charcoal tools: also consider making a shovel or hoe if you need to manage your charcoal pit or gather more clay more efficiently. These might come slightly later, but iron tools will help speed up all resource gathering.
At this point, you’ve essentially entered the Iron Age. You started with rocks and now you have actual iron tools. High five! 🙌 But we’re not stopping here – with those better tools, you can construct more advanced smithing structures. Next up: moving from wrought iron to steel production.
Step 4: Upgrade to a Simple Furnace & Anvil Casting
Your primitive furnace did the job for raw iron, but to get higher quality metal (and to be efficient), you’ll want to build a better furnace. Build 42 offers two tiers of furnace: Simple Furnace and Advanced Furnace. Let’s start with the Simple Furnace – which is akin to a real blast furnace or at least a more heat-resistant smelter for melting and casting metal.
Simple Furnace requirements: According to data, a Simple Furnace needs Masonry 1 skill to build (so hopefully by now you’ve got a little Masonry XP from building that primitive forge or crafting stone blocks). The ingredients include 1 Mason’s Trowel, 40 Stone Blocks, 1 Bucket of Clay Cement, 10L water, 2 Clay, 1 Sack of Sand, 40 Stones, 1 Hammer, 1 Chisel. It’s basically a bigger, sturdier version of the primitive furnace – lots of stone and clay. You’ll also use those masonry tools you made (trowel and chisel) to construct it.
The Simple Furnace allows you to melt down larger quantities of metal and even do casting. In fact, one of the first things you must do with it is cast a proper Anvil.
Up until now you’ve been banging metal on a rock. It works, but if you want to craft more advanced items, you need a real Blacksmith’s Anvil (a big hunk of iron/steel that you hammer on). Since this is the apocalypse, you can’t exactly buy one – you have to make it yourself! This is one of the coolest multi-step processes in Build 42 metalworking, so let’s outline it clearly:
How to Cast a Blacksmith’s Anvil:
Craft a Wooden Anvil Mold: You’ll use carpentry to create a mold frame for the anvil. It requires Carpentry level 2. Basically, nail together some planks into the shape of an anvil mold. The recipe is: 4 Planks + 1 Nail + (Hammer + Saw) = Wooden Blacksmith Anvil Mold. (The game shows this in a crafting menu under Carpentry.) This wooden mold is just the frame.
Press the Clay Anvil Mold: Now you need a Hand-Operated Press to press clay into that wooden mold. Yes, an old-school manual press (think of an archaic drill press or screw press). Build the Hand-Operated Press workstation – it likely requires some wood and simple parts (from the guide screenshot, it might not have a high skill requirement). Once you have the press, use it with your wooden mold and a bunch of clay (8 Clay) to create an Unfired Clay Anvil Mold. This is essentially the negative shape of an anvil in clay.
Fire the Clay Mold in a Kiln: Clay isn’t strong enough until it’s fired into ceramic. If you haven’t already, you’ll need to build an Advanced Kiln (a kiln is like a small furnace for pottery). The Advanced Kiln’s recipe is relatively simple: 1 Mason’s Trowel and 20 Clay (likely plus some fuel). Once built, put that unfired clay anvil mold in and fire it up! You’ll get a Ceramic Anvil Mold – now it’s hardened and ready for molten metal.
Cast the Anvil in the Furnace: Using your shiny new Simple Furnace (or Advanced Furnace, if you skipped ahead), you can now perform the actual casting. This will require a lot of metal – specifically 16 units of Iron/Steel (Bar halves) and some charcoal for heat. Place the ceramic mold and the raw metal into the furnace, heat it up, and use tongs to pour. The output: Blacksmith’s Anvil! 🎉 You’ve forged one of the most important tools in any smithy. (Game-wise, the recipe is shown as: Tongs + Ceramic Anvil Mold + 16× Steel/Iron Bar Half + 10× Charcoal = 1 Blacksmith Anvil. The total resources needed across all steps included 4 planks, 1 nail, 8 clay, 1 log, 10 charcoal, 16 metal bars.)
This anvil casting process is a huge milestone. It’s a bit of work, but now you have a legitimate anvil. This unlocks the ability to craft more sophisticated items that require heavy hammering.
Note: If you were lucky and found an anvil out in the world (maybe in a warehouse?), that could skip this. However, in zombie Kentucky, actual blacksmith anvils would be super rare loot, if present at all. So assume you’ll be casting your own.
Now with a Blacksmith’s Anvil and a Simple Furnace, you can also start melting down scrap more efficiently and even recasting metal. The game allows you to recycle crafted metal – for example, if you forged a bunch of spoons or knife blades to grind XP, you can toss them back in the furnace and reclaim the metal as bars. (Pro tip: A kitchen knife blade is an item that smelts down to exactly the same amount of metal it took to craft, making the metal cost of leveling zero if you recycle. We’ll talk more about leveling strategies later.)
Step 5: Build a Forge (Simple or Advanced) for Smithing
Up until now, you might still be using a crude forge or campfire to heat metal for hammering. With an anvil on hand and a better furnace, it’s time to construct a proper Forge. In PZ B42, there are two tiers of forges analogous to the furnaces:
- Simple Forge: A basic forge that’s good for working iron. It requires a Blacksmith Anvil (the one you just made), some stone/cement, and no bellows. The guide indicates it needs Masonry 1 and Carpentry 2 skills. The ingredients list is long (lots of stones, clay, a log, planks, nails, wire, etc.) – but by this point you likely have those or can get them. Essentially, you’re building a stone or brick enclosure, mounting your anvil, and maybe adding a small chimney or vent.
- Advanced Forge: The higher-tier forge, needed for working steel and advanced items. It requires more materials and a Large Bellows for extra airflow. Its skill requirement is Masonry 1, Carpentry 2, Carving 2, indicating you also need some Carving skill (likely woodworking skill related to fine work – possibly to make the bellows and other components). The ingredients include everything the simple forge has plus the bellows and some animal byproducts (an animal’s brain and tanned leather hide are listed!).
At this stage, let’s discuss the Bellows and why suddenly a pig’s brain is in your forge recipe. 😅 To get that Advanced Forge (and also the Advanced Furnace), you need a Large Bellows – basically a big leather air pump to intensify the fire. And to make a bellows, you need tanned leather. That introduces a whole side-crafting path: hunting and leatherworking.
Remember those livestock and wild animals Build 42 adds (cows, pigs, deer, etc.)? Time to make use of them. Here’s a quick summary of what you need to do to craft a Large Bellows:
- Build a Butcher’s Hook to hang animal corpses.
- Build a Softening Beam (a wooden beam to scrape and soften hides).
- Build a Tanning Barrel (to soak hides in tanning solution – which in primitive terms is a mix involving brains, believe it or not).
- Build a Leather Drying Rack for medium hides.
- Go hunting: kill a sheep, pig, deer, etc. Hang the carcass on the butcher’s hook.
- Skin the animal to get its hide, and collect the brain (animal brains contain tannins needed for traditional leather tanning – hence the requirement of 1 Animal Brain in the forge recipe).
- Use the Softening Beam and a Fleshing Tool to clean the hide (remove flesh/fur).
- Mix a Bowl of Brain Tan (brains + water in a bowl).
- Soak the hide in the Tanning Barrel with the brain mixture (tanning the leather).
- Dry the tanned leather on the rack.
After all that, you get a Medium Leather (Tanned, Crude) piece. This is exactly what you need for a Large Bellows. To craft the bellows, combine: 2 Planks + 2 Nails + 2 Medium Handles (wooden) + 1 Tanned Leather + tools (hammer & saw). Voila: Large Bellows!
That was a lot, but essentially B42 makes you go through realistic steps to obtain leather for advanced crafting. It’s a great example of how different survival activities interlock now – you can’t be a master blacksmith without also doing a bit of hunting and leatherworking. In multiplayer, you might assign someone the role of tanner/hunter while the smith focuses on metal, emphasizing co-op. If you’re solo, you’ve got a busy but immersive life!
Now, back to the forge construction: if you have the Large Bellows, you can build the Advanced Forge. If not, you can opt for the Simple Forge for now.
Which one to build? The community guide suggests: Build the Advanced Furnace first if you have resources (since currently simple vs advanced furnace have no recipe differences, might as well go advanced for future-proofing). But for forges, they advise going for Advanced Forge eventually, because some high-tier recipes (especially steel weaponry and armor) are only available on the advanced forge. If you’re short on leather or want to save resources, you can start with a Simple Forge, but you’ll want to upgrade as soon as possible to unlock everything.
Let’s assume you managed to get the Advanced Forge built (we believe in you!). Now you have:
- A Ceramic Smelter (Advanced Furnace) that can reach steel-melting temperatures.
- A Robust Forge (Advanced Forge) with bellows that can heat metal hot enough to work steel.
- A Blacksmith’s Anvil firmly in place.
- Plenty of Charcoal to fuel both.
- An array of tools (hammers, tongs, chisels, punches, etc.) at your disposal.
- Possibly a Grindstone too – eagle-eyed readers might have noticed a grindstone in one of the images (that rotating stone wheel in [21] and [22]). Yes, Build 42 also lets you build a grindstone for sharpening blades. It was mentioned in the dev blog as part of the progression (you get one by the intermediate stage). This will be useful for finishing weapons.

Endgame smithing setup: On the left, a tall stone blast furnace (advanced furnace) for smelting steel. In the center, the survivor stands by a grindstone wheel and a crate likely functioning as a metalworking bench with tools. On the right, a sturdy brick forge with an anvil in front and bellows attached (behind the anvil). This advanced forge allows working high-carbon steel. Buckets of water and various metal stock lie around. With this infrastructure, the player can craft high-quality weapons and tools from raw materials.
Step 6: Steel Production and the Metalworking Bench
At this point, you’re ready for the final frontier: Steel. Iron is great, but steel (iron with higher carbon content, properly hardened) is even better – it’s tougher and holds an edge well (perfect for weapons and quality tools).
To make steel in Build 42, you’ll use the Advanced Furnace along with a special ingredient: coke. Coke is a refined form of charcoal with even higher carbon content and burns hotter. The devs mentioned a “coke kiln” – which was likely a typo for “coke oven” – that you use to turn charcoal into coke. In the crafting list, perhaps the Advanced Kiln doubles as this if fed with charcoal, or there’s a dedicated Coke Oven structure. Either way, the process will be:
- Use a kiln/oven to bake charcoal into coke (a hotter-burning fuel).
- Load the Advanced Furnace with iron and coke, crank those bellows, and you’ll get steel ingots.
Once you can produce steel, you’ve essentially entered the late-game crafting tier. Steel ingots will allow you to craft the best weapons and tools. Also, with steel you can finally craft that mention from dev blog: a proper Anvil cast from steel (though we already did an iron one, you might even cast a better anvil from steel for durability) and the ultimate workstation: the Metalworking Bench.
The Metalworking Bench is described as a station for “making high quality, precision tools and items” once you have advanced forge capabilities. Imagine it like a workbench fitted with vises, cutters, maybe a drill press or other tooling. In-game, building the metalworking bench likely requires some steel, advanced carpentry and metalworking, and possibly those small tools like files and pliers. With it, you’d be able to craft the finest gear – perhaps firearms parts or fine mechanical components (though Build 42 may not have gun crafting yet, it sets the stage for it).
In summary, the progression goes: start with charcoal pit and primitive furnace → get iron bloom → make crude forge + stone anvil → craft basic iron tools → build simple furnace → cast anvil → build simple/advanced forge → produce steel with advanced furnace → build metalworking bench → craft advanced items.
It’s a long road, but totally achievable if you survive long enough. One conceit mentioned by the devs was that they wanted it theoretically possible to “start on a map that’s just forest and still arrive at steel production”, and as we see, they provided all the means to do so (albeit with some gamey allowances like iron ore being findable in Kentucky wilderness). Essentially, Build 42 lets a determined survivor progress from the Stone Age to the Industrial Age under zombie apocalypse conditions. How freaking cool is that?
Now that we’ve covered how you do all this, you’re probably wondering: what’s the point of all this effort? What glorious goodies can you make with these new metalworking skills? Let’s talk about the new weapons, armor, and items awaiting those willing to put in the work.
New Gear Galore: Weapons, Armor, and Gadgets You Can Forge
The payoff for mastering metalworking in Build 42 is the ability to craft an impressive array of gear that simply wasn’t available (or renewable) in Build 41. The Indie Stone devs have said, “Most items that one could reasonably expect to be blacksmithed can be blacksmithed”, and the results are usually more rugged, crafted versions of familiar items. So what can a zombie-apocalypse blacksmith make?
- Melee Weapons: Sharp and pointy things are a blacksmith’s bread-and-butter, and B42 doesn’t disappoint. You can forge sword blades, knife blades, spearheads, axes, maces, and more. For example, you could craft a one-handed sword or a spiked mace from scratch. The game shows off some of these (see images of a basic sword, a hunting knife, a mace, and spears) as craftable “homemade” weapons. They might be a bit crude in appearance at low skill (think rough metal finishes and improvised grips), but at higher skill tiers you can make more refined versions. In fact, weapons have distinct tiers that differ in appearance and performance – a novice’s makeshift sword might be bent and dull, while a master’s forged sword is sleek and deadly.
Example: You could start by forging a simple metal spearhead and attaching it to a wooden pole to upgrade from a regular wooden spear. At higher levels, you might forge a full-on longsword. The difference? The longsword will require better materials (steel instead of iron maybe) and higher skill, but will deal more damage and be more durable. The devs even teased “pointy metal weapon crafting” as a highlight of Build 42 – time to live out your knight fantasies in Kentucky.
- Armor and Protective Gear: For the first time, you’ll be able to smith metal armor pieces. Think helmets, breastplates, greaves, gauntlets – medieval-style armor to complement all those swords. In the code, they specifically mention things like metal shin guards and full metal armor sets becoming craftable at higher levels. This is a big deal because one trade-off in PZ has always been between protection and weight/mobility. Build 42 also introduced a clothing insulation/comfort system (with some players concerned heavy armor could be punishing in heat and weight), but if you’re willing to clank around like a knight, you can get serious bite and scratch protection by forging armor. A full suit of plate armor might unlock around Metalworking level 6–8 for various parts. Early on, you might start with simpler pieces like a metal chestplate or helmet (maybe around level 4–5).
Note: There’s a balance aspect – wearing heavy armor will tire you out faster and make you noisier, but the protection can be life-saving when surrounded by zombies. Also, you might mix forged armor with other gear (for example, a metal chestplate over a leather jacket, or chainmail plus padding). We’ll have to experiment to see the best combos, but the fact that you can create armor at all is a huge step up from relying on police gear or sports pads.
Tools and Hardware: Metalworking isn’t just about combat; you can make practical tools too. Some examples:
Hammers and Axes: Forge heads for tools like ball peen hammers, sledgehammer heads, axe heads, shovel heads, etc. At level 4, the game indicates you unlock hammer heads and hatchet heads. That means you can maintain your own supply of these critical tools. Broke your axe chopping wood? Just forge a new axe head and strap it to a wooden handle. No more praying for an axe drop!
Saw Blades and Knives: You can craft knives (for combat or cooking) and likely metal saw blades. There’s mention of a metalworking saw or hacksaw you could possibly craft if you didn’t find one.
Nails, Screws, Wire, and Small Parts: Yup, you can make nails and other fasteners. This feeds back into carpentry – once you can make nails, your construction potential is infinite (no more nail shortages when building your mega-base). The new system really shines in letting a late-game community be self-sufficient; you could even start a trading economy, supplying other survivors with nails and tools in exchange for food or labor.
Mechanical Components: While not explicitly detailed, a metalworking bench suggests you might make things like gears, springs, plates, and other components that could be used in advanced crafting (perhaps in generators, traps, or future machinery). Build 42 also expands other crafts (like there’s mention of brewing, distilling, etc.), so metalworking might tie in by providing copper tubing or iron stills for those. (Speculation, but plausible given the integrated nature of the update.)
Containers and Structures: You might craft metal barrels, lockboxes, or reinforcements for doors. The “machines” part of B42’s crafting refers to things like windmills, water pumps, or other contraptions – some of those will surely need metal parts that you can now produce. For instance, a hand-operated press we built earlier was itself likely built by forging some metal components (like a screw or press plate).
Weapons Upgrades & Customization: The PCGamesN article speculated about spiked rings or weighted bats. In vanilla B41 you could nail a bat to make a spiked bat. In B42, imagine forging a spike attachment or a weighted chunk to weld onto a bat for extra impact. So even for existing weapons, a blacksmith could enhance them. You might craft a bayonet for a rifle (though functional bayonets might be a mod or later feature), or metal arrowheads for improvised arrows if bows become a thing. If you can craft a spearhead, presumably you can also craft arrowheads for future bow/crossbow gameplay.
Fancy Stuff: Let’s not forget fun items – metal furniture or decorative gates for your base, a custom grill, or even a still to distill whiskey (brewing and distilling are part of Build 42’s crafting additions). A blacksmith character might end up forging almost anything metal you see in the world given enough time.
In short, Build 42’s metalworking lets you turn scrap and ore into virtually any metal item you need. The only exceptions might be electronics or firearms (and who knows, maybe down the line we’ll get bullet reloading or crafting too – there’s already hints of it, e.g. the handloading of ammo in Build 41 and new loot like reloading materials). But if it’s medieval or industrial tech level, you can probably make it. The devs essentially want players to be able to survive long-term without the world’s supplies magically replenishing, and giving us the ability to forge weapons and tools is a major part of that.
One neat aspect is that crafted versions of items might differ from the pre-apocalypse versions. For example, a blacksmith’s sword might not be as perfectly balanced as a military sabre – but it could be more durable (“rugged”) even if heavier. Similarly, a crafted axe might do more damage but weigh more than the store-bought fire axe. This adds variety and makes player-crafted gear unique.
Crafting Interface & Quality of Life Improvements
With all these new recipes and processes, you might be thinking the crafting UI could become overwhelming. The Indie Stone anticipated this and have updated the crafting interface and build menu in Build 42 to be more user-friendly:
- New Crafting UI: There’s now a dedicated UI for crafting on surfaces and using workstations. No more digging through endless right-click menus for recipes. For example, when you’re at a forge or anvil, you might open the crafting panel and see categories or a list of blacksmithing recipes, filterable by tool/station. The devs showed an image of the “crafting on a flat surface” UI that they’d been refining. It aims to present info more clearly, with crisp layout and consistency across different crafting types.
- Build/Construction UI: Build 42 introduces a new Build UI for placing structures (like walls, furnaces, etc.), which reduces reliance on the right-click menu. This menu likely has tabs for Carpentry, Masonry, Metalworking, etc. So to build a furnace or forge, you’d open the build panel, choose the object (similar to how you’d choose to place a rain barrel or a campfire in B41, but now integrated). It should show required materials and tools at a glance. This is far more convenient than the old system where you had to remember recipe ingredients or have the items in main inventory to even see the option.
- Workstation Interactions: Many new crafting actions require using a specific workstation (forge, press, kiln…). The UI will likely only show certain recipes when you’re near or using that station, to keep things sensible. Also, expect feedback like “Requires: Forge (nearby)” or “Needs Anvil” on recipes. The game is moving toward context-sensitive crafting which is more intuitive.
- Less Screen Clutter: They want to integrate the moveables (pickup/place furniture) system into the build interface eventually, meaning fewer separate windows or menus. Possibly not all in the initial unstable, but a goal during the polishing phase.
- Search and Categories: The crafting menu has search function and categories, which is a godsend when you have dozens of new recipes. (There’s a known bug currently that the search bar ignores selected categories, but that’s on their polish list.)
- Icons and Tooltips: With so many new items, devs are working on adding lots of new item icons and detailed tooltips. So you’ll be able to tell the difference between an Iron Bar and an Iron Rod by icon, or see in a tooltip that a “Steel Sword (Level 5)” does X damage versus a “Steel Sword (Level 9)” which does more.
- Multi-Step Guidance: The crafting UI might not explicitly walk you through multi-step processes (like the anvil casting), but devs hinted they wanted more direct information on constituent parts of building recipes. Even if it doesn’t ship with a full guide, the game’s crafting journal or recipes might reference needed steps (e.g., the anvil recipe might mention needing a mold).
- Fluid System: Separate from metalworking but worth noting: B42 overhauled how liquids work (fluids can be poured between any containers, mixed, etc., with a new UI for that). This affects things like preparing the brain tanning solution (mixing water and brain in a bowl) or handling gasoline, but also if we ever deal with molten metal or quenching oil. Right now, molten metal isn’t an item you carry (no bucket of molten iron in inventory, it’s abstracted in the furnace interface), but the foundations for better fluid handling are in place – and that improves the overall crafting experience consistency.
Overall, these UI changes mean while B42’s crafting (especially metalworking) is deep, it’s not going to be a nightmare to actually perform in-game. Testers have noted the game “plays more smoothly” now despite all the added complexity, thanks to these improvements. Of course, it’s still in unstable branch as of writing, so expect a few quirks and continue giving feedback – the devs explicitly are polishing the “Crafting and Building UIs” during the unstable phase.
Leveling Up Metalworking: XP Gains, Books, and Grind Strategies
We’d be lying if we said becoming a master smith in Build 42 was easy. By many accounts, it’s a serious grind to level the Metalworking skill. In fact, one community guide author joked (or half-joked) that “leveling up Metalworking skill, just like any other in Project Zomboid, is a pure nightmare and a sign of poor design choice… because fun in this game is not allowed.”. Ouch! Let’s talk about the reality of skilling up and how to make it manageable (and maybe even fun).
Skill Books and Magazines: First, as with other skills, there are skill books for Metalworking (the experience multiplier books for levels 1–10). However, in early testing the availability of these books was limited – perhaps intentionally to force players to engage with the system. The guide quips that books are “mostly not available, because fun is not allowed”, but that might be an exaggeration. Regardless, if you do find the Metalworking skill books, read them at the appropriate levels to boost your XP gains by 3x or 5x. It will save you a ton of grind.
More importantly, there are recipe magazines for various blacksmithing recipes. For example, to craft certain advanced weapons or tools, you might need “The Smithy Mag Vol.1” or similar. If you start with the Blacksmith occupation/trait, you likely begin with many of these recipes unlocked (and perhaps a starting Metalworking skill boost). This can make a huge difference – one player noted that taking the Blacksmith occupation means you won’t need all the magazines and you get an XP boost, making the process smoother. So if you plan on diving into metalworking, consider making a character with that specialty from the get-go.
XP Gain Basics: You gain Metalworking XP every time you successfully craft something at the forge or anvil that uses the Metalworking skill. Higher tier items likely give more XP. Early on, though, you can only make simple things which might give small XP drops. So the name of the game is volume – you will craft a lot of items to level up.
One guide worked out the most resource-efficient way to grind XP: crafting items that use very little material yet give decent XP, and then smelting them back down to reclaim materials. Their conclusion: the ideal grind item was the humble spoon. Yes, thousands of spoons. They estimated about 8,740 spoons crafted would take you to level 10 Metalworking! (Hopefully with some book boosts this number drops significantly). If that sounds absurd, the good news is you don’t literally have to litter the world with spoons – you can melt them back into ingots each batch so you don’t waste metal. But it underscores that grinding smithing is time-consuming.
Another popular item for XP is the Kitchen Knife Blade (essentially just the blade, without a handle). It’s great because, as mentioned earlier, it can be smelted and returns 100% of the metal used, so you lose no resources, just time and fuel. Plus, knives likely give more XP than spoons due to being a higher tier weapon component.
Level Unlocks: Here’s roughly what unlocking as you level (based on community info and dev hints):
- Level 0–1: Basics like nails, simple iron fittings, crude hammer heads.
- Level 2–3: More tools (screwdriver, chisel), simple blades (knives, spearheads).
- Level 4: Important – this is a big one. At level 4 you unlock things like hammer heads, hatchet heads, and some armor pieces. That means you can make axes and hammers (which improve your ability to gather and fight) and perhaps basic armor like a metal helmet or vest. Level 4 also might allow crafting the Blacksmith Apron or protective gear for working (if those exist).
- Level 5: Some swords become available. Possibly short swords or machetes at this point.
- Level 6: More armor parts (maybe metal gloves, boots) and better swords.
- Level 7: Possibly two-handed swords or specialized polearms; advanced tool versions.
- Level 8: Full suit of armor by this point (chest, legs, arms). Also the best weapon types unlocked (e.g., a rapier or a katana-equivalent if one exists).
- Level 9: The highest-end weapons (the guide said “all kinds of swords from level 5 to 9” – so level 9 presumably lets you craft the top-tier sword, maybe something like a claymore or a very balanced blade). Also maybe things like a steel safe or metalworking bench parts.
- Level 10: Bragging rights! You likely get efficient crafting (less material lost?) and maybe the ability to craft masterwork variants (just speculation – some games give bonus quality at max level).
Remember, you also need the magazine knowledge for certain things. You might be level 6 but if you never found the “Armor Smithing Vol.2” magazine, you won’t see that chestplate recipe. Conversely, if you have the recipe but not the skill, it will be greyed out until you meet the skill requirement. So, to truly unlock everything, you need both XP level and recipe knowledge.
Tips to Manage the Grind:
- Read skill books (if you can find them). Even if the devs made them rarer, there’s a chance to loot them in bookstores or industrial areas. A multiplier will cut down the required crafts tremendously.
- Use efficient crafts: As noted, make things like knife blades or spoons that you can recycle. Avoid wasting metal on items that can’t be recycled or give poor XP. The community will likely produce XP-per-material charts; early info already identified knife blades as zero-loss XP items.
- Parallel skill grinding: While waiting for metal to heat or charcoal to burn, do other useful tasks that raise skills you need, like Masonry or Carpentry. For example, craft stone blocks (Masonry XP) or wooden handles (Carpentry XP) which you’ll need anyway. This way your character is always progressing.
- Multitask with friends: On MP servers, group up – one player can be crafting charcoal and mining while another works the forge. You can pool XP essentially, each specializing a bit. The devs specifically set it up so it’s tough to solo-master every skill, but in a group you can each hit higher levels in your chosen field faster.
- Watch your back: Forging is time-consuming and usually done at base. But don’t let your guard down – all that hammering is noisy! Maybe have a partner stand guard or do it behind secure walls. (Imagine dying to a random zombie while buried in a crafting menu after all that work… nightmare.)
- Expect balancing: Since the unstable release, players have given feedback that the metalworking grind is pretty harsh. The devs have “XP gain adjustments” on their to-do list during the unstable patches. So by the time Build 42 is in stable, the amount of XP per craft or the book spawn rate might be tweaked to make this less brutal. Keep an eye on patch notes.
On the flip side, not everyone hates the grind. Some players find it rewarding. One Redditor said they found both Metalworking and Welding “pretty easy to level – building the forge took a bit of work but it was a good ride doing it.” Different strokes for different folks. If you enjoy the journey of slowly building up a workshop from nothing, you’ll love this. If you just want to swing a sword ASAP, you might feel impatience. But hey, in a game about painstaking survival, it kinda fits that becoming a master blacksmith isn’t instant.
Community Reactions: Hype, Feedback, and Roleplay Potential
The Project Zomboid community has been buzzing about Build 42’s metalworking ever since it was hinted in dev blogs. Now that some have tried it in the unstable beta, we’ve seen a mix of excitement, creativity, and some constructive salt 😅.
On the hype side: Many players are thrilled at the prospect of truly living off the land. No more dependency on lucky loot spawns – you can make your own luck. The idea of establishing a post-apocalyptic village with farms, a smithy, and trade is turning PZ into a quasi-RPG. Some have likened it to games like Cataclysm: Dark Days Ahead or mods like Hydrocraft, which also feature extensive crafting. Others simply are excited to reenact a bit of RuneScape or Skyrim in Zomboid – “I can finally use all those forge memes in PZ!” one gamer joked. Crafting swords and armor adds a fresh layer of gameplay on top of the usual modern survival.
Roleplay communities are already gearing up to assign professions. You’ll see servers where someone advertises in global chat, “Now taking orders for axes and swords, will trade for ammo or labor.” This was precisely the kind of emergent gameplay the devs hoped for – more reasons to interact beyond just guns and food. With NPCs on the horizon (Build 43), one can imagine NPC survivor enclaves having their own blacksmiths or demanding tools as quests, etc., leveraging these systems.
There’s also a lot of curiosity and discovery. Players share tips on Reddit and Steam forums: e.g., locations where ore is common, optimal base setups for a smithy, or how they nearly burned down their base because they built a charcoal pit too close to the house (pro tip: be careful with fire!). The learning curve is steep, but the community is banding together to figure it out – kind of like real blacksmithing apprentices comparing notes.
On the feedback/concern side: The complexity and grind have been a point of debate. Some love it (as a long-term goal), while others worry it might be too daunting or not worth the effort for what you get. A few concerns raised:
- “Is metalworking even worth it?” – A Reddit thread asked this when a player noticed you could only craft a couple armor items at first. They hadn’t unlocked much and felt underwhelmed. The answers clarified that more recipes come with magazines and levels, and that it’s very worth it once you unlock weapons and armor. It seems a common early impression that “I did all this and can only make a vest?!” – but stick with it; the floodgates open later.
- Armor vs. New Systems: There were concerns that the new clothing insulation and sweat system makes heavy armor a liability (because you could overheat or get exerted). One post said it “discourages use of armor or leveling up metalworking”. If wearing a forged armor suit makes you exhausted and hot, some feel it negates the benefit. This will likely come down to balance – maybe forged armor could be tuned to not be ridiculously heavy, or the insulation system might be tweaked. And of course, you can choose situationally when to wear armor (raiding a dense area? suit up; doing chores at base? maybe not).
- The UX for newbies: Some players felt the game doesn’t tutorialize the new crafting well. Without reading patch notes or guides, you might be lost on how to get started (“What do you mean I need Masonry 2 first?!?”). The devs did put all key info on the in-game crafting guide screen accessible via the “Guide” button in the crafting UI, and the PZ Wiki is being updated by community members to help newbies. For example, the PZ Wiki’s “Metalworking” page clearly states it was added in B42 and distinguishes it from Welding. So players are figuring it out, but expect some initial confusion.
- Bugs: As with any unstable release, a few bugs popped up – one bug had no XP being awarded for some metalworking crafts early on, which made leveling literally impossible until fixed. (It has since been addressed in a patch.) Another bug caused simple tongs to break quickly, but that’s intended – you’re supposed to make better tongs. The devs are active on the forums taking these reports and fixing them. So if something feels off (like you craft and get 0 XP), check if it’s a known bug and update your game.
Despite some grumbling here and there, the overall vibe is excitement. Players are already sharing pictures of their blacksmith setups – from modest backyard forges to full-on “industrial zones” in their bases with multiple furnaces and racks of weapons on display. It’s adding a new dimension to Project Zomboid, transforming it from pure survival horror to also include a bit of creative sandbox. One could almost play a run now where the goal is less about killing zombies and more about building a thriving homestead with a functional economy – a different kind of challenge within PZ’s framework.
And for those who aren’t into all that? Well, you can always ignore the metalworking and keep playing the old way – looting and scooting. But the zombies aren’t getting any easier (in fact B42 is tuning zombie spawns and combat to be more challenging in some ways), so having better gear might come in handy…
Tips for the Aspiring Apocalypse Blacksmith
To wrap up this guide, here’s a hit-list of practical tips and tricks, gamer-to-gamer, to help you make the most of Build 42’s metalworking system:
Choose the Right Occupation: If you’re starting a new character in B42, consider picking the Blacksmith occupation (or whatever it’s called in character creation). It typically grants a starting boost to Metalworking skill and unlocks many smithing recipes from the start. This means less hunting for magazines and a head-start on leveling. It does cost you some trait points, but it’s worth it if you plan to focus on crafting.
Loot Smart for Tools: Early game, keep an eye out for key metalworking tools in garages, sheds, and warehouses. Important ones: Ball Peen Hammer, Tongs/Vice Grips, Metalworking Chisel, Metalworking Punch. If you find a welder’s mask, welding torch, and propane tank, snag them too – not only for welding, but because you can use the torch to dismantle wrecked cars for a bounty of metal bars, wire, and sheets. Dismantling just a few burnt-out cars can provide dozens of iron/steel bar pieces and sheets to jump-start your smithing supply (one propane tank yields about 16 car wreck dismantles!). Also grab any bucket, trowel, saw, file, etc., you come across. It’s better to have the real tool than craft a crude version later.
Prioritize a Safe Workspace: You will be stuck at your base working for days on end to level this skill. So secure a good base in a relatively low-threat area before diving into smithing. Preferably one with space to set up a smithy (outdoor area for charcoal pits, maybe a shed to house your forge so rain doesn’t douse it, etc.). Some players fortify a corner of a large warehouse or use a secluded farmhouse to build their workshop. Clear the area of zombies first – the last thing you want is a horde showing up when you’re busy smelting.
Multitask Metal and Survival: Balance your time – don’t spend 100% of your days at the forge, or you might neglect food, water, and defense. A good routine: light the charcoal kiln or pit (it takes time to burn logs into charcoal), then while it’s burning, go do a farming run or a loot run. Come back, collect charcoal, do a bit of smithing. While metal heats in the furnace, go chop more wood or read skill books, etc. Treat it like real life – forge work, then chores, back and forth. This will also help avoid burnout (both in-game and mentally).
Use the Right Fuel for the Job: Charcoal is your primary fuel. Always have multiple batches of charcoal in production – you’ll be surprised how fast you burn through it when forging continuously. Later, consider making coke for steelmaking as it burns hotter (the advanced furnace likely needs coke to reach steel temps). And small tip: keep a bucket of water or a fire extinguisher handy near your furnace, just in case a fire breaks out. Better safe than sorry when you’ve got constant flames on your property.
Don’t Skip Masonry and Carving: Level up Masonry by crafting stone blocks or building a stone fireplace, etc., because you need at least level 1 (if not 2) in Masonry for many structures. Carving is a new skill (essentially fine carpentry) needed at level 2 for advanced forge/furnace. You can train Carving by whittling wood items or maybe crafting wooden animal figurines? (We’re not 100% sure how Carving is raised, but it could be from making wooden handles or intricate carpentry pieces). Point is, don’t ignore the other skills; metalworking relies on them.
Magazines Are Gold: If you find any “Smithing Monthly” or “Anachronist’s Almanac” (whatever they name the magazines for blacksmith recipes), read them and store them safely. They unlock recipes like different weapon types, armor patterns, etc. Without magazines, you might be stuck able to craft only the basics even if your skill is high. Similarly, share them in MP – if your friend finds one for something they don’t use, trade it.
Efficient Leveling Strategy: When you’re ready to grind XP, do it smartly:
Bulk craft & smelt: Craft a large batch of the chosen XP item (spoons, knife blades, arrowheads, whatever you pick). Then throw them all back into the furnace and melt them to reclaim materials. Repeat. This way you’re mostly just spending time and charcoal, not materials.
Use skill books before big crafting sessions to maximize XP gain.
Rest well and eat: sounds silly, but remember PZ gives XP bonuses if you’re well-fed and well-rested, and penalties if you’re exhausted or starving. Blacksmithing is tough work that can drain endurance. Keep your character fed (maybe have a pot of stew ready) and take breaks to sit or sleep so you operate at peak efficiency.
Alternate tasks to avoid boredom: If you, the player, get bored crafting 500 spoons in a row, break it up – do 100, then go fight some zombies or something, then another 100. It’s a marathon, not a sprint.
Leverage Multiplayer or Friends: If playing MP, divide the labor. One group member goes out to gather scrap (dismantling objects, wrecks, etc.) and another stays at base forging. Or run a shop system: some servers might have a designated safe zone where players trade goods – you could become “The Blacksmith of Riverside,” known for selling quality blades. It’s a fun way to engage the community and it rewards your hard work with other goodies (so you personally don’t have to farm every resource).
Keep Welding for Base Defense: Just because you can forge swords doesn’t mean the old welding skill is useless. Welding (old metalworking) is still how you make metal walls, gates, and barricades. A strong base might use a mix of wood and metal defenses. Luckily, as you grind metalworking, you’ll have tons of scrap and metal sheets from wrecks, so use those to fortify your base’s perimeter with metal fences and window bars. Also, welding XP is separate – you might incidentally max out Welding by all the dismantling and building, making you a master of both metal crafts.
With these tips, you should be well on your way to becoming the legendary smith of Knox Country. It’s immensely satisfying to go from using a frying pan as a weapon (early game woes) to wielding a hand-forged steel sword you made yourself. The first time you cleave a zombie in two with your own creation, you’ll know the grind was worth it.
Conclusion & Next Steps: Forging Your Legacy in Build 42
Project Zomboid Build 42’s metalworking overhaul transforms the game in a fundamental way. It’s no longer just about finding the best gear – it’s about making it. This system rewards the patient, the knowledgeable, and the cooperative. It brings a taste of medieval life into the 1990s apocalypse, and in doing so, opens up huge new gameplay possibilities.
To recap the highlights:
- Build 42 Metalworking = Blacksmithing – a new skill separate from the old Metalworking (now Welding). You’ll forge metal from raw ore/scrap into weapons, armor, tools, and more.
- Multi-tier Progression – start with primitive tools and gradually build forges, anvils, and furnaces, ultimately enabling steel production. This provides a long-term endgame objective for seasoned survivors.
- Tons of New Items – craft your own swords, axes, maces, nails, armor pieces, etc. These crafted items often have unique looks and strong durability. You can outfit yourself and your friends like never before (knight raid on the mall, anyone?).
- Integration with Other Systems – metalworking ties into hunting (leather for bellows), carpentry (handles, molds), farming (charcoal needs wood, which might involve tree farming in future), and more. It enriches the survival simulation aspect of PZ.
- Community and Co-op Focus – by encouraging specialization and trading, Build 42 makes multiplayer servers more dynamic. Lone wolves can do it all, but it’s a lot – having buddies to share the load or trade goods will make life easier and more fun.
- UI/UX Updates – new crafting and building UIs improve the experience, making complex crafting more manageable. Expect continued tweaks as unstable progresses (the devs are actively polishing based on feedback).
- Challenges – it’s not all easy. The skill grind is significant and the mechanics are detailed. But with knowledge (and this guide, hopefully) you have a roadmap to succeed. Remember, mastery in Zomboid always comes with challenge – that’s part of the thrill.
Related Survival Guides
Metalworking is just one piece of the survival puzzle. Check out these complementary guides to master other essential skills:
- First Day Survival Guide - Essential for new players before diving into advanced crafting
- Carpentry Guide - Build the structures needed for your metalworking setup
- Farming Guide - Grow food to sustain yourself during long crafting sessions
- Build 41 Metalworking Guide - Learn the basics of welding and metal construction
- Weapon Repair Guide - Maintain your crafted weapons and tools
- Foraging Guide - Find materials and fuel for your metalworking operations
So, fellow survivor, are you ready to pick up the hammer and forge a new path? Whether you dream of running a fortified compound with self-made weapons and armor, or you just like the idea of not depending on RNG for an axe, Build 42’s metalworking is a game-changer. It’s one of those systems that lets you tell a story with your gameplay: the tale of how you started with nothing but rocks and sticks and ended up leading a well-equipped community through the apocalypse, armed with weapons you forged with your own two hands.
Now get out there and start pounding metal! The zombies won’t know what hit them when you come striding out in full plate armor swinging a homemade claymore. 🔨🛡️ Happy smithing, and stay safe in Knox County!
Related Articles


