Apocalypse on Wheels: Driving for Survival in Project Zomboid
Project Zomboid Vehicle Advisor
Find the Right Vehicle for Your Survival
What's your priority in the Knox County apocalypse?
Storage Capacity
I need to haul lots of loot
Speed & Escape
I need to outrun danger
Off-Road Capability
I travel rough terrain often
Group Travel
I need to transport people
Project Zomboid offers a brutal sandbox where even a humble car can mean the difference between life and death on any given day. One moment you’re siphoning gasoline under the hot Kentucky sun, nervously eyeing the tree line for shambling silhouettes; the next, you’re grinding gears and fishtailing around a corner with a horde in pursuit. Vehicles in Project Zomboid aren’t just convenient–they’re transformative. They turn the game’s sprawling map into your personal highway, but they can just as easily amplify the danger if misused. In this deep dive, we’ll explore everything a survivor-gamer needs to know about “Project Zomboid: Vehicles”: how to find them, fix them, fight with (or in) them, and even mod them for an even wilder ride. Buckle up, because this road trip through the apocalypse is about to begin!
Getting Your First Ride (Finding and Using Vehicles)
Picture this: you’re peering through the smashed window of a dusty sedan in an abandoned parking lot, heart pounding as you spot a few zombies shuffling nearby. You’ve been on foot for days and the open road calls to you – but first, you need to find a working vehicle and actually get it started. Vehicles spawn all over Knox Country, typically in driveways, parking lots, or even amidst roadside wrecks. Their condition can range from pristine to burnt-out husks, so it pays to be choosy early on. Here’s how to snag your first set of wheels:
Look in the Right Places: Check residential driveways, garages, and parking lots at businesses for parked cars. Keys might be found in nearby houses or on the ground near the vehicle. Often, the game will spawn the key in the car’s ignition or glovebox if you’re lucky. There’s nothing quite like the joy of finding a key already in the ignition of a car – it’s a ready-made escape route.
Breaking In (if Necessary): Many cars you find will be locked. Don’t be shy about smashing a window to get inside if the coast is clear – just be ready for the noise to attract nearby undead. (Pro tip: use a weapon or tool to break glass from a safe distance, and clear the broken glass before climbing in to avoid cuts.) Alternatively, if your character has some Mechanics skill, you can attempt to remove a window via the Mechanics menu to avoid noise, though this isn’t always possible if the doors are locked. Once in, unlock the other doors and trunk from inside.
Starting the Engine: If you have the key, you’re golden – insert it and turn on the ignition. In Project Zomboid, you can start the engine by pressing the engine start key (
Nby default) or via the vehicle radial menu (Vkey). Remember that you need the key not just for the engine, but also to operate the headlights and radio. No key, no dice – the car won’t even let you turn on the headlights without one in the ignition.Hot-wiring for the Bold (or Desperate): If no key is available, and you’re not inclined to hoof it, you can try hot-wiring the vehicle. To hot-wire a car, your survivor needs Electrical skill 1 and Mechanics skill 2, or alternatively the Burglar profession which lets you hot-wire from the get-go. This requirement reflects that not just anyone can twist two wires and drive off – your character needs a bit of know-how (or a criminal background). Once you meet the requirements, enter the car and open the radial menu (
V). Instead of “Start Engine,” you’ll see a “Hotwire Engine” option. Click that, and after a short animation your character will attempt to bypass the ignition. A successful hot-wire will magically grant you “keys” to that car in the form of a permanent hotwired status – you (and anyone else in multiplayer) will see a key icon above the vehicle from then on, indicating it’s usable. A few notes on hot-wiring: if you fail, don’t panic. Failures do not break the car or your tools; you can keep trying until it works. Failing will, however, make some noise – imagine the sound of an amateur sparking wires together – which can draw local zombies to your location. Also, hot-wiring isn’t guaranteed if the car is in great shape; in fact, newer or well-maintained cars are trickier to hot-wire, reflecting their better security. And if you do manage to hotwire that shiny modern pickup, be aware that any survivor can now start it up – in multiplayer, a hotwired car is free real estate for other players unless you physically lock the doors or guard it.Know Your Controls: Driving in Project Zomboid is far more involved than pressing “W” to go. The default controls are intuitive but worth reviewing:
Waccelerates,Sbrakes/reverses,AandDsteer. It’s basically like a twin-stick setup relative to your car’s orientation.Eenters/exits the vehicle (make sure you’re next to the driver’s door, or your character might clamber into the back seat by mistake!).Vopens the Vehicle Radial Menu, a context wheel that gives you access to many functions (like managing doors, trunk, towing, engine, etc.) both from inside and outside.Ftoggles headlights,Qhonks the horn (careful with that one!), andZlets you switch seats if you’re inside a multi-seat vehicle.Tip: If you ever need to bail out in a hurry, remember to stop the car completely before hitting
Eto exit – jumping from a moving car isn’t an option (this isn’t an action movie, and you’re not invincible). Plus, leaving the engine running and door open is a surefire way to invite zombies into the driver’s seat after you.
Car Quality and Condition: When you first get in a car, check its condition with the Vehicle Info (
Ukey by default, or via radial menu). This pops up a panel with details like overall condition, engine power, and how much gas is in the tank. You’ll quickly learn to eyeball the fuel gauge on the dashboard UI as well, but the info screen is great for a deeper look at the car’s health. A car that looks okay on the outside might have a dead battery or an empty gas tank – two things you should verify before counting on that ride. Also, listen to the engine when you start it – if it repeatedly fails to turn over or makes awful sputtering noises, the engine or battery could be in poor shape.Key Icons and Security: If you have the correct car key in your inventory and you’re near the vehicle, a little key icon will pop up above your character’s head. That’s the game’s way of saying “You have the keys to this ride.” Use it as confirmation, especially in parking lots where multiple similar cars can cause confusion. Additionally, cars can have alarms – randomly, a car alarm might trigger when you open a locked door or even sometimes when you start hot-wiring. Alarms cause a huge noise radius (comparable to house alarms) and will draw every zombie for blocks. There’s no way to know if a car has an alarm until it goes off, so just be mentally prepared to GTFO if you suddenly hear a siren wailing upon breaking into a car. You can use this to your advantage too (more on that later), but it’s usually an “oh crap” moment.
Once you have a working vehicle, savor that victory. Survivors of the Knox Event can now drive vehicles and explore every nook and cranny of the vast map, dramatically expanding your freedom of movement. Driving for the first time in Project Zomboid feels almost like switching to a different game mode – the world zips by at 50+ mph, zombies become road obstacles to swerve around (or speed-bump over), and distances that took all day to hike are crossed in minutes. But with great power (of horsepower) comes great responsibility… and risk. Before you put the pedal to the metal, let’s talk about what types of vehicles you might find and what they’re good (and not so good) for.
Know Your Wheels: Vehicle Types and Characteristics
Not all cars are created equal in Project Zomboid. In fact, vehicles are divided into three broad categories in the vanilla game – Standard, Heavy-Duty, and Sport – each with their own sets of parts and performance profiles. Think of it as classes of vehicles, akin to classes in an RPG: your standard vehicles are the well-rounded everyman, heavy-duty are the burly tanks, and sports are the speedy but fragile hotrods. In practical terms, this affects everything from how much loot you can haul to how the vehicle handles off-road. Let’s break down the differences:
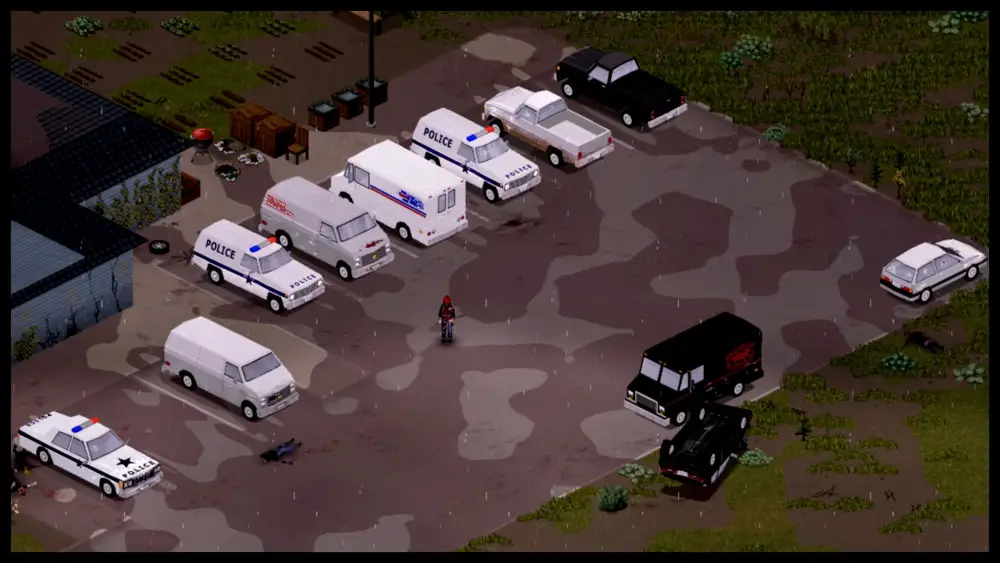
A parking lot full of driveable dreams. Project Zomboid features a variety of vehicles–from police cruisers and news vans to delivery trucks and family sedans–each with unique stats and handling quirks. A keen survivor will choose their ride carefully based on needs.
- Standard Vehicles: These are your typical consumer cars – sedans, station wagons, compact cars, and family vans. Examples in-game include models like the Chevalier Nyala (a four-door sedan that also appears as police or taxi variants) and the Masterson Horizon (a compact hatchback). Standard vehicles use “standard” parts (tires, brakes, etc.) which are the most common. They tend to have moderate storage (a trunk plus maybe glove box and back seats for extra space) and balanced performance. A sedan isn’t going to win a drag race against a sports car, but it’s also not guzzling fuel like a box truck. Standard cars often have 4–5 seats. For instance, a Chevalier Nyala sedan has a trunk capacity around 50–55 and seat capacity for 3 passengers (each seat can hold 20 units of gear if empty), giving a total storage around 120 units when in perfect condition. In gameplay, standard cars are great all-purpose vehicles – jack of all trades, master of none. They usually attract a moderate amount of attention when driving; their engines have average noise levels and average horsepower. If you’re not sure what you need, a nice station wagon or sedan can do a bit of everything.
- Heavy-Duty Vehicles: These include pickup trucks, vans, ambulances, and other larger, tougher vehicles (the ones that use “heavy-duty” class parts). Heavy-duty vehicles are the pack mules and bulldozers of the apocalypse. They often sport large trunks or cargo beds and can seat 2–6 people depending on the model (for example, the Franklin Valuline van has 5 seats plus a huge trunk). Their storage is usually the best: many vans/trucks have trunk capacity in the 80–100 range, plus multiple seats. A fully intact delivery van (like the Chevalier Step Van) can total around 118 capacity or more across trunk, seats, and glove box. Heavy vehicles also generally have higher durability – a sturdier frame means they can take a few more hits from zombies or fend off collisions a bit better than a flimsy sedan. However, heavy vehicles come with drawbacks. They tend to have lower top speeds and slower acceleration due to their weight, and they drink fuel like it’s the end of the world (which, well, it is). A delivery truck or pickup will burn gasoline noticeably faster than a compact car. They’re also louder on average – a beefy truck engine makes a deep rumble that can draw zombies from afar, especially if the muffler is in bad shape (more on mufflers shortly). Handling-wise, heavy-duty vehicles can feel sluggish: wider turning radius, and they get slowed down heavily by rough terrain. But if you need to haul a ton of loot or plow through a barricade of abandoned cars, heavy-duty is your go-to. Some heavy vehicles have special features too; for instance, certain pickups come with built-in sirens (police pickup) or emergency lights that you can toggle, just like police sedans.
- Sport (Performance) Vehicles: Now we’re talking fast cars – the sleek coupes, sports cars, and muscle cars that use “sport” class parts. Examples include the Chevalier Cossette (a two-door sports car that’s arguably the fastest vanilla vehicle) and the Dash Elite (a sporty sedan). These cars are all about speed and acceleration. They have powerful engines – e.g. the Cossette boasts around 570 horsepower, making it one of the best for raw speed. In gameplay terms, that means quicker getaways and the ability to outrun virtually anything… except your own recklessness. Sport cars usually have the worst storage capacity: often only 2 seats (maybe 4 in some sports sedans) and a small trunk. You won’t be moving furniture or stockpiling food in a little sports coupe. For example, a Chevalier Cossette’s trunk might hold only 30 units, and with two seats you’re looking at 50–70 total storage – basically one hiking bag’s worth of loot. Sport vehicles also tend to be fragile; they don’t take hits well. Smack a tree at high speed in a muscle car and you’ll crumple it like a soda can (along with your body). Another consideration is noise: these high-performance engines can be LOUD. A sports car with a busted muffler is practically a rolling beacon of noise, audible from very long ranges. Lastly, sports cars are relatively rare spawns – you might not see one at all in a given run unless you specifically look at rich neighborhoods or certain parking lots. But if you do get one in good shape, it’s a treasure for emergency escapes and quick trips. Just remember: speed kills (usually you).
Now, the game’s Mechanics system is tuned such that parts are not interchangeable between these categories. That means if you salvage a heavy-duty battery from a van, you can’t shove it into your sedan; you need a standard battery for a standard car, and a performance tire won’t fit on a pickup’s rim, etc. This might seem like a bummer when scavenging for parts, but it’s an important detail – always note what type of vehicle you’re working on, and grab the matching parts. The good news is the game provides “Car Type” info in the vehicle mechanics screen (it will say Standard, Heavy-Duty, or Sport in the top-right of that panel). Tools and general supplies like gas and engine oil (actually, PZ doesn’t simulate oil levels, scratch that) are universal, but component parts must match the class.
To give a quick comparison, here’s a handy summary of how the three vehicle classes stack up:
| Vehicle Class | Examples | Storage Capacity | Speed & Power | Durability | Fuel Economy | Noise Level |
|---|---|---|---|---|---|---|
| Standard | Sedans, Station Wagons (e.g. Chevalier Nyala, Masterson Horizon) | Moderate trunk (40–55) + 4–5 seats (total 100–120 capacity). | Average horsepower (300–400 hp). Decent acceleration and top speed (70–90 mph range). | Average durability – can take a few hits but not too many. | Moderate consumption – won’t drain tank instantly, but long trips still eat fuel. | Moderate – a healthy muffler keeps them fairly quiet, but still audible to nearby zombies. |
| Heavy-Duty | Pickups, Vans, Utility (e.g. Dash Bulldriver pickup, Franklin Valuline van) | Large trunk (80–100) + multiple seats (total 150–200 capacity in vans). Excellent for hauling loot. | Lower top speed (60–80 mph) due to weight. Engines can be powerful (350+ hp) but heavy bulk = slow acceleration. | High durability – can plow through more zombies or debris. Tough body and bumpers. | Poor economy – high fuel usage, you’ll want spare gas cans for long trips. | Loud – big engines make noise; bad mufflers on these attract hordes far and wide. |
| Sport | Sports Cars, Performance Sedans (e.g. Chevalier Cossette, Dash Elite) | Small trunk (25–45) + 2–4 seats (total 50–110 capacity). Not much storage; pack light. | Very high horsepower (450–570 hp). Fast acceleration, top speeds 90+ mph. Great for outrunning trouble. | Low durability – crumples easily on impact. Parts wear faster at high speeds and stress. | Decent economy at cruising speed (engines are efficient), but you might floor it a lot which guzzles gas. Small tank. | High – even in perfect condition, performance engines are noisy. With a worn muffler, expect zombie attention from far away. |
(Capacities assume 100% part condition; lower conditions reduce effective capacity. “hp” = horsepower for comparison.)
As you explore, you’ll encounter specific models with unique quirks. For example, the Spiffo’s Van (a branded food delivery van) is heavy-duty and covered in cute raccoon mascot decals – it’s slow, but has a huge trunk for all your loot and a built-in loudspeaker you can use (effectively a horn/siren). Police cars (either standard police sedans or heavy-duty police trucks) come with sirens and lightbars – incredibly useful for creating diversions by sound. An ambulance is basically a heavy-duty van with a siren and often spawns with medical loot inside (bandages, etc.). Then you have the rare sports like the Chevalier Primani or Mercia Lang 4000 – exotic names for fast cars that might spawn in rich neighborhoods or car lots.
One cool detail: cars in PZ have varying “Engine Loudness” values and muffler quality multipliers. A healthy muffler keeps the noise down, but as it wears out the car gets louder. For instance, a muffler at 50% condition makes the car 40% louder than normal. So a sports car with a bad muffler is one of the loudest things in the game, while a standard car with a performance muffler upgrade could actually run fairly quiet. We’ll talk more about mufflers and part conditions in the maintenance section.
Lastly, it’s worth noting that trailers are a thing too. As of the latest updates, the base game includes a couple of towable trailers (which fall under the “Standard” category parts-wise). You can find small utility trailers or larger ones, and hitch them to a vehicle to dramatically increase your carrying capacity. Two stock trailers exist in vanilla: one is a small passenger trailer, and another is more of a large utility trailer (think U-Haul type). Each has its own storage capacity and weight. Towing them will affect your driving (more weight = slower, longer braking distance). We’ll cover towing mechanics separately, but just be aware that a trailer can turn a mid-size car into a cargo hauler – albeit at the cost of speed and maneuverability.
Choosing the right vehicle is a bit like choosing a weapon or armor in an RPG. You consider the stats and what you need: If you want to loot a town in one go, you might seek out a delivery van or pickup for the storage. If you’re setting up a remote safehouse far away, maybe a reliable sedan with good fuel economy is ideal to make fewer refueling stops. If you plan to race down the highway or do a quick smash-and-grab in a dangerous area, a sports car might save your skin with its speed (just don’t overload it). In short, pay attention to a vehicle’s type and condition before committing to it as your main ride.
Next up, now that you’ve got a car (or have your eye on one), is keeping it running. The apocalypse is hard on automobiles: they don’t maintain themselves, and there’s no mechanic down the street to fix a busted engine or change your oil. It’s on you to be the mechanic, or at least to understand the basics of vehicle maintenance and repair in Project Zomboid.
Repairing and Maintaining Your Vehicle
Just like firearms require cleaning and bases need reinforcing, vehicles in Project Zomboid demand some TLC to stay in top form. If you’ve ever owned a car in real life, you know neglect leads to breakdowns – the same is true (perhaps even more so) in Knox Country. Without maintenance, your newly acquired ride might literally die on you at the worst possible time. Let’s go step by step through the art of being an apocalypse mechanic:
The Vehicle Mechanics UI and Understanding Parts
When you press the vehicle mechanics key (U by default) or choose “Mechanics” from the radial menu while near a car, you’ll open up the Vehicle Mechanics window (make sure you’re outside the vehicle or it won’t show all parts). This is a detailed diagram of the car and its components – basically a car anatomy screen. You’ll see a top-down schematic of the vehicle with colored sections and a list of parts on the right with their conditions shown as percentages. At first glance, it’s a lot of information, but here’s how to read it:
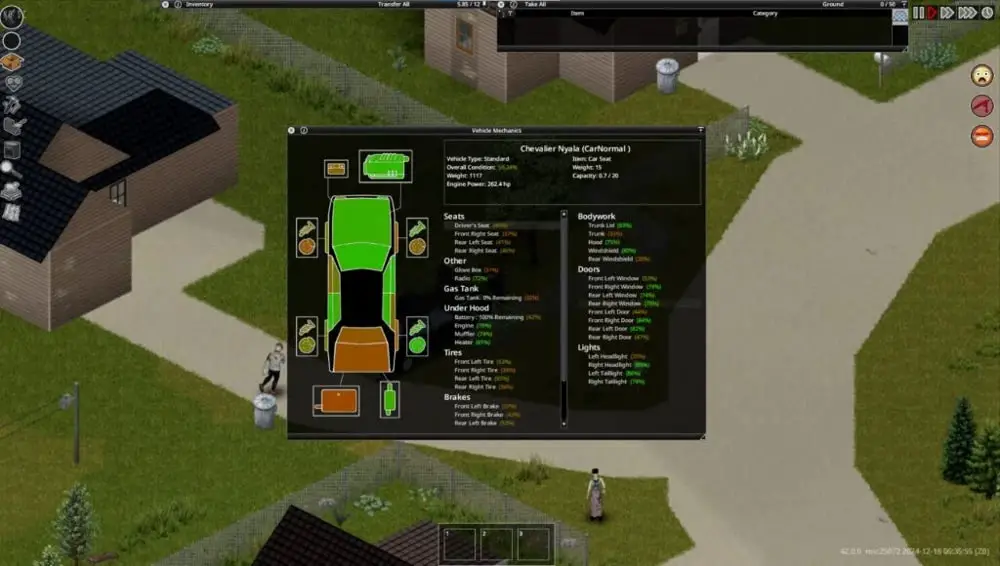
Inspecting a car in Project Zomboid using the Vehicle Mechanics UI. Each part – battery, engine, tires, brakes, etc. – is listed with its current condition (in green/orange/red). In this example, a “Chevalier Nyala” sedan is shown with various parts highlighted. Regular maintenance and repairs can keep these parts (and thus the car) in good shape for the long haul.
Overall Condition and Engine Quality: At the top of the window, it will show the vehicle’s type and an overall condition percentage (which is like an average of major parts), as well as the engine’s condition and “quality.” The Engine Condition % is the health of your engine part – if it gets to 0%, the car won’t start at all. Engine Quality is a stat from 0–100 that represents how well the engine runs even if it’s in perfect repair. A high-quality engine (say 80–100) will start reliably and stall less, whereas a low quality engine might stall or fail to start even at decent condition. If you ever find a car with 100% engine quality – cherish it; at 100 quality the engine essentially has only a 1% chance to fail starting (it “skips the condition check” which means it will almost always start up smoothly). Engine quality is somewhat innate to the vehicle and can only be changed by swapping the engine out entirely (an advanced move requiring high Mechanics skill). Most cars you find will have engine quality somewhere in the middle – not junk, but not race-tuned either.
Part List and Colors: The diagram shows sections like the hood, trunk, each door, tires, etc., often colored green, orange, or red. Green means the part is in good shape, orange indicates moderate wear, and red means it’s in bad shape (or broken). On the right side, parts are listed by category:
Engine: The heart of the car. If this is orange or red, the vehicle will have trouble starting and may randomly stall while driving – which is scary if you’re barreling down the highway or trying to escape a horde.
Battery: Car battery, with a condition % and a charge % (if you scroll or expand, it shows charge). A battery can be in fine condition but completely discharged (0% charge, meaning it’s effectively dead until recharged). Conversely, it could be fully charged but in bad condition (which means it won’t hold that charge for long or deliver enough current). Batteries slowly lose charge over time, faster if you use lights/radio when the engine’s off. If you see the battery is low on charge (e.g. 10%), you’ll want to either swap it or charge it soon.
Gas Tank: Shows condition and fuel amount. Important: low condition gas tanks can leak fuel. If you notice your fuel is mysteriously dropping even when you haven’t been driving, check the tank’s condition. A tank in poor shape (under 20%) will start leaking – at very low condition it can drain a full tank in minutes. Tanks also have different capacities (a heavy-duty truck has a bigger tank than a compact car). And yes, condition also affects capacity: a damaged tank can’t hold as much fuel as it should. Keep your tank in good repair or replace it if it’s badly damaged.
Tires: Each wheel has a tire with a condition. Tires affect your traction and how the car handles, especially off-road. If a tire’s condition is 0%, it’s essentially flat or “blown out” – you’ll drive much slower and the car will pull to one side. Interestingly, tires in PZ do not slowly lose condition just from age – they wear down only when the vehicle is being driven (and more so if you’re skidding, driving off-road, or hitting zombies). Also, tires don’t lose air pressure over time unless there’s damage. Keep an eye on tire condition; having one go out during a chase is no fun. If you find a tire pump (and the game adds the ability to pump tires), that’s a bonus, but currently tire pressure is more of a hidden stat.
Brakes: Each car has a set of brakes (often grouped as front and rear). Low-condition brakes will reduce your brake force – meaning it takes longer to stop. This is subtly dangerous; you might not realize your brakes are shot until you blow a stop and plow into a wall because the car didn’t slow as expected. Always try to keep brakes in decent shape, especially for heavier vehicles that need all the stopping power they can get.
Suspension: Each wheel has a suspension part. Suspension affects handling and how much bumpiness the car endures off-road. If your suspension is trashed, the car might be prone to losing control on turns or bouncing in unpleasant ways. Also, suspension (along with tires) could factor into towing effectiveness and off-road speed. Make sure those shocks are solid if you plan to go mudding.
Muffler: Perhaps one of the most overlooked parts. The muffler’s job is to reduce engine noise. The lower the condition of the muffler, the louder your vehicle. At 100% condition, a standard muffler makes your car as quiet as it can be (which is still not silent, but reasonably low radius). As it drops, the noise radius increases dramatically – a near-broken muffler can make even a tame sedan sound like a drag racer. Replacing a muffler can be a bit finicky because you need the right type (standard, heavy, sport). If you want to stealth-drive, keep an eye on that muffler and replace it when needed.
Bodywork: This includes hood, trunk lid, doors, windows, windshield, and mirrors. These parts don’t affect performance much, but they affect protection and storage. For instance, a hood in good shape helps protect your engine from damage when you hit zombies or objects. If the hood breaks off or is at 0%, any little bump can directly damage your engine. The trunk lid (and trunk itself) if crumpled will reduce your trunk capacity and can even cause items to spill out onto the road as you drive. Ever notice loot mysteriously missing? If you took a hard hit and your trunk is busted, you might literally be leaking loot! Doors and windows obviously protect you; a broken driver’s side window means a zombie can grab or bite you as you drive past, and if both your door and window are gone, you’re basically sitting on an open platter. Fun fact: you can actually remove doors and windows deliberately (for repairs or swaps). Replacing broken glass with intact windows is an option if you have spares. Also, bodywork parts provide some armor to the car’s occupants and internals: e.g. a door in good condition will take the brunt of zombie swipes until it breaks.
Lights: Headlights and tail lights can break, but these are minor – headlights let you see at night; if they’re both broken, night driving becomes very dangerous due to low visibility. Tail lights being broken just means you don’t have those little red glows; not a big deal, except that when you brake the light won’t show (though that’s only relevant in multiplayer to signal others, as zombies don’t care about brake lights).
This UI is your bible for car maintenance. It’s not just for looking; from here you can uninstall or install parts. Right-click on a part in the list (or on the diagram) and you’ll see options to remove or repair if you meet the requirements. Every part lists the needed tool and skill to interact with it. For example, to remove a tire you need a Lug Wrench and a Jack, and at least Mechanics level 0 (anyone can remove a tire). To pull out a radio, you just need a Screwdriver. To mess with the engine or gas tank, you’ll typically need a Wrench and some skill.
Tools of the Trade: What You Need to Be a Mechanic
Just as a carpenter needs a hammer and saw, an aspiring grease-monkey in Zomboid needs the right tools:
- Screwdriver: The most basic tool, used for things like uninstalling the car radio, headlights, and other small parts. Always have one; they’re super common (found in garages, sheds, tool stores).
- Wrench (sometimes called a Spanner): Used for various engine parts, suspension, muffler, etc. In game it’s a distinct tool item. Check garages, toolboxes, or the trunks of wrecked cars for this.
- Jack: A car jack is required to lift the vehicle for tasks like removing tires or suspension. When you initiate removing a tire, you’ll see your character use the jack automatically if you have one in inventory.
- Lug Wrench (Tire Iron): Specifically for loosening/tightening wheel lug nuts. Needed alongside the Jack for tire removal.
- Propane Torch and Welding Mask: These come into play for bodywork repairs – if you want to fix up a hood or patch trunk damage, you’ll be using metal sheets and a propane torch (with mask) to do metalwork on the car’s body. Essentially, deep repair of certain parts crosses into the Metalworking skill domain.
- Duct Tape / Glue / Wire: Some very low-level repairs (like patching a windshield or temporarily fixing a tire) can use items like duct tape. Though often, you’ll be outright replacing parts rather than taping them up – except maybe using duct tape to repair a windshield crack or something small.
- Spare Parts: This is not a tool but worth mentioning. To repair an engine, you need “Engine Parts.” You obtain engine parts by dismantling other engines (basically harvesting from wrecks) – each car can be harvested for some if you have the skill. These parts are then used to repair engine condition a few percentage points at a time. Likewise, to fix suspension or brakes, you might need replacement parts or scrap. It’s often easier to swap in a completely new part from another car than to “repair” a broken one, except in the case of engines which you can partially repair with scrap parts.
Make sure to stash these tools at your safehouse or in your car’s trunk. A lot of players keep a mechanic kit in their vehicle: a box or bag with a jack, lug wrench, regular wrench, screwdriver, some duct tape, and a few essential spares (like an extra fan belt or spark plugs if the game has those individually – currently it abstracts some of that). This way if the car breaks down far from home, you can potentially fix it on the spot rather than being stranded.
Skill and Knowledge: The Mechanics Skill and Recipe Magazines
Project Zomboid gates certain advanced mechanical actions behind skill levels and sometimes behind learned recipes. The Mechanics skill governs your success chances and what you can do. Even failing an installation or removal can grant a little XP, so you can grind the skill. Here are key points:
- Level 0–1: You can do basics like remove tires, radios, headlights, batteries, spark plugs, etc. (Note: Spark plugs are not individually modeled in vanilla, but you can remove and repair the “Engine” as a whole at higher levels).
- Level 2–3: You can start doing more: brakes, suspension, maybe starter motors. Also, hot-wiring becomes available at Elec 1 + Mech 2 as mentioned (if you weren’t a Burglar).
- Level 4–5: Now you’re getting good – you can remove/install gas tanks, mufflers, and do moderate repairs.
- Level 6+: You can basically strip a car down to its frame and rebuild it. You also start gaining more when salvaging parts (e.g., pulling an engine might yield more spare engine parts with higher skill).
Importantly, knowledge is needed for certain vehicle types unless your character is already a trained mechanic. There are recipe magazines like “Laines Auto Manual – Standard Models,” “Commercial Models,” and “Performance Models.” By default, a regular survivor character needs to read these magazines to learn how to service those types of vehicles. If you don’t have the magazine for, say, heavy-duty (commercial) vehicles, the game won’t let you install or uninstall certain parts on heavy-duty cars. The exceptions:
- If you chose the Mechanic profession at character creation, you start with all the knowledge (no magazines needed for standard and heavy-duty; I believe you might still need the performance one for sports cars unless you also picked the Amateur Mechanic trait).
- There’s also an Amateur Mechanic trait (which some characters like Burglar get for free, or you can add) that grants basic car knowledge. According to the info, Amateur Mechanic covers standard and heavy vehicles, but still requires reading the sport car manual for performance models. So even a hobby mechanic has to study a bit to understand those fancy sports engines.
In short, if you’re scavenging magazines, keep an eye out for the car manuals. They often spawn in gas station bookstores, mechanic shop offices, or occasionally in mailboxes. Having them allows any character to work on that class of vehicle. Without them, you’ll be limited. Nothing’s worse than finding a sweet sports car and realizing you can’t even change its tire because “I never read that book.”
Common Maintenance Tasks
To keep your vehicle running smoothly, you’ll want to perform some regular maintenance tasks. Here are the big ones, along with the how and why:
- Refueling: This is the most frequent “maintenance” task – keeping the car gassed up. Always try to keep your fuel above half a tank; you never know when you’ll need to make an unplanned detour. You can refuel by using a Gas Can on the car (right-click the gas tank area or use the radial menu while holding a can) or by pulling up to a gas pump. Remember, gas pumps only work if the power is on. After the power grid goes down (usually within the first month by default), you’ll need a generator to power the pump. Position the car so the gas cap is on the same side as the pump (most cars have the cap on the driver’s side). If you’re not sure, hop out and walk around – or use the Fuel Side Indicator mod which adds a little arrow on your dashboard pointing to the fuel cap side. Pro tip: turn off the engine while refueling! It’s good practice to save fuel and avoid any mishaps (and in real life, you wouldn’t fuel a running car either).
- Changing a Tire: If you find a tire in the red, or you got one shot out (if NPC bandits were a thing, which in vanilla they aren’t yet) or blown by running over debris, you’ll need to replace it. Make sure you have a jack and lug wrench. To change a tire, open the mechanics UI, right-click the tire and choose uninstall. Your character will jack up the car, remove lug nuts, etc. (This takes a little time, hope no zombies are rushing you!). Then you can install a new tire from your inventory. It’s wise to carry a spare tire in your trunk if you have room – at least one that fits your vehicle’s type. Without a spare, you might have to drive on a rim to a nearby wreck and hope its tire fits. And yes, driving on a missing tire is possible but agonizingly slow and will damage the car further.
- Topping Off Fluids: PZ doesn’t simulate engine oil or coolant levels explicitly, but it does simulate battery charge. If you have a low battery (either by checking the mechanics UI or noticing the car struggling to start and the headlights being dim), you have two options: swap the battery or charge it. Swapping is easy – find a charged battery (maybe from another car or one you stashed) and use a screwdriver to remove the old and insert the new. Charging a battery can be done by running the car (driving recharges the battery via alternator) or using a Car Battery Charger tool if you’ve found one. The car battery charger is a lootable tool that you place on the ground and connect to a power source (such as a generator or active house grid) and it will charge a battery over time. If you’re staying in one base, it’s convenient to have a charger set up in your garage. Otherwise, a good strategy is to take batteries from abandoned cars and rotate them: use one until it’s low, then swap in a fresh one and later charge the first at base. Also, don’t leave your headlights or radio on when the engine’s off – that will drain the battery fast. It’s easy to forget in a moment of panic when you stop the car to run into a building; get in the habit of turning off the lights (press
F) and removing the key (or shutting engine for hotwired) when you park. - Engine Repairs: The engine can be repaired using spare engine parts. If your engine condition is, say, 50%, you might be experiencing frequent stalls or hard starts. To fix it, you need to have scavenged Engine Parts (these come from taking apart other engines – you’ll see an option to “Take Engine Parts” if you have a high enough Mechanic skill and the right tools). Each engine part item can be used to restore a few percentage points of engine condition, and higher mechanic skill makes each part more effective. When you attempt engine repair in the UI, it’ll consume some of those parts and improve the condition slightly. At low skill, you may need dozens of engine parts to significantly raise condition (which is usually not practical early on). As your skill improves, your engine repairs get more efficient (using fewer parts for more % gain). Whether it’s worth repairing or just finding a better engine/car is situational. One comment from an experienced player sums it up: “Totally worth fixing up a car if you find one with a 100% quality engine. … If it’s just an old pickup, you can baby it with spare parts until you find one in better condition”. This implies: a rare high-quality engine is valuable enough to justify heavy repairs, whereas for common vehicles, you might do minimal fixes and replace the whole car when possible.
- Replacing Other Parts: If any part is in the red, consider replacing it. That could be a door, hood, or even brakes. Replacing is often simpler than repairing. Find a similar vehicle (same type) that’s in better condition, and remove the part from that car, then install it in yours. For example, your hood is 5% condition (nearly trashed). You find another of the same model with a hood at 80%. You can uninstall that hood (requires a wrench and maybe hammer for bodywork) and then install it on your car. Voila, your engine is protected again. Keep in mind, uninstalling body panels like hoods might require some metalworking skill if they’re very damaged, but generally if it’s not completely wrecked you can pull it off.
- Windshields and Glass: Broken windshields don’t stop your car, but they do expose you. You cannot repair shattered glass; you have to replace the whole windshield. This can be a pain because windshields often break from crashes. If driving with no windshield, you risk zombies reaching in (though they usually go for side windows) and also if you collide with zombies, there’s less protection (some of those impacts can hurt you if the windshield is gone, not to mention rain will get in your face). If you find a similar car with an intact windshield and have a wrench, you can swap it over. Side window glass is simpler: just find the specific door window from a matching car. Door windows usually require only a screwdriver to replace (via the mechanics UI).
- Lights and Electronics: Headlights can be popped out and replaced with working ones easily with a screwdriver. They are important for night driving. Tail lights and the radio are quality-of-life: the radio lets you listen to broadcasts (useful early in the game for news/weather) and the lighter/AC if you care. If the radio unit is broken, you can swap in a new one from another car or even an aftermarket better radio (some mods or certain rare loot might allow upgrades, but in vanilla they’re mostly similar).
- Cleaning & Misc: There’s no mechanical need to clean blood off your car in PZ (purely cosmetic), but if you roleplay, maybe you want to wash the car at a working sink or with a water source. A bloody car doesn’t degrade or anything – it just looks gnarly.
In summary, preventive maintenance goes a long way. Change tires before they blow, keep the engine tuned up, patch that gas tank hole, and you’ll avoid a lot of “stranded on the roadside” scenarios. And remember, each repair or part swap you do will give you Mechanics XP (even failures give a little). One popular (and somewhat cheesy) way to level Mechanics is to find a safe spot with a couple of junk cars and repeatedly uninstall and reinstall easy parts like headlights, radios, and seats. You can literally farm XP by taking out a car’s radio, putting it back, taking it out again… over and over. It’s tedious, but it works – that’s how real apprentices learn, right? By repetitive practice. Just keep an eye out that you don’t get snuck up on while elbow-deep in an engine bay.
Spare Parts and Salvage
As you maintain vehicles, you’ll inevitably need parts. Aside from finding parts on shelves (for example, sometimes gas stations or hardware stores might have a spare tire or car battery on the shelf), your primary source will be other cars. Every wreck or abandoned vehicle is a potential goldmine of spares. Here’s how you can be an opportunistic scavenger:
- Engines: If a car’s engine is beyond saving but you have time, uninstall it (requires high skill) to get engine parts. Or, if the whole car is not useful, you might remove the engine and then “dismantle” it for a bunch of engine parts in one go. These parts are generic “Engine Parts” used for repairs.
- Battery: Take batteries from vehicles you find, especially if they have some charge. You can charge them later. Having multiple batteries means you can rotate them as mentioned. They’re heavy though, so maybe not more than one spare in your trunk.
- Tires: If you have storage space, take good tires off abandoned cars. You can stack them at your safehouse for future use. Note they’re heavy and bulky, though; maybe prioritize at least one full extra set for your main vehicle.
- Brakes/Suspension/Mufflers: These parts rarely have individual loot spawns, so your best bet is to pull them from other cars. If you come across a wreck that’s in better shape than your car, strip it! Many players maintain a “junkyard” at their base – dragging wrecks in and stripping them for every usable piece. (On a related note, the game’s world includes actual Wrecking Yards in some towns, which contain numerous car wrecks and sometimes spare parts or even a usable car if you’re lucky. Those places are ideal to scavenge parts, just be careful of the dense zombie population that tends to gather around industrial areas.)
- Body Panels: Doors, hoods, trunk lids – if pristine, grab them if you have a place to store. They can be used to replace damaged ones later. However, these parts are also heavy and take space; you might not hoard too many unless you have a base with lots of storage.
- Scrapping vs. Repairing: Currently, you can’t fully scrap a car into raw metal in vanilla (though there are mods for that). You can, however, salvage usable parts and leave the husk. If you have Metalworking skill, you can also patch up certain body parts with metal sheets and a torch – for example, you can weld metal sheets onto a trunk to restore some of its integrity (this shows up as “Door Repair” or “Trunk Repair” options when you have sheets and a torch). It won’t return to 100% unless you fully replace the part, but it can reinforce a part somewhat. There’s even an option to create makeshift armor for windows (welding bars over windows) in vanilla? Actually, that might not be in vanilla, but some mods or upcoming features. As of now, heavy body armor like plating the front of your car with a metal plate (Mad Max style) isn’t an option in the base game – but mods do allow it, which we’ll discuss later.
One thing to keep in mind: all vehicle parts have weight, and the act of working on a car takes in-game time. So never start a lengthy repair if you’re not sure the area is secure. You don’t want to be in the middle of swapping an engine when a horde wanders by. Ideally, do your repairs at a base or garage you’ve cleared. If you must do an emergency fix in the field (like changing a tire on the highway), try to dispatch any nearby zombies first and be as quick as possible.
Fuel, Batteries, and the Essentials of Keeping the Engine Running
We touched on fuel and batteries above, but these systems are so critical they deserve a closer look. Running out of gas or power at the wrong moment can end your survival abruptly, so a savvy survivor learns to manage these resources like a pro. Let’s talk fuel systems, power, and part degradation in depth – essentially the “lifeblood” and “heartbeat” of your vehicle.
Gasoline: Liquid Gold of the Apocalypse
Fuel is life for any vehicle. In Project Zomboid, gasoline doesn’t go bad (at least not within the timeframe of the game), but it does run out – both in individual vehicles and as a whole on the map. Here’s what you need to know:
Finite Resource: All gas stations have a fixed amount of fuel in their tanks when the game starts. Once the power shuts off, you can’t pump more without a generator. And even with a generator, you’re pulling from a limited reserve. If you or others on a server overuse fuel, you can dry up a gas station. There is no infinite refuel source beyond what’s in the world initially, so be mindful of your consumption especially in long games or multiplayer servers.
Siphoning Fuel: You can transfer fuel between vehicles using gas cans. If you have an empty gas can, go to a vehicle that has some gas, right-click it, and choose “Siphon Gasoline.” Your character will glug out some fuel into the can (it takes a little time). Then you can take that can to your car and refuel it. This is bread-and-butter activity: scavenging fuel from disabled cars to fill your working car. Note you can only siphon if the target vehicle has some fuel to begin with (obvious, but worth stating). Some wrecked cars might have a few drops; others will be bone dry.
Fuel Capacity and Efficiency: Different vehicles have different tank sizes. A heavy-duty truck might hold 100 units of fuel, a small sedan maybe 60. If you fill your car’s tank and a gas can or two, you have a considerable range. How far that gets you depends on the car’s fuel efficiency – which is not explicitly given in a stat but generally, heavy vehicles consume more per distance than compacts. The devs have indicated that gas consumption now depends on what gear you’re in and is “more forgiving” after some updates. Essentially, driving at a reasonable steady speed on highways gives you decent mileage, whereas lots of stop-and-go in town or high-RPM redlining will burn more fuel. A sports car can gulp gas if you floor it everywhere, while a econo-sedan driven calmly can stretch a tank much further.
Conserving Fuel: In survival situations, it pays to save fuel. Here are some tips:
Don’t use the car for every little trip. If a loot run is just a few houses down, walk or sneak instead of firing up the engine.
When you do drive, plan efficient routes. Combine multiple objectives in one trip if possible.
Avoid idling the car unnecessarily. If you’re stopped and not in immediate danger, kill the engine to save gas (and reduce noise). Realize though that restarting uses a bit of fuel too, so if you’re stopping for just a few seconds maybe leave it running – otherwise, turn it off.
Coast when possible. Letting go of the acceleration and coasting toward your destination saves a bit of fuel and also reduces noise. There’s even a “Cruise Control” feature (use
Shift+WandShift+Sto adjust it) that can lock your speed at a constant rate; using it to maintain a steady slow roll through areas can help keep RPM low and fuel usage minimal.Smaller vehicles = less consumption. If you have a choice, maybe use the motorcycle or small car for routine travel and reserve the big truck for when you really need that carrying capacity.
Stockpile gas early. While the power is still on, consider stockpiling some fuel. Fill a few gas cans and store them at your base. As insurance, also grab a generator and the “How to Use Generators” magazine (to learn how to operate it). That way, when power goes out, you can setup the generator at a gas station to keep fuel flowing. Just be aware generators consume fuel too, and operating one at a gas station can be noisy, attracting zombies, so set it up, fuel quickly, and get out.
Fuel Side Indicator: As mentioned, by default most cars have the cap on the left (driver’s) side. The Fuel Side Indicator mod simply adds a UI arrow so you don’t have to guess or remember. In any case, repositioning your car at the pump if the prompt doesn’t show up is a quick fix – you need that cap in proximity to the pump object.
Fuel Leaks: Reiterating – a leaky gas tank is devastating. If you fill up a car with a bad tank, you might return to find it mysteriously empty later. If you must drive a car with a leaky tank (you haven’t found a replacement yet), consider not filling it all the way (to avoid faster leakage) and drive it straight to where it can be fixed. Or carry a lot of gas cans and accept that you’re basically refilling constantly (not ideal). Better yet, swap that tank ASAP. You might use some Metalworking to patch a tank if your skill allows (applying metal sheet might help a bit), but often replacement is the way to go.
Batteries and Electricity
Cars don’t just need gas – they need electrical power for the starter, ignition, lights, and more. The car battery is your vehicle’s rechargeable energy source. Managing batteries is a slightly lesser concern than fuel, but still important:
- Battery Charge: You can see the current charge of the battery either in the vehicle mechanics screen (hover or scroll to battery, it’ll say e.g. “Charge: 85%”) or by checking the dashboard – the red battery icon will light if the battery is very low. If you leave your radio or headlights on without the engine, you may come back to a dead battery. A fully charged battery can last quite a while powering lights, but eventually it will die. Also, batteries slowly self-discharge over many days if not used, especially if in a cold environment.
- Alternator and Running: In PZ, when you drive (or idle) the car with the engine on, the battery gains charge. Essentially, the car has an alternator that tops the battery up. If your battery is low, taking a long drive (or just idling for some in-game hours) can charge it. Be careful idling though – you’re burning fuel and making noise. If desperate to charge, maybe idle in a remote area or inside a secure garage with the doors closed.
- Replacing Batteries: If a battery’s condition is bad (below 20% condition or so), even if you charge it, it might not hold charge well or deliver enough power. In that case, swap it out. Car batteries are interchangeable only within the same vehicle type category (Standard battery for standard cars, etc.). Always keep an eye out for good batteries. They have weight (like 5 units) so carrying spares is doable. If, for instance, you plan a long trip to Louisville, it might be worth bringing a charged spare battery in case your main dies.
- Using the Car Battery Charger: If you find this device, it’s fantastic. You place it on the ground (note: use the “Place Car Battery Charger” option, not just drop it, so that it becomes an interactive world object). Hook it up by plugging it (if near an outlet in a powered building) or by having a generator running nearby. Then you can attach a battery to it via the context menu. It will charge at a steady rate. It’s slower than charging via driving, but it doesn’t consume your fuel (just whatever generator fuel or house electricity is left). In a pinch, you could even charge a battery at base with a generator, then take that battery out and bring it to your car to start it. Essentially, using the charger, you can treat batteries kind of like large heavy “fuel cans” of electricity. Just be cautious placing or picking up the charger – there have been reports that placing it in weird spots can sometimes bug it (like behind certain furniture). Always retrieve it when done; it’s a valuable tool.
- Battery lifespan: Batteries don’t last forever. Repeatedly draining and charging will slowly degrade the condition. If you notice a battery’s condition slipping, that’s wear and tear. Eventually you’ll toss it out. There’s plenty around, though – every abandoned car has one.
- Winter and Cold Effects: In cold weather, batteries can struggle (though I’m not entirely certain if PZ fully simulates cold-cranking difficulties). It might in some form. If your playthrough hits winter, and you left your car out in subzero weather, you might find it a bit harder to start in the morning (though usually it’ll still start, just possibly with a stall or two). This is minor, but just remember that winter can add stress to vehicles too.
Part Degradation and Damage: When Things Fall Apart
Nothing lasts forever in Project Zomboid – and vehicles, when used roughly, can degrade quite fast. We’ve gone over how to fix parts, but let’s talk about what actually causes parts to wear down or break in the first place:
- Driving and Mileage: Simply using the car will slowly lower the condition of various parts. Every time the engine is started, there’s a small chance it takes a durability hit, especially if its quality is low. Every second the engine is running doesn’t necessarily degrade it, but running at high RPMs (e.g., driving full throttle) might increase wear. Notably, parts only degrade while being driven – if you park the car and leave it, it’s not going to mysteriously wear out just sitting there. (Flat tires don’t occur just from time – only from damage or bad luck while driving.) That’s good – you can have a project car sitting in your safehouse for months and it’ll be in the same shape you left it.
- Off-road Driving: Taking your vehicle off paved roads will slow you down and reduce traction, but it also stresses the suspension and tires more. Expect your tires and suspension parts to lose condition faster if you frequently go mudding through forests or bumpy fields. If you hear a lot of thumping and see the car body bouncing, that’s strain on those parts. It’s not instant doom, but you’ll want to check them after extensive off-roading.
- Hitting Zombies: Let’s be honest, mowing down zombies with a car is tempting. In emergencies, a two-ton hunk of metal can clear a path through a horde that no amount of shotgun shells could. But every zombie you hit is like hitting a heavy object – it damages your car. The hood and engine take the brunt if you’re smashing into them head-on. Windshields can shatter if enough bodies pile on. Tires can even get damaged if you run over corpses or debris (though running over already-dead corpses does not damage your tires/suspension – the bump you hear is mostly cosmetic). It’s the act of killing a zombie with the car that causes damage: the initial impact tends to hurt your front (or whatever side hits them) and possibly your tire if you drive directly over them at speed. Interestingly, many players have noticed an optimal strategy: driving slowly through a crowd will knock zombies down and kill them under your wheels without massively damaging your car, whereas slamming at high speed will wreck your front end. In fact, some say as of Build 40 you could “easily drive through the horde at low speed and make meat steak out of them” while suffering minimal damage. However, do this at your own risk. A slow plow can still degrade your hood and suspension over time, and if you misjudge, you can get swarmed.
- Collisions (Trees, Poles, Other Vehicles): These are worse than hitting zombies. A stationary object is unforgiving. Smack a tree or telephone pole, and you can instantly total a car – engine dropping to 0%, radiator (if we had radiators) leaking hypothetical coolant, wheels torn off, you name it. Even minor scrapes with walls will scratch paint and dent body parts. Treat obstacles with respect; driving fast on city streets is how many survivors meet their end with a sudden crash. If you must drive fast, do it on open highways. When in towns, slow down – you never know when wreckage or a shambling zombie will appear around a corner, and you won’t have time to brake if you’re zooming.
- Wear and Tear Factors: Some parts degrade at different rates. For example, brakes might last a very long time unless you’re constantly stomping them or driving with broken brakes causing friction. Mufflers seem to degrade relatively quickly if you do a lot of off-road or bumpy travel (could be simulating knocks and rust). The engine’s condition will very slowly drop with use, but if you frequently redline the RPM or drive with low oil (if oil was simulated) it would drop faster – since we don’t explicitly manage oil, consider that running the engine hot (like long drives at max speed) might simulate that wear. There was a hidden stat mention that better parts give more performance, implying that as parts degrade, performance (speed, handling) also degrades. For example, a tire at 50% might slightly reduce top speed or increase fuel consumption. It’s subtle, but keep parts in good shape to keep the vehicle at peak performance.
- Towing Strain: If you tow another vehicle (which we’ll cover soon), note that it puts extra strain on your engine and brakes. It’s effectively like driving while carrying a heavy load. You may find your engine condition dropping a bit faster during long tows, especially if the towed car is heavy. Also, if you have the Sunday Driver trait (which reduces acceleration) and you tow, you’ll find it painfully slow – that trait “heavily decreases player acceleration” and when towing that effect is magnified. Conversely, Speed Demon makes you accelerate quicker, which also helps towing to not be a total slog (though be careful not to overdo it and snap the tow, as sometimes physics can get wonky).
One often overlooked aspect of vehicle maintenance is simply listening to your car. Turn off the radio and pay attention to sounds: a grinding noise when braking means brakes are shot; heavy thumps mean you’re hitting rough ground too hard; a loud engine roar could hint the muffler fell off; difficulty starting or frequent stalls indicate engine or battery trouble. The game provides audio feedback that, if heeded, can give you early warning to check something.
Finally, remember that sometimes a car is beyond saving. If you start with a junker that has an engine at 20% and no tires, maybe use it for short term and then abandon it when you find a better one. Don’t get too sentimentally attached to one vehicle (unless it’s really one-of-a-kind or you spent a huge effort fixing it up). Always have a backup plan – either a spare vehicle at base or at least a bicycle (if using the bike mod) or plain old walking shoes. This is the apocalypse; even the best ride might end up a burnt-out shell if things go south. In the next sectionIn the next stretch, we’ll cover driving tactics, common mishaps, and those realistic survival strategies that turn a good driver into a legendary survivor. We’ll also spotlight some best vehicle choices for different scenarios. It’s time to put the pedal to the metal – wisely.
Life on the Road: Driving Tips, Tricks, and Survival Strategies
So you’ve got a working car and a basic grasp of how not to crash it – now what? Now the real fun (and responsibility) begins. Using vehicles effectively in Project Zomboid isn’t just about maintenance; it’s about strategy. Here are a host of tips, tricks, and solutions to common problems to help keep you alive behind the wheel:
Noise Management – Stealth vs. Speed: Cars are noisy – there’s no getting around it. But you can manage noise. First, accelerate gently instead of flooring it; high RPMs make more noise and attract more undead attention. Cruising at 30 mph down a street will draw far fewer zombies than gunning it at 80 with the engine roaring. If you have Speed Demon trait, be extra careful – while it lets you accelerate faster, it also means you’ll reach those loud engine revs quicker (and indeed, tests show it makes cars effectively louder in practice by hitting higher RPM). On the flip side, Sunday Driver trait caps your speed to a granny-like crawl (around 30 mph max). It’s safer noise-wise, but can be deadly if you need to outrun something. Many players avoid Sunday Driver despite the free perk points, because being unable to go above jogging speed in a car is too limiting when things go south.
Route Planning: Before you roar off on an adventure, plan your route. Check the in-game map (if you have one) or use memory to avoid choke points like narrow streets that might be clogged with wrecks or hordes. Highways are generally clear but sometimes have roadblock events or car pile-ups (the game spawns random accident scenes). Carry a Propane Torch and Welding Mask if you can, because you can dismantle wrecks that block your path if you have to. It’s time-consuming (and uses propane fuel), but it’s an option if a critical road is jammed with non-movable wrecks. Otherwise, detour around via fields or alleys (just mind the trees and fences).
Parking Smart: How you park your vehicle can save your life. Always park facing outward from wherever you pull in. That means back into driveways or parking spots so that when you need to leave, you can just hit the gas and go forward. Fumbling with a three-point turn while a mob closes in is a heart-pounding experience you’d best avoid. Also, try to park on solid ground; parking in tall grass or forests can sometimes get your car stuck or make it harder to accelerate out. Pro tip: leave your driver’s side window rolled up when you park in a dangerous area. If a zombie finds you while you’re starting the car, a closed window buys you time; an open window means they can grab or bite you immediately as you fumble for the ignition.
Quick Exit Strategy: In case you do get swarmed while in the car, know how to bail out safely. Ideally, you avoid this scenario, but if your car gets disabled or surrounded, you may have to abandon it. Try to slow down as much as possible before jumping out (you must almost stop to actually get out). Pick the side with fewer zombies (climb out the passenger side if your driver’s door is mobbed). The moment you exit, start running or pushing zombies – don’t linger. Remember, if zombies are pressed against your doors, you might need to shove them first to clear a path. If the car is totally surrounded and you can’t get out without being grabbed… well, you might have made a few too many mistakes leading up to that. In that worst case, consider honking to draw them to one side, then exit out the opposite door and sprint. It’s risky but sometimes the noise diversion can create an opening.
Car as a Weapon (Use Sparingly): We all dream of mowing down a horde like we’re in a zombie action flick. And yes, you can kill zombies with your car. But as mentioned, it’s very hard on the vehicle. A viable tactic is the “slow crawl” method: drive at a modest speed (5–10 mph) into zombies so the impact isn’t too hard, but enough to knock them under the wheels. Then your car will run over them and often kill them after a few knocks. This way, you can (somewhat) safely clear a group without instantly destroying your hood. However, even this will wear your vehicle down and if too many bodies pile up, you risk getting your car stuck on a mound of corpses. The fast ram method (flooring it through a crowd) will scatter zombies like bowling pins, true – but you’ll usually wreck your radiator/engine in the process, potentially leaving you stranded amid a very angry, only-partially-thinned horde. A good compromise: use the horn or siren to lure a horde into a tight clump, then slowly push through them, and lead the remainder away. Or better yet, avoid the fight entirely. In PZ, discretion is the better part of valor – you usually don’t need to kill every zombie with your car, you just need to get past them or draw them away.
Using Sirens and Alarms Tactically: Certain vehicles (police cars, ambulances, fire dept vehicles) come with built-in sirens you can toggle from the radial menu. These are extremely loud – much larger draw radius than a horn – and will attract zombies from very far away to that vehicle. This can be both a blessing and a curse. Tactical use of siren: Say you want to clear a town. Park your police car on one end of town, turn on the siren, and run (on foot) to the opposite end. The noise will pull most undead toward the blaring car. They’ll gather around it, attacking it (sirens also tend to make zombies attack the vehicle). Your car will get beaten on, but if it’s in good shape it can withstand this for a while. Meanwhile, you’re free to loot the now-emptier area. Later, you can try to sneak back to the car (hopefully the horde moved a bit away after losing interest, or you use a second car to pick it up). This is advanced and risky, but it’s a known strategy. Even a simple horn honk (
Qkey) can be used similarly on the fly – honk to lure zombies out of a building or to get a group to move toward your car instead of your survivor. Just remember, you’re ringing the dinner bell – have a plan for where the zombies you attract will go. Don’t just gather 200 zombies and then find you’ve boxed yourself in. Ideally, lead them on a merry chase with the car and then lose them in the countryside.Barricading with Vehicles: An unconventional but effective use of broken or spare cars is as mobile barricades. You can push (by driving) a wreck or parked vehicle to certain chokepoints: for example, use a car to block the gate of a fenced base, or plug a narrow alley with an old truck to prevent zombies from passing. Zombies will treat cars like solid obstacles – they might swarm around them or smack them, but can’t path straight through until they destroy it (which can take a long time, and they actually can’t fully “destroy” a car like they do doors; they’ll just damage parts). A common trick in multiplayer or late-game is to create a wall of vehicles around a base. Be warned: vehicles require space, and if one car is too close to another or a wall, zombies might glitch through or climb onto things unexpectedly. Still, a line of wrecks is much harder for zombies to breach than a wooden wall. Just don’t leave a path where they can squeeze through. Also, if you barricade with a vehicle you still intend to use, make sure it has an escape path (otherwise, when you need it, you’ll find it boxed in by other junk).
Shooting from Vehicles: Project Zomboid allows drive-by shootings, which is as action-movie as it sounds. If you have a firearm and want to fire from your car, you need to open your window (via the vehicle radial menu, choose roll down window). Once down, you can aim and shoot normally while the car is moving (your character will stick their hand out and blast). This can be useful to take out a lone zombie blocking the road or to pop a few shots at a gas station horde to thin them. Remember, shooting makes noise too – you might just draw more zombies, negating the point. And trying to line up shots while driving is difficult; your vehicle doesn’t stop on a dime when you’re busy aiming. Still, it’s a trick worth knowing. (Melee attacks from inside the car used to be a thing, but as of recent updates the devs disabled melee-from-vehicle to prevent exploits, so you can’t whack zombies with a baseball bat while seated – only guns work). Overall, shooting from a car is situational; use it only if you’re confident or desperate.
Dealing with Breakdowns: Eventually, you’ll likely face a breakdown or a “car won’t start” scenario in the field. If the engine won’t crank and you’re in a tight spot, immediately assess the danger. If zombies are closing in, bail out and handle them or flee first – then worry about the car. If you have time, troubleshoot: Did you run out of gas? (Check fuel gauge; it happens to the best of us, especially if a fuel tank leak caught you off guard.) Is the battery dead? (If the lights won’t even turn on and there’s just a clicking when you turn the key, that’s a likely culprit). If you carry a spare battery, now’s the time to swap it. If not, maybe another nearby car has one – quickly swap batteries from an abandoned car if you can. Engine failure from condition 0% is a showstopper – if you somehow let your engine get totally destroyed, it won’t start at all, and you won’t fix that without major repairs and spare parts on hand. At that point, it’s abandon-ship time. Also, remember ignition damage: if you repeatedly fail hot-wiring or if a car has taken ignition damage, you might need to repair the ignition (which requires electrical skill and possibly a new ignition coil item). Generally, if a car simply refuses to start and you’re not sure why, consider that a sign to find another vehicle or head home on foot if possible.
Stalling and Engine Reliability: If you notice your engine stalling occasionally (sputtering off even though you have gas), that’s a sign the engine condition is low or its quality is poor. It can happen at inconvenient times – the car might stall in the middle of a road, leaving you mashing “start engine” while zombies approach. To minimize this, keep that engine above 50% condition if you can. If you get a stall, don’t panic: pop open the mechanics UI later and see what’s up. In the moment, shift to neutral and turn the key again (in game, just press
Nor use radial to restart). It usually starts on the first or second try unless it’s really trashed. We mentioned before: an engine of 100% quality only has a 1% stall/fail chance on start, whereas something like 20% quality might stall quite often. If you have a persistent staller, plan your routes with more margin for error (no tightrope driving through groups, because Murphy’s Law says that’s when it’ll stall). And get that engine fixed or replaced soon.Eyes on the Road!: This one sounds obvious, but in an isometric game where your focus is often on the character or inventory, it’s easy to become distracted. When driving, pay attention to the road ahead. It’s tempting to check your map or manage your inventory while cruising, but a split-second lapse and you might ram into a wreck or a building. If you must check something, slow down or stop in a safe area briefly. Likewise, keep an eye out for Crawlers on the road – those low-to-the-ground zombies can sometimes be hard to see, and hitting one is like running over a spike strip; it can damage tires. (Running over corpses won’t hurt the car’s mechanics, but running over a living crawler might do a number on your wheel, given the game’s logic that “killing a zombie with your car can damage tires”.)
Carry Emergency Supplies: Treat your car like a survival kit on wheels. Some recommended items to always keep in the trunk:
A Gas Can (full if possible) – if you run dry, you’ve got a bit to get you to safety.
Lug Wrench, Jack, Screwdriver, Wrench – the core tools to fix common issues.
A Spare Tire – at least one; you often won’t need it, until you really do.
Spare Fan Belt – fan belts can randomly break (a minor event, but your car won’t run without one). They’re small; toss an extra in.
Duct Tape – emergency fixes for windows or a temporary patch on something like a windshield or headlights.
Battery Charger or Spare Battery if you have room and one is available.
Headlights (bulbs) – a spare headlight or two if you plan on night driving, so you can replace a broken one on the fly.
First Aid Kit – car accidents happen; having bandages in the glove box is just good sense.
Water and some food – if you get stranded or spend a long time clearing a road, you’ll need to stay hydrated/fed.
Lighter/Matches and a Gas Can – not for the car, but consider if you ever need to torch a horde (risky, but sometimes people do set zombies on fire). A full gas can could be a makeshift weapon (pour fuel, light a fire). Again, only if you know what you’re doing – fire can easily roast you instead and a car won’t save you from flames.
Towing Basics: Did you find a second car worth keeping, or a generator trailer to haul? Knowing how to tow vehicles is crucial for expanding your vehicular arsenal. To tow a car, align your driving vehicle’s front or rear to the target vehicle’s opposite end (basically, back your car’s rear to the front of the one you want to tow, or nose your front to its back). Get out, walk between the two (they need to be close), and open the radial menu – you’ll see an icon with a plus/chain to attach the vehicles. One gotcha: make sure the vehicle to be towed has its parking brake (handbrake) off or it won’t budge. Enter it, press
Space(handbrake key) or use the radial to release it, then go back to towing car and attach. Once attached, drive slowly. Towing massively reduces acceleration and handling. It’s like dragging a dead weight – because you are. Your car’s engine power vs the weight of what you’re towing determines how fast you can go. Ironically, sports cars make great tow vehicles due to high horsepower, whereas a heavy truck with moderate engine might struggle (it’s hauling a weight almost equal to itself). If it feels like you can barely move, you probably exceeded what your car can handle – consider removing excess load from the towed car (strip out loot, etc., or get a more powerful vehicle). When you want to drop the tow, stop and use the radial menu again to detach (minus icon). Note: Towing isn’t meant for quick getaways; it’s for relocating assets. Plan to tow when area is mostly clear, because you’ll be moving at a crawl. And if you have the Better Towing mod or similar, note that some mods require a tow rope or bar item and simulate even more weight physics. Vanilla towing is simpler – just link and go.Alternate Transportation: If fuel becomes scarce or you lose your vehicle, remember there are other ways to get around. Project Zomboid’s vanilla game doesn’t have bicycles or horses (yet), but the Braven’s Bicycles mod introduces bikes, which are silent and don’t need fuel (you’ll need to pedal, which uses your stamina). Bikes can’t carry as much and you can’t run zombies over, but they’re great for scouting or getting to your crashed car to retrieve stuff. Mods also add motorcycles (Autotsar Motorclub or the standalone Kawasaki KZ1000 Police bike mod) which are basically loud, fast two-wheelers – fun, but quite dangerous if you crash, and you’re very exposed to zombie attacks while on them. Boats aren’t in the game, but maybe one day – for now, bridges and cars are how you traverse rivers (unless you mod in a rowboat or such).
Real-Life Logic Helps: Treat the game’s vehicles somewhat like you would in real life and you’ll do well. Don’t skip maintenance – a neglected car will fail you at the worst time. Don’t drive intoxicated (yes, if your character is drunk or panic-fogged, your driving will suffer!). Wear a seatbelt… well, there isn’t a seatbelt button, so presumably you always do. But realize that a high-speed crash can injure or even kill your character from the impact alone, seatbelt or not. The devs are fairly realistic: cars don’t explode Hollywood-style in Project Zomboid. If you crash, the car’s not going to erupt in a fireball; it’ll just be wrecked and maybe catch fire if something in the environment ignites it. So at least you usually won’t burn alive, which is solace. Zombies cannot magically jump on your moving car like action movie zombies – they’re more likely to get knocked aside or just bang on it. Use this knowledge: a slow-moving car can gently push zombies out of the way without triggering the same response as a sudden slam.
Know When to Ditch: Lastly, know when to let go of a vehicle. It might be your first ride or your favorite van, but if it’s on its last legs and you have a better option, strongly consider switching. Sentimentality kills. That being said, some players do manage to keep one car alive for years in-game, through meticulous care and part replacement – essentially making it their “Eleanor” (Gone in 60 Seconds reference) or prized vintage. That’s awesome if that’s your style, but always have contingency plans. Maybe park a backup car at your base or stash a spare along a common route (some survivors leave a junker with a full gas tank in a barn halfway to Louisville, for instance, as a refueling depot and emergency car).
With these tips in mind, you’ll handle most vehicle-related dilemmas the Knox Event throws at you. Experience is the best teacher – you might have a harrowing tale or two of an escape by the skin of your teeth after a botched turn or a heroic supply run using an ambulance as a distraction. Cherish those stories; that emergent chaos is what Zomboid is all about!
Best Vehicle Choices for Different Playstyles
By now it’s clear that some vehicles excel in certain roles more than others. To help you decide what ride suits your survivor life, here’s a rundown of the best vehicle types for various playstyles and scenarios:
The Lootmobile (Best for Looting & Base Building): If you’re the type who goes on massive supply runs and brings back haul after haul, you need a vehicle with max cargo capacity. Your best bet is a Heavy-Duty Van or Pickup. For example, the Chevalier Step Van (the boxy delivery truck) or the Franklin Valuline full-size van are top-tier loot haulers – they have huge trunk space and multiple seats to stuff goods in. A Step Van can carry a generator, dozens of logs, or a whole grocery store’s contents in one go. It’s essentially a mobile storage unit. Pickups like the Dash Bulldriver are also great: slightly less trunk than a van, but often a bit more maneuverable and common. When using a lootmobile, consider removing the rear seats (through the mechanics menu) to eke out a bit more storage (empty seats provide extra capacity, but if you’re solo you might not need all seats). Just remember: heavy vehicles plus heavy load means slow going. Don’t rush a packed van or you risk flipping it (not literally flipping – but losing control). And watch that fuel gauge; these guzzle gas, especially when loaded down.
The Getaway Car (Best for Fast Travel & Fleeing): Sometimes you need to be somewhere now – or away from somewhere five seconds ago. That’s when you want a fast, reliable car. The obvious choice: a Sport or Performance car, like the Chevalier Cossette (sports coupe) or Dash Elite (sporty sedan). These cars have high top speeds and quick acceleration, perfect for outrunning a pursuing horde or covering long distances (like driving from West Point to Louisville) in shorter time. They also generally have better handling at speed (though still be careful with sharp turns). The downside is tiny storage, so these aren’t for looting runs – these are for emergency escapes, quick scouting, or courier missions where you just need to deliver a small item fast. Another great getaway vehicle is the police sedan variant of the Chevalier Nyala: it’s not technically a “sport” model, but police package cars have a bit more horsepower than civilian versions, and you get the siren option. They’re also four-door with a trunk, so you can carry some gear. Think of it as a compromise between speed and utility. Keep your getaway car tuned (tires and engine in top shape) to minimize any stall risk when you really need to floor it.
The Off-Road Workhorse (Best for Rough Terrain & Remote Areas): If your survival strategy has you farming in the woods or fishing at distant cabins, you’ll travel off the beaten path. Heavy-Duty vehicles, especially those with higher clearance, shine here. The Franklin All-Terrain (if you find one; it’s basically a 4x4 SUV) is explicitly made for off-road. Lacking that, a regular pickup truck or even the off-road Jeep (some mods add jeeps) will do. Heavy suspension and tires suffer less on bumpy dirt tracks. These vehicles can handle hordes on a muddy trail better – they won’t get bogged down as easily and maintain traction when a sedan would be slipping. They also tend to have good front-end durability, which is nice when you inevitably hit a tree or two while bouncing around forests. If you know you’ll be frequently off-road, consider adding the “Off-road tires” if you find some (there are tire varieties in loot; not sure if base game differentiates traction, but it could via condition drop rates). And pack two spares – off-roading far from base, a flat tire can be a death sentence if you didn’t prepare.
The Troop Transport (Best for Multiplayer Groups or NPC followers): In multiplayer or if you play with NPC mods, you might need to carry several people. Look for vehicles with many seats. The ordinary van often has 6 seats (2 front, 2 middle, 2 back). The ambulance has 4 (with lots of storage too, and sometimes medical loot). The Masterson Horizon wagon is actually a small car but with 4 seats; still, for groups bigger than 4, you want a van or one of those short buses (if using the Filibuster Rhymes' Used Cars mod, there are school buses and even big coach buses that can hold a ton of people, but in vanilla the closest is probably a van or the 5-seat station wagon like the Chevalier Cerise which has seats plus trunk). When rolling with a crew, speed becomes less important than stability – you don’t want to tip or crash with a full party. So drive cautiously and make sure everyone in the back keeps their limbs inside – those rear windows are an entry point for zombies if someone foolishly leaves it open.
The Decoy & Utility Vehicle (Special Purpose): This is more of a role than a model. Some vehicles you keep around not for travel or loot, but for their special uses. A police car or fire truck to use the siren as a zombie magnet (as discussed). A beat-up “junk” car that you leave with its horn blaring (via an attached alarm clock or triggered alarm) as a distraction while you do something else. Or a truck with a trailer: if you have the Autotsar Trailers mod, you can attach a big trailer for truly insane carrying capacity – useful for one-time base relocation or loot sweep, though a trailer will slow you even more than towing a car. Some players designate a “sacrifice car” – one with a full tank and alarm – to be used in case they ever get in an impossible situation; they’ll lure zombies, then set that car on fire or blow it (with a molotov) to create a distraction. In vanilla, cars don’t explode, but a burning car will create noise and flame that attract zombies. In any case, think creatively: a vehicle can be more than just a ride. It can be a tool, a weapon, or a barrier.
To sum up: choose the right tool for the job. Just like you wouldn’t go looting a hospital with only a spoon for defense, don’t go on a cross-country run with a clunky delivery van that can barely top 60, and don’t try to haul 20 logs in a sports car. Match your vehicle to your needs and you’ll greatly increase your survival odds.
Mods and Upgrades: Taking Vehicles to the Next Level
The vanilla Project Zomboid vehicle experience is deep, but the community has revved it even further. If you’re hungry for more vehicles, enhancements, or realistic tweaks, mods can greatly expand your automotive adventures. Here are some standout vehicle-related mods (and mod packs) that gamers swear by:
Filibuster Rhymes' Used Cars (Mod) – This is the famous vehicle expansion mod. It adds a massive variety of vehicles to the game – over 50 base models, and if you count variants, over 90+ new vehicles in total! Everything from classic cars, sports cars, SUVs, to military trucks and buses. Ever wanted a school bus to convert into a mobile base? Fili’s got it. How about a Humvee or a Delivery truck with custom art? Got those too. The mod integrates these vehicles into the world seamlessly, spawning them in logical places (you might find a school bus near schools, or a military APC at the checkpoint). These vehicles come with full mechanics, some with unique features. The sheer variety fulfills that fantasy of scavenging for the perfect dream car. Just note: with great variety comes great restraint – you might spend more time collecting cars than surviving! (But hey, some of us love roleplaying a post-apoc car collector).
Autotsar Vehicle Mods (Collection) – The “Autotsar” team has made several high-quality mods:
Autotsar Trailers – Adds multiple towable trailers, from small utility trailers to large fuel tankers and even a mobile generator trailer. With this, you can attach a trailer to your truck and essentially double or triple your storage. Want to camp out? Tow a camper trailer. The trailers have their own storage and some have generators or water tanks built-in. It really extends logistics for serious bases.
Autotsar Tuning Atelier (Chevalier Samara) – This mod introduces a specific car (the Samara) and a slew of custom tuning parts for it. Think muscle car tuning – you can find and install wide fenders, spoilers, armor plating (window bars, wheel armor), bullbars, and more. It’s basically the first step toward “Mad Maxing” a car. You end up with a beefed-up ride built for zombie collisions. It’s somewhat limited to that one model (a compact car) in this mod, but it’s very cool as a proof of concept. There are plans or other mods to allow tuning on more vehicles.
Autotsar Motorclub – Adds motorcycles. Now you can vroom around on two wheels. The bikes are fast and nimble, but extremely loud and dangerous. They hold very little (though the mod kindly gives them small saddlebag storage). Bikes can weave through wrecks nicely and are great for solo travel if you’re confident. Just don’t crash; you have zero protection on a bike. (And yes, you can wear a helmet – the KZ1000 Police bike mod even comes with a CHiPs style helmet).
Autotsar Buses (if available) – Large buses with many seats. Great for multiplayer – load your whole faction in a bus for a road trip. But they’re slow and unwieldy, as you’d expect.
These Autotsar mods often require “Tsar’s Common Library” (a mod that many vehicle mods use for shared code).
Braven’s Bicycles (Redux) – Adds bicycles to the game. The bikes are silent, require no fuel, and give you exercise (riding them builds fitness XP)! They occupy a nice niche: early game or low-infrastructure travel. You might use a bike to quietly scout a town before deciding to bring a car in. Downsides: they’re not fast (especially if your stamina is low), and you can get exhausted pedaling hard. But they are fantastic for not attracting attention. Just imagine ringing a little bike bell to lure one zombie at a time (okay, they don’t have bike bells… yet).
KI5’s Vehicle Collection – Modder KI5 has made a plethora of lore-friendly vehicles, focusing often on military or off-road types. This includes things like the '86 Oshkosh “Mullet” (a military truck), Humvee variants, classic muscle cars, etc. What’s special is many of KI5’s vehicles come with armored variants or can be fitted with armor. For instance, an SUV might have a version with window cages and reinforced bumpers. KI5’s mods are highly regarded for quality; as an Indie Stone dev spotlight said, “KI5’s vehicles, with over 25 separate mods to choose from, are extremely popular in our community – wide range of well-crafted cars”. If you want a technical (the pickup with a machine gun – though no functional guns on vehicles in vanilla, but mods might) or a big rig, check KI5’s workshop items.
Motorious Zone (FHQwhgads’s Vehicle Pack) – This is another vehicle pack that adds a ton of real-world inspired vehicles but keeping a vanilla aesthetic. It has everyday cars from the 80s/90s: think Toyota Previa minivan, VW Scirocco, Nissan 300ZX, even a Lamborghini Diablo for kicks. Plus some Easter egg vehicles referencing pop culture. If Filibuster’s pack is about sheer quantity, Motorious is about authenticity and seamlessly fitting in the game’s art style. It’s great for adding variety without breaking immersion (the cars feel like they were always part of the game).
Vehicle Armor and Upgrade Mods: There are a few mods that let you armor up any vehicle. One example is “Standardized Vehicle Upgrades”, which covers all vanilla and Filibuster cars, letting you craft armor plating for windows, hood, trunk, etc. This mod basically turns your workshop into West Coast Customs: you gather metal and junk, then beef up your car’s defense. With such a mod, you could make a clunker into a tank – windshield bars to stop zombie incursions, spiked bumper to reduce damage when hitting Zeds, trunk reinforcements so your loot is safer. It’s a bit overpowered if you max everything (you’ll hardly fear zombies at all while driving), but it’s balanced by the material and skill requirements. Another mod, “Armor All Vehicles,” similarly adds armor recipes. If you really want that Dead Reckoning (Land of the Dead movie) vibe of a fortified zombie-proof ride, mods are the way to get it.
Better Towing / Tow Bar Mods: If you felt towing in vanilla was too easy or weird, there are mods like Better Towing that require a physical “tow bar” item and simulate tow ropes. Some also improve physics so the towed vehicle doesn’t wobble as crazily. Use these if you want towing to feel more realistic (but expect it to be more work – e.g., you might need to manually connect a tow rope item to two cars).
Vehicle Dismantling/Recycling Mods: As mentioned, without mods you can’t strip a car down completely for resources. Vehicle Recycling mods allow exactly that – break cars down into metal scrap, plastic, electronics, etc. This can be great for engineers or when you have a lot of destroyed cars around your base you want cleared. Scrap from cars can be repurposed for barricades or crafting. Just be mindful that some servers consider this a balance change (free resources), but in singleplayer it can make sense that you’d scrap those 5 junk cars in your yard for some useful metal.
Fuel & Mechanics Overhaul Mods: There are mods that make fuel more scarce or add fuel stability issues (like fuel can go bad after a year, etc.), for extra realism. Others overhaul the mechanics skill – for instance, making it so you can install different engine types or requiring more specific tools. These are for the hardcore simulationists. For example, “True Motors” mod makes engine power and gearboxes more detailed, or “Realistic Vehicle Failure” might introduce random breakdown events. Use these if you find vanilla too forgiving and want the authentic “old car experience” of random failures.
Visual and UI Mods: Cosmetic mods exist too – like ones to change the vehicle radio UI or to show actual brand logos on cars (if you prefer real car names). There’s a Vanilla Vehicle Enhancer that tweaks textures and adds visual variety (like different wheel styles, etc.). Also, the Fuel Side Indicator mod we described is a simple but popular one – it puts a little arrow on your dash gas gauge showing which side the fuel cap is on, just like modern real cars have, so you never guess wrong at the pump.
One great thing about PZ’s modding is many vehicle mods are designed to work together. It’s not uncommon for players to run Filibuster’s, Motorious, KI5’s, and various other vehicle mods all at once, creating an absolute glut of vehicles – essentially turning Knox Country into a car show (or junkyard, after the apocalypse wear). Just be aware more vehicles can mean more strain on older computers, and you’ll definitely want to organize your Mechanics skill books because there might be new magazines for new car types.
Finally, keep an eye on the Project Zomboid forums and workshop for updates. Developers sometimes integrate aspects of popular mods into the game – for example, towing was inspired by a mod and then officially added. Who knows, tomorrow we might see official vehicle upgrades or bicycles in vanilla due to how much the community enjoys those.
The Road Ahead: Updates and the Future of Vehicles
Project Zomboid’s development is ongoing, and vehicles have seen significant changes since their introduction. A quick history: vehicles were first added in Build 39 (dubbed “The Vehicles Build”) after a long wait. That update opened up a whole new way to play, and subsequent builds polished the system. Build 41 (the animation overhaul) further improved vehicle visuals, resizing some models and tweaking handling to be more realistic. It also introduced that cutaway vision (so your car doesn’t block your view in tall buildings) and better sound design – making engines roar appropriately and zombie thumps on your hood appropriately startling.
There have been numerous quality-of-life fixes: for instance, developers made it so parking stalls spawn cars in consistent directions (so less weirdly parked cars), they balanced fuel consumption (making it a bit more forgiving), and they gave cars more immersive details (like glovebox loot and key spawn chance in ignition). Over time, we also got the ability to sleep in vehicles (Build 41 added that), which was huge for solo nomads. The devs even slipped in fun details like vehicles having loot reflective of their former owners (you might find an angler’s gear in a truck or newspapers and candy in a family car).
Looking forward, the devs have hinted at (or the community speculates about) a few possible vehicle-related features:
- More Vehicle Types: The map is expanding with new areas, and dev updates have shown new vehicle liveries for specific towns (like a different Sheriff’s department skin on police cars in one region). This suggests we’ll see more variety (cosmetic at least) in vanilla. Maybe even new base models – perhaps one day a motorcycle or bicycle could make it in officially, especially as they consider survivor NPCs (NPCs might need non-car transport).
- Upgrades and Attachments: It wouldn’t be surprising if a future build allowed some light vehicle upgrades – maybe not full armor plating as in mods, but perhaps things like roof-rack storage or tow hitches by default. The code and art for trailers exist now, so devs could introduce a towable trailer or generator trailer in vanilla eventually.
- Wear & Tear and Repairs Overhaul: As part of the larger crafting overhauls planned, the vehicle maintenance might deepen. For example, requiring oil changes or replacing spark plugs after lots of use – this is speculation, but since they’re making late-game more involved, vehicles might get their own late-game challenges (finding spare engine parts years into apocalypse could be tough).
- NPC Drivers: In future builds (post-42, which will have NPCs), you can bet you might meet other survivors on the road. That means AI driving. It’s a whole can of worms (pathfinding a car through zombie-infested roads is hard for AI), but if they implement it, you could have scenarios of NPC-driven ambulances cruising around or hostile factions doing drive-bys on you. That’s down the road (pun intended), but exciting to imagine.
- Advanced Damage: There’s talk on forums about making collisions more detailed – e.g., chance of player injury, having the physics improved so cars might flip or get pushed if hit by a train (train system is another planned thing for far future). Already, one must be careful as a collision can cause a character to take damage (especially if not wearing a seatbelt – currently assumed always on).
- Boat Vehicles: The devs have mentioned wanting to eventually use the huge river and waterways. There’s no confirmation of drivable boats, but many players hope for it. If that comes, it’ll be a whole new “vehicle” system (water vehicles) with its own rules.
One thing is certain: vehicles are here to stay, and the devs actively monitor feedback. For example, when players noted an issue with car locks (early on your character would shout “Locked!” which could attract zombies – devs changed it to a quieter attempt and a subtle sound). They also adjusted zombie behavior, so zombies can’t just ninja-drag you out of a moving car easily; they have to stop you first.
In recent patch notes, we saw small changes like battery charger devices added (so devs do listen – they added that item to help with battery management), and ongoing fixes to multiplayer sync issues with vehicles (to make sure what you see is what others see in MP, reducing desync crashes).
Final Drive
As you wrap up your last run of the day, parking your trusty wagon inside your fort, take a moment to appreciate how far you’ve come. You started on foot, terrified of the 2-block trek to the gas station. Now you’re tuning engines, making supply runs across counties, and maybe even roleplaying as a post-apocalyptic trucker on the lonely highways. Vehicles add that element of freedom and power to Project Zomboid – but also new responsibilities and risks.
Short Actionable Summary: Always keep your vehicle in good repair (a well-maintained car “only has a 1% chance of failing to start”, which are odds you want in the apocalypse). Carry essential tools and spares for emergencies. Use noise-makers like sirens strategically to manipulate zombie mobs instead of blundering into them. Match your vehicle to the task: use vans for hauling, sports cars for quick escapes, and don’t be afraid to set up a secondary base with spare wheels in case you lose your primary ride. And remember the survivalist’s motto: two is one, one is none – having a backup vehicle (or at least a bicycle) can be a literal lifesaver if your main car breaks down or gets swarmed.
In closing, the world of Project Zomboid vehicles is as expansive as the map itself. From the first moment you hot-wire a beat-up pickup in Muldraugh to the day you’re cruising down an open highway with a trunk full of loot and a horde fading in your rear-view mirror, you’ll find that cars quickly become an integral part of your story – both a refuge and a catalyst for danger. So stay safe, buckle up, and maybe keep a cassette of good tunes in the glove box for those long drives. Good luck, survivor, and see you on the road!
Drive safe out there, and happy motoring in the apocalypse. This is how you died – but with a good set of wheels, it won’t be today.